

Owner's Manual
Page 25
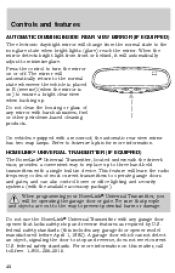
.... MAX A/C is noisier than the air sent to the windshield defroster ducts. The air will be heated or cooled based on the temperature selection. It can also be heated or cooled based on the temperature selection. The air will automatically dehumidify the air to cool the vehicle. If the outside air temperature...
.... MAX A/C is noisier than the air sent to the windshield defroster ducts. The air will be heated or cooled based on the temperature selection. It can also be heated or cooled based on the temperature selection. The air will automatically dehumidify the air to cool the vehicle. If the outside air temperature...

Owner's Manual
Page 44
Locate the compass module mounted at the base of the mirror. 3. Refer to the ON position. 4. Determine which magnetic zone you are in for greater than two seconds. 44 Release the switch, then ...
Locate the compass module mounted at the base of the mirror. 3. Refer to the ON position. 4. Determine which magnetic zone you are in for greater than two seconds. 44 Release the switch, then ...

Owner's Manual
Page 45
... 4 seconds until the CAL indicator turns off all electrical accessories (heater/air conditioning, wipers, etc.) and make sure all vehicle doors are displayed on the base of the mirror. 3. Power quarter rear windows (if equipped) portion of the VENT Press the control to open area free from the switch. 6. For optimum...
... 4 seconds until the CAL indicator turns off all electrical accessories (heater/air conditioning, wipers, etc.) and make sure all vehicle doors are displayed on the base of the mirror. 3. Power quarter rear windows (if equipped) portion of the VENT Press the control to open area free from the switch. 6. For optimum...
Owner's Manual
Page 46
... mirror detects bright light from the normal state to minimize glare. Do not use the HomeLink Universal Transmitter with harsh abrasives, fuel or other petroleum-based cleaning products. AUTO On vehicles equipped with a single built-in R (reverse)(when the mirror is placed in device. HOMELINK UNIVERSAL TRANSMITTER (IF EQUIPPED) The HomeLink...
... mirror detects bright light from the normal state to minimize glare. Do not use the HomeLink Universal Transmitter with harsh abrasives, fuel or other petroleum-based cleaning products. AUTO On vehicles equipped with a single built-in R (reverse)(when the mirror is placed in device. HOMELINK UNIVERSAL TRANSMITTER (IF EQUIPPED) The HomeLink...
Owner's Manual
Page 97
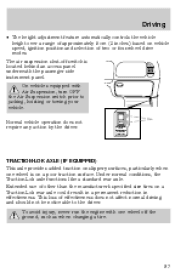
... noticeable to jacking, hoisting or towing your vehicle. Driving • The height adjustment feature automatically controls the vehicle height over a range of approximately 5 cm (2 inches) based on a Traction-Lok rear axle could result in a permanent reduction in effectiveness.
... noticeable to jacking, hoisting or towing your vehicle. Driving • The height adjustment feature automatically controls the vehicle height over a range of approximately 5 cm (2 inches) based on a Traction-Lok rear axle could result in a permanent reduction in effectiveness.
Owner's Manual
Page 106
...specific to each vehicle and is not a limit or a specification. • GVWR (Gross Vehicle Weight Rating): Maximum total weight of the base vehicle, passengers, optional equipment and cargo. Traction or brake capability may be improved by moving your engine may also enter your engine's air...not stop the vehicle as effectively as dry brakes. VEHICLE LOADING Before loading a vehicle, familiarize yourself with the following terms: • Base Curb Weight: Weight of cargo, passengers and optional equipment. Drying can be limited and if the ignition system gets wet, your vehicle ...
...specific to each vehicle and is not a limit or a specification. • GVWR (Gross Vehicle Weight Rating): Maximum total weight of the base vehicle, passengers, optional equipment and cargo. Traction or brake capability may be improved by moving your engine may also enter your engine's air...not stop the vehicle as effectively as dry brakes. VEHICLE LOADING Before loading a vehicle, familiarize yourself with the following terms: • Base Curb Weight: Weight of cargo, passengers and optional equipment. Drying can be limited and if the ignition system gets wet, your vehicle ...

Owner's Manual
Page 151
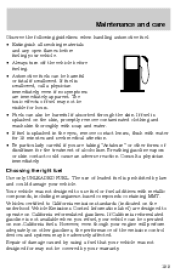
... and its ability to stop on wet pavement as a tire grade 100. Maintenance and care Treadwear The treadwear grade is a comparative rating based on the wear rate of the tire when tested under test surfaces of asphalt and concrete. A tire marked C may depart significantly from... to degenerate and reduce tire life, and excessive temperature can cause heat buildup and possible tire failure. 151 The temperature grade for a tire that is based on a specified government test course. Temperature A B C The temperature grades are A, B, and C, and they represent the tire's ability to dissipate ...
... and its ability to stop on wet pavement as a tire grade 100. Maintenance and care Treadwear The treadwear grade is a comparative rating based on the wear rate of the tire when tested under test surfaces of asphalt and concrete. A tire marked C may depart significantly from... to degenerate and reduce tire life, and excessive temperature can cause heat buildup and possible tire failure. 151 The temperature grade for a tire that is based on a specified government test course. Temperature A B C The temperature grades are A, B, and C, and they represent the tire's ability to dissipate ...
Owner's Manual
Page 155
... also be operated on California reformulated gasolines. If California reformulated gasoline is splashed in the eyes, remove contact lenses, flush with metallic compounds, including manganese-based compounds containing MMT. However, even though your engine will perform adequately on the skin, promptly remove contaminated clothing and wash skin thoroughly with soap and...
... also be operated on California reformulated gasolines. If California reformulated gasoline is splashed in the eyes, remove contact lenses, flush with metallic compounds, including manganese-based compounds containing MMT. However, even though your engine will perform adequately on the skin, promptly remove contaminated clothing and wash skin thoroughly with soap and...

Owner's Manual
Page 160
... lamp bulbs unless they can be replaced immediately with new ones. At the back of the headlamp, remove the headlamp assembly retainers by its plastic base and do not touch the glass. Maintenance and care EXTERIOR BULBS Replacing exterior bulbs Check the operation of the following lamps frequently: • headlamps •...
... lamp bulbs unless they can be replaced immediately with new ones. At the back of the headlamp, remove the headlamp assembly retainers by its plastic base and do not touch the glass. Maintenance and care EXTERIOR BULBS Replacing exterior bulbs Check the operation of the following lamps frequently: • headlamps •...

Owner's Manual
Page 161
Disconnect the electrical connector from the headlamp bulb by turning it rearward. 7. Rotate the headlamp bulb cover counterclockwise and remove. 6. Remove the bulb retainer ring by grasping the wire and pulling it counterclockwise about ¼ turn, then slide the ring off the plastic base. 161 Maintenance and care 5.
Disconnect the electrical connector from the headlamp bulb by turning it rearward. 7. Rotate the headlamp bulb cover counterclockwise and remove. 6. Remove the bulb retainer ring by grasping the wire and pulling it counterclockwise about ¼ turn, then slide the ring off the plastic base. 161 Maintenance and care 5.

Owner's Manual
Page 162
To complete reinstallation of the new bulb into the socket until the plastic base contacts the rear of the socket. 10. Replacing parking lamp/turn and remove. 7. Pull the headlamp assembly forward slightly to expose the electrical connectors. 5. Rotate ... the headlamp assembly. 9. When the grooves in the OFF position. 2. Open the hood. 3. Maintenance and care 8. Make sure the headlamp control is in the plastic base are aligned, push the bulb into the socket. Disconnect the electrical connector from the bulb socket. 6.
To complete reinstallation of the new bulb into the socket until the plastic base contacts the rear of the socket. 10. Replacing parking lamp/turn and remove. 7. Pull the headlamp assembly forward slightly to expose the electrical connectors. 5. Rotate ... the headlamp assembly. 9. When the grooves in the OFF position. 2. Open the hood. 3. Maintenance and care 8. Make sure the headlamp control is in the plastic base are aligned, push the bulb into the socket. Disconnect the electrical connector from the bulb socket. 6.

Owner's Manual
Page 163
... The halogen bulb contains gas under pressure. Avoid touching the glass envelope. 1. When the grooves in reverse order. Grasp the bulb only by its base. To complete installation of the foglamp retaining bracket). 163 Disconnect the electrical connector from the back of the foglamp assembly (the accompanying artwork represents the... rear side of the parking lamp/turn signal assembly, follow the removal procedures in the plastic base are aligned, push the bulb into the parking lamp assembly socket. Maintenance and care 8.
... The halogen bulb contains gas under pressure. Avoid touching the glass envelope. 1. When the grooves in reverse order. Grasp the bulb only by its base. To complete installation of the foglamp retaining bracket). 163 Disconnect the electrical connector from the back of the foglamp assembly (the accompanying artwork represents the... rear side of the parking lamp/turn signal assembly, follow the removal procedures in the plastic base are aligned, push the bulb into the parking lamp assembly socket. Maintenance and care 8.

Owner's Manual
Page 165
..., carefully pull out the bulb. To complete installation of the liftgate lamp assembly, follow the removal procedures in the plastic base are aligned, push the bulb into the socket until the plastic base contacts the rear of the new bulb into the socket. Insert the glass end of the socket. 5. When the...
..., carefully pull out the bulb. To complete installation of the liftgate lamp assembly, follow the removal procedures in the plastic base are aligned, push the bulb into the socket until the plastic base contacts the rear of the new bulb into the socket. Insert the glass end of the socket. 5. When the...

Owner's Manual
Page 170
...than normal. Use cleaning fluid or alcohol with cold water to avoid cracking the engine block or other engine components. 170 Never use acid-based wheel cleaners, steel wool, fuel or strong detergents. Use a tar remover to clean the engine. Remove any tar spots. When washing... detergent as bird droppings, tree sap, insect remains, tar spots, road salt and industrial fallout immediately. Use only carnauba or synthetic-based waxes. Use tar remover to remove. Observe the application instructions on the surface. Repairing paint chips Minor scratches or paint damage from ...
...than normal. Use cleaning fluid or alcohol with cold water to avoid cracking the engine block or other engine components. 170 Never use acid-based wheel cleaners, steel wool, fuel or strong detergents. Use a tar remover to clean the engine. Remove any tar spots. When washing... detergent as bird droppings, tree sap, insect remains, tar spots, road salt and industrial fallout immediately. Use only carnauba or synthetic-based waxes. Use tar remover to remove. Observe the application instructions on the surface. Repairing paint chips Minor scratches or paint damage from ...
Owner's Manual
Page 171
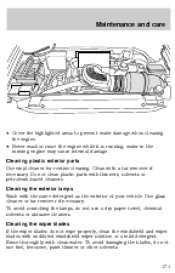
Cleaning plastic exterior parts Use vinyl cleaner for routine cleaning. Use glass cleaner or tar remover if necessary. Clean with thinners, solvents or petroleum-based cleaners. To avoid damaging the blades, do not use a dry paper towel, chemical solvents or abrasive cleaners. water in the running ; Maintenance and care • ...
Cleaning plastic exterior parts Use vinyl cleaner for routine cleaning. Use glass cleaner or tar remover if necessary. Clean with thinners, solvents or petroleum-based cleaners. To avoid damaging the blades, do not use a dry paper towel, chemical solvents or abrasive cleaners. water in the running ; Maintenance and care • ...

Warranty Guide 2nd Printing
Page 26
Ford recommends that you use non-Ford parts. situation. and (b) the labor charges (based on your vehicle, you may choose to Ford parts in performance, quality, and durability. However, when you are equivalent to use replacement parts that are ...
Ford recommends that you use non-Ford parts. situation. and (b) the labor charges (based on your vehicle, you may choose to Ford parts in performance, quality, and durability. However, when you are equivalent to use replacement parts that are ...

Scheduled Maintenance Guide 2nd Printing
Page 16
... Ford specification WSL-M2C192-A, part number F1TZ-19580-B or equivalent. Check with Ford design front axles are not to develop your own tire rotation interval based on your air filter. The 5,000 km (3,000 mile) lube change or (2) any time the axle has been submerged in water. The Severe Duty Schedule...
... Ford specification WSL-M2C192-A, part number F1TZ-19580-B or equivalent. Check with Ford design front axles are not to develop your own tire rotation interval based on your air filter. The 5,000 km (3,000 mile) lube change or (2) any time the axle has been submerged in water. The Severe Duty Schedule...


