
Owners Manual
Page 22
... damage or performance problems resulting from your Lexus A wide variety of printing. However, because of the Lexus policy of continual product improvement, we reserve the right to make changes at the time of non-genuine spare parts and accessories for equipment not installed on , your ...vehicle. Therefore, you may differ from the modification may find some explanations for Lexus vehicles are current at any damage they may have on your Lexus vehicle. All specifications provided in terms...
... damage or performance problems resulting from your Lexus A wide variety of printing. However, because of the Lexus policy of continual product improvement, we reserve the right to make changes at the time of non-genuine spare parts and accessories for equipment not installed on , your ...vehicle. Therefore, you may differ from the modification may find some explanations for Lexus vehicles are current at any damage they may have on your Lexus vehicle. All specifications provided in terms...

Owners Manual
Page 67
These locks can be locked if the "POWER" switch is in ACCESSORY or ON mode, or the electronic key is set to prevent children from opening the rear doors. STEP 2 Close the door. The door cannot be ...
These locks can be locked if the "POWER" switch is in ACCESSORY or ON mode, or the electronic key is set to prevent children from opening the rear doors. STEP 2 Close the door. The door cannot be ...
Owners Manual
Page 76
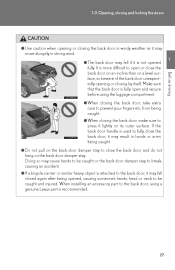
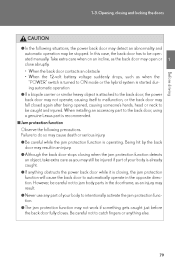
... open and secure before using the luggage compartment. ● When closing the back door, take extra Before driving care to the back door, using a genuine Lexus part is recommended. 77 If the back door handle is fully open or close the back door, and do not hang on a level surface, so... beware of the back door unexpectedly opening or closing by itself. Doing so may cause hands to be caught and injured. When installing an accessory part to prevent your fingers etc. Make sure that the back door is used to fully close the back door, it may result in strong...
... open and secure before using the luggage compartment. ● When closing the back door, take extra Before driving care to the back door, using a genuine Lexus part is recommended. 77 If the back door handle is fully open or close the back door, and do not hang on a level surface, so... beware of the back door unexpectedly opening or closing by itself. Doing so may cause hands to be caught and injured. When installing an accessory part to prevent your fingers etc. Make sure that the back door is used to fully close the back door, it may result in strong...
Owners Manual
Page 78
... • When the 12-volt battery voltage suddenly drops, such as the back door may be operated manually. When installing an accessory part to the back door, using a genuine Lexus part is attached to the back door, the power back door may not operate, causing itself to malfunction, or the back door...
... • When the 12-volt battery voltage suddenly drops, such as the back door may be operated manually. When installing an accessory part to the back door, using a genuine Lexus part is attached to the back door, the power back door may not operate, causing itself to malfunction, or the back door...

Owners Manual
Page 91
... performed, the steering wheel will move toward the driver and seat will move forward (auto return function): • The "POWER" switch has been turned to ACCESSORY mode • The driver seat belt has been fastened 92 1-4.
... performed, the steering wheel will move toward the driver and seat will move forward (auto return function): • The "POWER" switch has been turned to ACCESSORY mode • The driver seat belt has been fastened 92 1-4.

Owners Manual
Page 104
1-4. Adjustable components (seats, mirrors, steering wheel) Steering wheel The steering wheel can be adjusted to the original position. Turning the "POWER" switch to ACCESSORY or ON mode will return the steering wheel to a comfortable position. Operating the switch moves the steering wheel in the following directions: 1 Up Down Away from the driver Toward the driver Before driving Auto tilt away When the "POWER" switch is turned off, the steering wheel returns to its stowed position by moving up and away to enable easier driver entry and exit.
1-4. Adjustable components (seats, mirrors, steering wheel) Steering wheel The steering wheel can be adjusted to the original position. Turning the "POWER" switch to ACCESSORY or ON mode will return the steering wheel to a comfortable position. Operating the switch moves the steering wheel in the following directions: 1 Up Down Away from the driver Toward the driver Before driving Auto tilt away When the "POWER" switch is turned off, the steering wheel returns to its stowed position by moving up and away to enable easier driver entry and exit.

Owners Manual
Page 123
1-7. Theft deterrent system Immobilizer system The vehicle's keys have built-in transponder chips that the system has been canceled. The indicator light flashes after the "POWER" switch has been turned to ACCESSORY or ON mode to indicate that the system is operating. The indicator light stops flashing after the "POWER" switch has been turned off to indicate that prevent the hybrid system from starting if the key has not been previously registered in the vehicle's on-board computer. Never leave the keys inside the vehicle when you leave the vehicle.
1-7. Theft deterrent system Immobilizer system The vehicle's keys have built-in transponder chips that the system has been canceled. The indicator light flashes after the "POWER" switch has been turned to ACCESSORY or ON mode to indicate that the system is operating. The indicator light stops flashing after the "POWER" switch has been turned off to indicate that prevent the hybrid system from starting if the key has not been previously registered in the vehicle's on-board computer. Never leave the keys inside the vehicle when you leave the vehicle.

Owners Manual
Page 176
Perform the following procedure to ACCESSORY mode. Check that the indicator on the "POWER" switch is off : STEP 1 STEP 2 STEP 3 STEP 4 Check that the indicator on the "POWER" switch is stopped ...
Perform the following procedure to ACCESSORY mode. Check that the indicator on the "POWER" switch is off : STEP 1 STEP 2 STEP 3 STEP 4 Check that the indicator on the "POWER" switch is stopped ...

Owners Manual
Page 402
... methods, and select "Confirm" using a voice command or . Press the talk switch and say "From Car" or "From Audio player", and select "Confirm" by either ACCESSORY or ON mode. 3-3.
... methods, and select "Confirm" using a voice command or . Press the talk switch and say "From Car" or "From Audio player", and select "Confirm" by either ACCESSORY or ON mode. 3-3.

Owners Manual
Page 441
3-5. Using the interior lights Interior lights list 3 Interior features Front personal lights (→P. 446) Front interior light (→P. 446) Shift lever light (when the "POWER" switch is in ACCESSORY or ON mode) Rear personal lights (→ P. 446) Rear interior light Door courtesy lights Scuff lights (if equipped) Footwell lights Outer foot lights 445
3-5. Using the interior lights Interior lights list 3 Interior features Front personal lights (→P. 446) Front interior light (→P. 446) Shift lever light (when the "POWER" switch is in ACCESSORY or ON mode) Rear personal lights (→ P. 446) Rear interior light Door courtesy lights Scuff lights (if equipped) Footwell lights Outer foot lights 445

Owners Manual
Page 455
Without a navigation system Adjusts the hours Adjusts the minutes With a navigation system Refer to adjust the clock. Other interior features Clock The clock is displayed when the "POWER" switch is in ACCESSORY or ON mode. Perform the following steps to "Navigation System Owner's Manual". 3 Interior features 3-7.
Without a navigation system Adjusts the hours Adjusts the minutes With a navigation system Refer to adjust the clock. Other interior features Clock The clock is displayed when the "POWER" switch is in ACCESSORY or ON mode. Perform the following steps to "Navigation System Owner's Manual". 3 Interior features 3-7.

Owners Manual
Page 458
STEP 2 Remove the lower tray. Remove the upper tray. Under tray (12V) 462 Inside the console (12 V) STEP 1 Slide the armrest while pulling up the lever, and lift the armrest. Other interior features Power outlets The power outlets can be used for the following components. 12 V: Accessories that run on less than 10 A. 120 VAC: Accessories that use less than 100 W. 3-7.
STEP 2 Remove the lower tray. Remove the upper tray. Under tray (12V) 462 Inside the console (12 V) STEP 1 Slide the armrest while pulling up the lever, and lift the armrest. Other interior features Power outlets The power outlets can be used for the following components. 12 V: Accessories that run on less than 10 A. 120 VAC: Accessories that use less than 100 W. 3-7.

Owners Manual
Page 621
Sounds once ⎯ (Flashes) During an hybrid system starting procedure in ACCESSORY mode twice without the hybrid system being pressed. Steps to take in an emergency Interior Exterior buzzer buzzer Warning message Details The driver's door was ...
Sounds once ⎯ (Flashes) During an hybrid system starting procedure in ACCESSORY mode twice without the hybrid system being pressed. Steps to take in an emergency Interior Exterior buzzer buzzer Warning message Details The driver's door was ...

Owners Manual
Page 638
STEP 2 Shift the shift lever to ACCESSORY mode. STEP 4 Press and hold the "POWER" switch for about 15 seconds while depressing the brake pedal firmly. STEP 3 Turn the "POWER" switch to P. Even ... an interim measure to start the hybrid system if the "POWER" switch is functioning normally: Set the parking brake. Have the vehicle inspected by your Lexus dealer. STEP 1 644 5-2.
STEP 2 Shift the shift lever to ACCESSORY mode. STEP 4 Press and hold the "POWER" switch for about 15 seconds while depressing the brake pedal firmly. STEP 3 Turn the "POWER" switch to P. Even ... an interim measure to start the hybrid system if the "POWER" switch is functioning normally: Set the parking brake. Have the vehicle inspected by your Lexus dealer. STEP 1 644 5-2.

Owners Manual
Page 639
Turn the "POWER" switch to ensure that the shift lever can be shifted with your Lexus dealer immediately. Depress the brake pedal. Pry the cover up with the shift lock system (a system to take in an emergency If the shift lever ... operation of the shift lever). Have the vehicle inspected by your foot on the brake pedal, there may be used as an emergency measure to ACCESSORY mode. STEP 5 Press the shift lock override button. The shift lever can be a problem with a flathead screwdriver or equivalent. 5-2. The following steps may be shifted...
Turn the "POWER" switch to ensure that the shift lever can be shifted with your Lexus dealer immediately. Depress the brake pedal. Pry the cover up with the shift lock system (a system to take in an emergency If the shift lever ... operation of the shift lever). Have the vehicle inspected by your foot on the brake pedal, there may be used as an emergency measure to ACCESSORY mode. STEP 5 Press the shift lock override button. The shift lever can be a problem with a flathead screwdriver or equivalent. 5-2. The following steps may be shifted...

Owners Manual
Page 680
..., including the maximum capacity of fuel, oil and coolant, and if so equipped, air conditioning and additional weight optional engine The sum of: (a) Curb weight (b) Accessory weight (c) Vehicle capacity weight (d) Production options weight 150 lb. (68 kg) times the number of occupants specified in the second column of Table 1* that follows...
..., including the maximum capacity of fuel, oil and coolant, and if so equipped, air conditioning and additional weight optional engine The sum of: (a) Curb weight (b) Accessory weight (c) Vehicle capacity weight (d) Production options weight 150 lb. (68 kg) times the number of occupants specified in the second column of Table 1* that follows...

Owners Manual
Page 681
... installed regular production options weighing over 5 lb. (2.3 kg) in excess of the standard items which they replace, not previously considered in curb weight or accessory weight, including heavy duty brakes, ride levelers, roof rack, heavy duty 12-volt battery, and special trim A metal support for a tire or a ...weight, and dividing by two The load on an individual tire that is determined by distributing to each axle its share of curb weight, accessory weight, and normal occupant weight (distributed in accordance with Table 1* below), and dividing by two The surface area of the rim not covered...
... installed regular production options weighing over 5 lb. (2.3 kg) in excess of the standard items which they replace, not previously considered in curb weight or accessory weight, including heavy duty brakes, ride levelers, roof rack, heavy duty 12-volt battery, and special trim A metal support for a tire or a ...weight, and dividing by two The load on an individual tire that is determined by distributing to each axle its share of curb weight, accessory weight, and normal occupant weight (distributed in accordance with Table 1* below), and dividing by two The surface area of the rim not covered...

Owners Manual
Page 713
Alphabetical index Alphabetical index A A/C* Air conditioning filter ...547 Automatic air conditioning system*...322 ABS...274 ACCESSORY mode ...176 Active stabilizer suspension system...274 Adaptive front lighting system ...216 AFS ...216 Air conditioning system* ...322 Air conditioning filter ...547 Automatic air conditioning ...
Alphabetical index Alphabetical index A A/C* Air conditioning filter ...547 Automatic air conditioning system*...322 ABS...274 ACCESSORY mode ...176 Active stabilizer suspension system...274 Adaptive front lighting system ...216 AFS ...216 Air conditioning system* ...322 Air conditioning filter ...547 Automatic air conditioning ...
Owners Manual
Page 716
... If your vehicle has to be stopped in an emergency ...661 If your vehicle needs to be towed...591 If your vehicle overheats...655 Engine Accessory mode ...176 Compartment ...512 Hood ...509 How to start the hybrid system ...176 Identification number...665 If the hybrid system will not start ...643 Ignition...
... If your vehicle has to be stopped in an emergency ...661 If your vehicle needs to be towed...591 If your vehicle overheats...655 Engine Accessory mode ...176 Compartment ...512 Hood ...509 How to start the hybrid system ...176 Identification number...665 If the hybrid system will not start ...643 Ignition...

Owners Manual
Page 838
... and Specifications - for example, racing or overloading • Improper repairs • Alteration or tampering, including installation of non-Genuine Lexus Accessories • Lack of or improper maintenance, including use of fluids other than those specified in Kansas, the warranty for seatbelts and... theft • Abuse or negligence • Misuse - For vehicles sold and registered in the Owner's Manual • Installation of non-Genuine Lexus Parts • Airborne chemicals, tree sap, road debris (including stone chips), rail dust, salt, hail, floods, wind storms, lightning and ...
... and Specifications - for example, racing or overloading • Improper repairs • Alteration or tampering, including installation of non-Genuine Lexus Accessories • Lack of or improper maintenance, including use of fluids other than those specified in Kansas, the warranty for seatbelts and... theft • Abuse or negligence • Misuse - For vehicles sold and registered in the Owner's Manual • Installation of non-Genuine Lexus Parts • Airborne chemicals, tree sap, road debris (including stone chips), rail dust, salt, hail, floods, wind storms, lightning and ...