
User Guide
Page 13
...warrant these products and is the sound of continual product improvement, we reserve the right to make changes at the time of non-genuine spare parts and accessories for Lexus vehicles are currently available in terms of color and equipment. Therefore, you may hear sound coming ... for equipment not installed on , your vehicle in the market. Accessories, spare parts and modification of your vehicle. However, because of the Lexus policy of a fuel evaporation leakage check and, it does not indicate a malfunction. This is not responsible for their performance, repair, or replacement...
...warrant these products and is the sound of continual product improvement, we reserve the right to make changes at the time of non-genuine spare parts and accessories for Lexus vehicles are currently available in terms of color and equipment. Therefore, you may hear sound coming ... for equipment not installed on , your vehicle in the market. Accessories, spare parts and modification of your vehicle. However, because of the Lexus policy of a fuel evaporation leakage check and, it does not indicate a malfunction. This is not responsible for their performance, repair, or replacement...

User Guide
Page 36
FCC WARNING: Changes or modifications not expressly approved by the party responsible for compliance could void the user's authority to the following two conditions: (1) This device may not ...
FCC WARNING: Changes or modifications not expressly approved by the party responsible for compliance could void the user's authority to the following two conditions: (1) This device may not ...

User Guide
Page 134
2-1. Driving procedures Engine (ignition) switch Performing the following operations when carrying the electronic key on your person starts the engine or changes "ENGINE START STOP" switch modes.
2-1. Driving procedures Engine (ignition) switch Performing the following operations when carrying the electronic key on your person starts the engine or changes "ENGINE START STOP" switch modes.
User Guide
Page 142
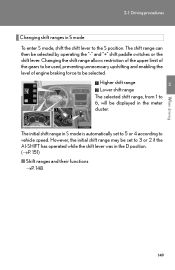
Changing the shift range allows restriction of the upper limit of the gears to be used, preventing unnecessary upshifting and enabling the level of engine braking ... range, from 1 to 6, will be set to 5 or 4 according to be selected by operating the "-" and "+" shift paddle switches or the shift lever. 2-1. Driving procedures Changing shift ranges in S mode is automatically set to the S position. However, the initial shift range may be displayed in the meter cluster. 2 When driving The...
Changing the shift range allows restriction of the upper limit of the gears to be used, preventing unnecessary upshifting and enabling the level of engine braking ... range, from 1 to 6, will be set to 5 or 4 according to be selected by operating the "-" and "+" shift paddle switches or the shift lever. 2-1. Driving procedures Changing shift ranges in S mode is automatically set to the S position. However, the initial shift range may be displayed in the meter cluster. 2 When driving The...

User Guide
Page 147
Driving procedures Turn signal lever Right turn Left turn Move and hold the lever partway to signal a lane change The left hand signal will flash until you release the lever. Move and hold the lever partway to signal a lane change The right hand signal will flash until you release the lever. 2-1.
Driving procedures Turn signal lever Right turn Left turn Move and hold the lever partway to signal a lane change The left hand signal will flash until you release the lever. Move and hold the lever partway to signal a lane change The right hand signal will flash until you release the lever. 2-1.

User Guide
Page 155
Instrument cluster STEP 2 Push "" within 6 seconds of the speedometer or tachometer needle moving to change the setting of the desired speed, then turn the indicator mode to its previously displayed content. 2-2. If the satellite switch is displayed to indicate that the desired speed has been set. Pushing and holding the button changes values at a faster rate. The yellow indicator is not operated for some time, the multi-information display returns to "ON" by pushing the "ON/OFF" button.
Instrument cluster STEP 2 Push "" within 6 seconds of the speedometer or tachometer needle moving to change the setting of the desired speed, then turn the indicator mode to its previously displayed content. 2-2. If the satellite switch is displayed to indicate that the desired speed has been set. Pushing and holding the button changes values at a faster rate. The yellow indicator is not operated for some time, the multi-information display returns to "ON" by pushing the "ON/OFF" button.

User Guide
Page 186
2-4. The range of the sensors may change depending on the shape of the sensors. Note that the sensors cannot detect obstacles that are extremely close to the vehicle. Using other driving systems Detection range of the sensors Approximately 1.6 ft. (50 cm) Approximately 1.6 ft. (50 cm) Approximately 4.9 ft. (150 cm) The diagram shows the detection range of the object etc. 2 When driving 193
2-4. The range of the sensors may change depending on the shape of the sensors. Note that the sensors cannot detect obstacles that are extremely close to the vehicle. Using other driving systems Detection range of the sensors Approximately 1.6 ft. (50 cm) Approximately 1.6 ft. (50 cm) Approximately 4.9 ft. (150 cm) The diagram shows the detection range of the object etc. 2 When driving 193

User Guide
Page 207
... according to the "Navigation System Owner's Manual". Without navigation system Fan speed Fan speed display Off Driver's side temperature setting display Automatic mode Airflow display Changes the air outlets used Passenger's side temperature setting display Micro dust and pollen filter Driver's side temperature control Dual operation Air conditioning on/off Passenger...
... according to the "Navigation System Owner's Manual". Without navigation system Fan speed Fan speed display Off Driver's side temperature setting display Automatic mode Airflow display Changes the air outlets used Passenger's side temperature setting display Micro dust and pollen filter Driver's side temperature control Dual operation Air conditioning on/off Passenger...

User Guide
Page 215
Without navigation system On/off The defoggers will automatically turn off after 15 to remove raindrops, dew and frost from the outside rear view mirror defoggers These features are used to defog the rear window, and to 60 minutes. 3-1. Using the air conditioning system and defogger Rear window and outside rear view mirrors. The operation time changes according to the "Navigation System Owner's Manual". With navigation system Owners of models equipped with a navigation system should refer to the ambient temperature and vehicle speed.
Without navigation system On/off The defoggers will automatically turn off after 15 to remove raindrops, dew and frost from the outside rear view mirror defoggers These features are used to defog the rear window, and to 60 minutes. 3-1. Using the air conditioning system and defogger Rear window and outside rear view mirrors. The operation time changes according to the "Navigation System Owner's Manual". With navigation system Owners of models equipped with a navigation system should refer to the ambient temperature and vehicle speed.

User Guide
Page 220
3-2. Using the audio system Using the radio Type A Seeking any traffic program station Station selector Displays radio text messages Silencing a sound 3 Power Volume Seeking the AM⋅FM/SAT frequency mode buttons Adjusting the frequency (AM, FM mode) or channel (SAT mode) Changing the program types Scans for receivable stations Interior features Type B Seeking any traffic program station Station selector Silencing a sound Power Volume Seeking the AM/FM frequency mode buttons Adjusting the frequency Station selector 229
3-2. Using the audio system Using the radio Type A Seeking any traffic program station Station selector Displays radio text messages Silencing a sound 3 Power Volume Seeking the AM⋅FM/SAT frequency mode buttons Adjusting the frequency (AM, FM mode) or channel (SAT mode) Changing the program types Scans for receivable stations Interior features Type B Seeking any traffic program station Station selector Silencing a sound Power Volume Seeking the AM/FM frequency mode buttons Adjusting the frequency Station selector 229

User Guide
Page 227
If it does not change automatically, select another channel. Wait for about 2 seconds until the radio returns to the previous channel or "CH001". Contact the XM® Listener Care Center at 1-877-515-3987. Using the audio system "CH UNAVL" The channel you selected is no longer available. 3-2.
If it does not change automatically, select another channel. Wait for about 2 seconds until the radio returns to the previous channel or "CH001". Contact the XM® Listener Care Center at 1-877-515-3987. Using the audio system "CH UNAVL" The channel you selected is no longer available. 3-2.

User Guide
Page 238
Each time is pressed, the display changes in the order of Folder no./ File no./Elapsed time → Folder name → File name → Album title (MP3 only) → Track title → Artist name. 3-2. Using the audio system Switching the display Press .
Each time is pressed, the display changes in the order of Folder no./ File no./Elapsed time → Folder name → File name → Album title (MP3 only) → Track title → Artist name. 3-2. Using the audio system Switching the display Press .

User Guide
Page 245
3-2. Pressing or changes the play mode in the following order: "PLAYLISTS"→"ARTISTS"→"ALBUMS"→"SONGS"→ "PODCASTS"→"GENRES"→"COMPOSERS"→ "AUDIOBOOKS" Press to select the desired play mode STEP 1 STEP 2 Press to select iPod menu mode. STEP 3 254 Using the audio system Type B Repeat play Shuffle playback Playback/Pause Go back Displays text message Silencing a sound iPod menu/ Song selection Song selection Power Volume Song selection Playback Selecting a play mode.
3-2. Pressing or changes the play mode in the following order: "PLAYLISTS"→"ARTISTS"→"ALBUMS"→"SONGS"→ "PODCASTS"→"GENRES"→"COMPOSERS"→ "AUDIOBOOKS" Press to select the desired play mode STEP 1 STEP 2 Press to select iPod menu mode. STEP 3 254 Using the audio system Type B Repeat play Shuffle playback Playback/Pause Go back Displays text message Silencing a sound iPod menu/ Song selection Song selection Power Volume Song selection Playback Selecting a play mode.

User Guide
Page 248
Using the audio system Adjusting sound quality and volume balance STEP 1 STEP 2 Press Pressing to enter iPod menu mode. changes sound modes. (→P. 270) 3-2.
Using the audio system Adjusting sound quality and volume balance STEP 1 STEP 2 Press Pressing to enter iPod menu mode. changes sound modes. (→P. 270) 3-2.

User Guide
Page 255
Using the audio system Switching the display Press . 3-2. Each time is pressed, the display changes in the order of Elapsed time → Folder name → File name → Album title (MP3 only)→ Track title → Artist name.
Using the audio system Switching the display Press . 3-2. Each time is pressed, the display changes in the order of Elapsed time → Folder name → File name → Album title (MP3 only)→ Track title → Artist name.

User Guide
Page 258
... steady sound quality, we recommend that you do not include any unnecessary folders. • When the USB memory is connected and the audio source is changed ), the USB memory will resume play from the same point in which it was last used for files other than MP3 or WMA files or... bit rate of at least 128 kbps and a sampling frequency of 44.1 kHz. • There is removed and reinserted (and the contents have not been changed to USB memory mode, the USB memory will be possible at the start of the encoding and the file format, poor sound quality or noise...
... steady sound quality, we recommend that you do not include any unnecessary folders. • When the USB memory is connected and the audio source is changed ), the USB memory will resume play from the same point in which it was last used for files other than MP3 or WMA files or... bit rate of at least 128 kbps and a sampling frequency of 44.1 kHz. • There is removed and reinserted (and the contents have not been changed to USB memory mode, the USB memory will be possible at the start of the encoding and the file format, poor sound quality or noise...

User Guide
Page 260
Using the audio system Optimal use of the audio system Adjusting the sound quality Adjusting the ASL Changing the sound quality modes 3 Interior features 269 3-2.
Using the audio system Optimal use of the audio system Adjusting the sound quality Adjusting the ASL Changing the sound quality modes 3 Interior features 269 3-2.

User Guide
Page 265
Selecting a radio station STEP 1 STEP 2 Press to select a radio station. to select radio mode. The audio source changes as follows each time is not connected, that mode will be skipped. to decrease the volto continue increasing or decreasing the volume. Type A: FM1→... or song STEP 1 Press ory mode. If no discs are inserted in the player, or if the external device is pressed. Using the audio system Changing the audio source Press when the audio system is turned on To scan for receivable stations, press and hold beep. until you hear a Press "∧...
Selecting a radio station STEP 1 STEP 2 Press to select a radio station. to select radio mode. The audio source changes as follows each time is not connected, that mode will be skipped. to decrease the volto continue increasing or decreasing the volume. Type A: FM1→... or song STEP 1 Press ory mode. If no discs are inserted in the player, or if the external device is pressed. Using the audio system Changing the audio source Press when the audio system is turned on To scan for receivable stations, press and hold beep. until you hear a Press "∧...

User Guide
Page 273
...Bluetooth® phone →P. 298) , Menu list of the Bluetooth® audio system First menu Second menu Third menu "Pair Audio" "Connect" "Change Name" "List Audios" "Set Passkey" "Delete Audio" "Guidance Vol" "System Setup" "Device Name" "Initialize" Operation detail Registering a portable player .... If the portable player has a Bluetooth® phone, the phone can be used Changing the registered name of a portable player Listing the registered portable players Changing the passkey Deleting a registered portable player Setting voice guidance volume Displaying the Bluetooth® device...
...Bluetooth® phone →P. 298) , Menu list of the Bluetooth® audio system First menu Second menu Third menu "Pair Audio" "Connect" "Change Name" "List Audios" "Set Passkey" "Delete Audio" "Guidance Vol" "System Setup" "Device Name" "Initialize" Operation detail Registering a portable player .... If the portable player has a Bluetooth® phone, the phone can be used Changing the registered name of a portable player Listing the registered portable players Changing the passkey Deleting a registered portable player Setting voice guidance volume Displaying the Bluetooth® device...

User Guide
Page 276
... fast-forward or rewind, press and hold "∧" or "∨" on to select the desired track. (∧) or (∨). Each time is pressed, the display changes in the order of Elapsed time → Album title → Track title → Artist name. 285 Using the Bluetooth® audio system Selecting an album...
... fast-forward or rewind, press and hold "∧" or "∨" on to select the desired track. (∧) or (∨). Each time is pressed, the display changes in the order of Elapsed time → Album title → Track title → Artist name. 285 Using the Bluetooth® audio system Selecting an album...


