
Owners Manual
Page 1
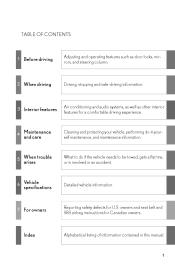
... maintenance, and maintenance information. 5 When trouble arises What to do if the vehicle needs to be towed, gets a flat tire, or is involved in this manual. 1 Index Alphabetical listing of information contained in an accident. 6 Vehicle specifications Detailed vehicle information. 7 For owners Reporting safety defects for Canadian owners. owners and seat...
... maintenance, and maintenance information. 5 When trouble arises What to do if the vehicle needs to be towed, gets a flat tire, or is involved in this manual. 1 Index Alphabetical listing of information contained in an accident. 6 Vehicle specifications Detailed vehicle information. 7 For owners Reporting safety defects for Canadian owners. owners and seat...
Owners Manual
Page 3
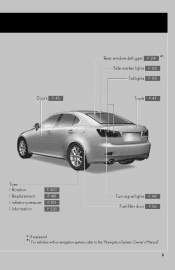
Rear window defogger P. 214 Side marker lights P. 165 Tail lights P. 165 *1 Doors P. 43 Trunk P. 47 Tires l Rotation l Replacement l Inflation pressure l Information P. 400 P. 481 P. 519 P. 528 Turn signal lights P. 147 Fuel filler door P. 82 ∗: If equipped *1: For vehicles with a navigation system, refer to the "Navigation System Owner's Manual". 9
Rear window defogger P. 214 Side marker lights P. 165 Tail lights P. 165 *1 Doors P. 43 Trunk P. 47 Tires l Rotation l Replacement l Inflation pressure l Information P. 400 P. 481 P. 519 P. 528 Turn signal lights P. 147 Fuel filler door P. 82 ∗: If equipped *1: For vehicles with a navigation system, refer to the "Navigation System Owner's Manual". 9

Owners Manual
Page 7
C Automatic transmission Automatic transmission shift lever P. 139 Seat heater switches ∗ P. 335 Seat heater/ventilator switches ∗ P. 338 Shift lock override button P. 492 Cigarette lighter ∗ P. 333 Ashtray ∗ P. 332 Auxiliary box ∗ P. 325 Manual transmission Manual transmission shift lever P. 145 Parking brake lever P. 148 Cigarette lighter ∗ P. 333 Ashtray ∗ P. 332 Auxiliary box ∗ P. 325 Seat heater switches ∗ P. 335 Seat heater/ventilator switches ∗ P. 338 ∗: If equipped 13
C Automatic transmission Automatic transmission shift lever P. 139 Seat heater switches ∗ P. 335 Seat heater/ventilator switches ∗ P. 338 Shift lock override button P. 492 Cigarette lighter ∗ P. 333 Ashtray ∗ P. 332 Auxiliary box ∗ P. 325 Manual transmission Manual transmission shift lever P. 145 Parking brake lever P. 148 Cigarette lighter ∗ P. 333 Ashtray ∗ P. 332 Auxiliary box ∗ P. 325 Seat heater switches ∗ P. 335 Seat heater/ventilator switches ∗ P. 338 ∗: If equipped 13
Owners Manual
Page 11
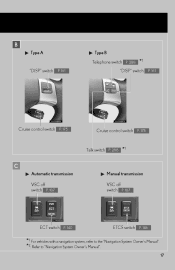
B Type A Type B Telephone switch P. 288 "DISP" switch P. 161 *1 "DISP" switch P. 161 Cruise control switch P. 175 Cruise control switch P. 175 Talk switch P. 288 *1 C Automatic transmission VSC off switch P. 187 Manual transmission VSC off switch P. 187 ECT switch P. 140 ETCS switch P. 146 *1: For vehicles with a navigation system, refer to the "Navigation System Owner's Manual". *2: Refer to "Navigation System Owner's Manual". 17
B Type A Type B Telephone switch P. 288 "DISP" switch P. 161 *1 "DISP" switch P. 161 Cruise control switch P. 175 Cruise control switch P. 175 Talk switch P. 288 *1 C Automatic transmission VSC off switch P. 187 Manual transmission VSC off switch P. 187 ECT switch P. 140 ETCS switch P. 146 *1: For vehicles with a navigation system, refer to the "Navigation System Owner's Manual". *2: Refer to "Navigation System Owner's Manual". 17
Owners Manual
Page 13
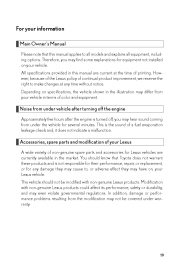
...off, you may find some explanations for equipment not installed on your Lexus A wide variety of printing. Modification with non-genuine Lexus products. Depending on , your Lexus vehicle. For your information Main Owner's Manual Please note that Toyota does not warrant these products and is not ... leakage check and, it does not indicate a malfunction. This vehicle should know that this manual are currently available in the illustration may differ from under the vehicle for Lexus vehicles are current at any damage they may have on specifications, the vehicle shown in the...
...off, you may find some explanations for equipment not installed on your Lexus A wide variety of printing. Modification with non-genuine Lexus products. Depending on , your Lexus vehicle. For your information Main Owner's Manual Please note that Toyota does not warrant these products and is not ... leakage check and, it does not indicate a malfunction. This vehicle should know that this manual are currently available in the illustration may differ from under the vehicle for Lexus vehicles are current at any damage they may have on specifications, the vehicle shown in the...

Owners Manual
Page 16
... "Do not", "Do not do in illustrations Safety symbol The symbol of damage to yourself and others. Indicates the outcome of injury to your Lexus and its equipment if the warning is ignored. You are informed about what you must or must not do this", or "Do not let this... manual Cautions & Notices CAUTION This is a warning against anything which may cause injury to the vehicle or its equipment. Arrows indicating operations Indicates the action (pushing...
... "Do not", "Do not do in illustrations Safety symbol The symbol of damage to yourself and others. Indicates the outcome of injury to your Lexus and its equipment if the warning is ignored. You are informed about what you must or must not do this", or "Do not let this... manual Cautions & Notices CAUTION This is a warning against anything which may cause injury to the vehicle or its equipment. Arrows indicating operations Indicates the action (pushing...

Owners Manual
Page 44
Adjustable components (seats, mirrors, steering wheel) Front seats Manual seat 1 Before driving Seat position lever Seatback angle lever Vertical height adjustment lever Seat cushion (front) angle knob 51 1-3.
Adjustable components (seats, mirrors, steering wheel) Front seats Manual seat 1 Before driving Seat position lever Seatback angle lever Vertical height adjustment lever Seat cushion (front) angle knob 51 1-3.

Owners Manual
Page 45
... or your neck may contact the shoulder belt, increasing the risk of death or serious injury in the event of sliding under the lap belt. l Manual seat only: After adjusting the seat, make sure that the seat is in position. 52
... or your neck may contact the shoulder belt, increasing the risk of death or serious injury in the event of sliding under the lap belt. l Manual seat only: After adjusting the seat, make sure that the seat is in position. 52

Owners Manual
Page 46
... ON mode. Push the "SET" button, then STEP 3 within 3 seconds push button "1", "2" or "3" until the signal beeps. Before driving n Recalling the memorized position Vehicles with a manual transmission: Check that the shift lever is set . It is set in P. Driving position memory (driver's seat)∗ 1-3.
... ON mode. Push the "SET" button, then STEP 3 within 3 seconds push button "1", "2" or "3" until the signal beeps. Before driving n Recalling the memorized position Vehicles with a manual transmission: Check that the shift lever is set . It is set in P. Driving position memory (driver's seat)∗ 1-3.

Owners Manual
Page 60
... wheel while driving. n After adjusting the steering wheel Make sure that the steering wheel is securely locked. 1-3. Adjustable components (seats, mirrors, steering wheel) Steering wheel (manually adjustable type) The steering wheel can be adjusted to mishandle the vehicle and an accident, resulting in death or serious injury.
... wheel while driving. n After adjusting the steering wheel Make sure that the steering wheel is securely locked. 1-3. Adjustable components (seats, mirrors, steering wheel) Steering wheel (manually adjustable type) The steering wheel can be adjusted to mishandle the vehicle and an accident, resulting in death or serious injury.

Owners Manual
Page 72
1-4. n Sunshade The sunshade can be opened and closed manually. n To reduce moon roof wind noise Drive with the moon roof open automatically when the moon roof is in the instrument panel when the "ENGINE ...
1-4. n Sunshade The sunshade can be opened and closed manually. n To reduce moon roof wind noise Drive with the moon roof open automatically when the moon roof is in the instrument panel when the "ENGINE ...

Owners Manual
Page 100
... driving Observe the following precautions regarding the front passenger occupant classification system. l Make sure the "AIR BAG OFF" indicator light is not illuminated, consult this manual as for the front passenger seat. Failure to do so may not activate correctly, which could cause death or serious injury in the front passenger...
... driving Observe the following precautions regarding the front passenger occupant classification system. l Make sure the "AIR BAG OFF" indicator light is not illuminated, consult this manual as for the front passenger seat. Failure to do so may not activate correctly, which could cause death or serious injury in the front passenger...

Owners Manual
Page 102
... seat/convertible seat 109 1-7. l For installation details, follow the instructions provided with the lap portion of the child. General installation instructions are provided in this manual. (→P. 113) Types of child restraints Child restraint systems are classified into the following 3 types according to the age and size of the lap/shoulder...
... seat/convertible seat 109 1-7. l For installation details, follow the instructions provided with the lap portion of the child. General installation instructions are provided in this manual. (→P. 113) Types of child restraints Child restraint systems are classified into the following 3 types according to the age and size of the lap/shoulder...

Owners Manual
Page 114
Safety information CAUTION n When installing a child restraint system Follow the directions given in the child restraint system installation manual and fix the child restraint system securely in the folded position. When installing a forward facing or booster child seat on the front seat when unavoidable. ...
Safety information CAUTION n When installing a child restraint system Follow the directions given in the child restraint system installation manual and fix the child restraint system securely in the folded position. When installing a forward facing or booster child seat on the front seat when unavoidable. ...

Owners Manual
Page 117
... STEP 2 Release the parking brake. (→P. 148) Gradually release the brake pedal and gently depress the accelerator pedal to ensure safe driving. Manual transmission STEP 1 While depressing the clutch pedal, shift the shift lever into N. (→P. 145) 124 STEP 2 If necessary, set the parking... should be observed to accelerate the vehicle. At the same time, gently depress the accelerator pedal to P or N. (→P. 139) Manual transmission STEP 1 While depressing the clutch pedal, depress the brake pedal. n Stopping Automatic transmission STEP 1 With the shift lever in D,...
... STEP 2 Release the parking brake. (→P. 148) Gradually release the brake pedal and gently depress the accelerator pedal to ensure safe driving. Manual transmission STEP 1 While depressing the clutch pedal, shift the shift lever into N. (→P. 145) 124 STEP 2 If necessary, set the parking... should be observed to accelerate the vehicle. At the same time, gently depress the accelerator pedal to P or N. (→P. 139) Manual transmission STEP 1 While depressing the clutch pedal, depress the brake pedal. n Stopping Automatic transmission STEP 1 With the shift lever in D,...

Owners Manual
Page 118
...person. STEP 2 Gently depress the accelerator pedal. STEP 5 Lock the door, making sure that you have the electronic key on your person. Manual transmission STEP 1 STEP 1 2 When driving STEP 2 STEP 3 With the parking brake firmly set the parking brake and shift the shift lever... to stop the engine. Manual transmission STEP 1 While depressing the clutch pedal, depress the brake pedal. Starting on a steep uphill Automatic transmission Firmly set and the clutch ...
...person. STEP 2 Gently depress the accelerator pedal. STEP 5 Lock the door, making sure that you have the electronic key on your person. Manual transmission STEP 1 STEP 1 2 When driving STEP 2 STEP 3 With the parking brake firmly set the parking brake and shift the shift lever... to stop the engine. Manual transmission STEP 1 While depressing the clutch pedal, depress the brake pedal. Starting on a steep uphill Automatic transmission Firmly set and the clutch ...

Owners Manual
Page 120
... • Accidentally depressing the accelerator pedal instead of vehicle control. l Do not shift the shift lever to an accident that may twist your Lexus dealer immediately. l With automatic transmission vehicles, do not let the vehicle roll backwards while 2 When driving the shift lever is in a driving ...brake pedal will result in sudden acceleration that could result in death or serious injury. • When backing up, you are unfamiliar with a manual transmission) while the vehicle is in an accident. n When driving the vehicle l Do not drive if you may lead to N while the...
... • Accidentally depressing the accelerator pedal instead of vehicle control. l Do not shift the shift lever to an accident that may twist your Lexus dealer immediately. l With automatic transmission vehicles, do not let the vehicle roll backwards while 2 When driving the shift lever is in a driving ...brake pedal will result in sudden acceleration that could result in death or serious injury. • When backing up, you are unfamiliar with a manual transmission) while the vehicle is in an accident. n When driving the vehicle l Do not drive if you may lead to N while the...

Owners Manual
Page 125
... same time during driving. Doing so may damage the clutch. Doing so may cause clutch trouble. Doing so may damage the power steering motor. With manual transmission vehicles l Do not rest your foot on an uphill grade. n When parking the vehicle With automatic transmission vehicles, always put the shift lever in...
... same time during driving. Doing so may damage the clutch. Doing so may cause clutch trouble. Doing so may damage the power steering motor. With manual transmission vehicles l Do not rest your foot on an uphill grade. n When parking the vehicle With automatic transmission vehicles, always put the shift lever in...

Owners Manual
Page 128
STEP 2 Check that the parking brake is set . STEP 3 Firmly depress the clutch pedal. Driving procedures Manual transmission STEP 1 Check that the shift lever is set in N. Continue depressing the clutch pedal until it starts or for up to 30 seconds, whichever is completely started from any mode. 2 When driving 135 The engine can be started . The "ENGINE START STOP" switch indicator turns green. The engine will crank until the engine is less. STEP 4 Press the "ENGINE START STOP" switch. 2-1.
STEP 2 Check that the parking brake is set . STEP 3 Firmly depress the clutch pedal. Driving procedures Manual transmission STEP 1 Check that the shift lever is set in N. Continue depressing the clutch pedal until it starts or for up to 30 seconds, whichever is completely started from any mode. 2 When driving 135 The engine can be started . The "ENGINE START STOP" switch indicator turns green. The engine will crank until the engine is less. STEP 4 Press the "ENGINE START STOP" switch. 2-1.

Owners Manual
Page 129
... components can be used. ACCESSORY mode Some electrical components such as the audio system can be turned to ACCESSORY mode, not to OFF. (vehicles with a manual transmission) released. (The mode changes each time the switch is in a position other than P when turning off the engine, the "ENGINE START STOP" switch will...
... components can be used. ACCESSORY mode Some electrical components such as the audio system can be turned to ACCESSORY mode, not to OFF. (vehicles with a manual transmission) released. (The mode changes each time the switch is in a position other than P when turning off the engine, the "ENGINE START STOP" switch will...

