
Owners Manual
Page 20
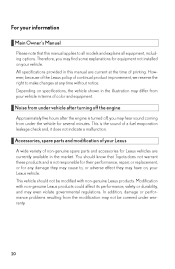
...provided in this manual applies to all models and explains all equipment, including options. However, because of the Lexus policy of continual product improvement, we reserve the right to make changes at the time of printing. This is the sound of non-genuine spare parts and accessories for several ...minutes. You should not be covered under warranty. 20 Depending on , your Lexus vehicle. Noise from under the vehicle for Lexus vehicles are current at any...
...provided in this manual applies to all models and explains all equipment, including options. However, because of the Lexus policy of continual product improvement, we reserve the right to make changes at the time of printing. This is the sound of non-genuine spare parts and accessories for several ...minutes. You should not be covered under warranty. 20 Depending on , your Lexus vehicle. Noise from under the vehicle for Lexus vehicles are current at any...
Owners Manual
Page 117
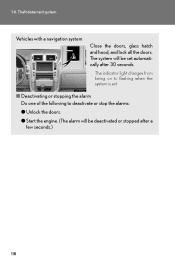
1-6. The system will be set . Theft deterrent system Vehicles with a navigation system Close the doors, glass hatch and hood, and lock all the doors. The indicator light changes from being on to flashing when the system is set automatically after 30 seconds.
1-6. The system will be set . Theft deterrent system Vehicles with a navigation system Close the doors, glass hatch and hood, and lock all the doors. The indicator light changes from being on to flashing when the system is set automatically after 30 seconds.
Owners Manual
Page 178
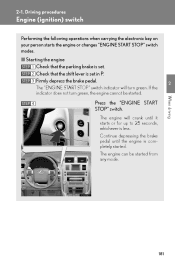
Driving procedures Engine (ignition) switch Performing the following operations when carrying the electronic key on your person starts the engine or changes "ENGINE START STOP" switch modes. 2-1.
Driving procedures Engine (ignition) switch Performing the following operations when carrying the electronic key on your person starts the engine or changes "ENGINE START STOP" switch modes. 2-1.
Owners Manual
Page 188
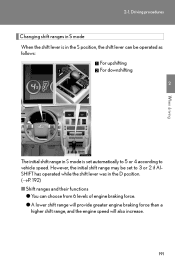
However, the initial shift range may be operated as follows: For upshifting For downshifting 2 When driving The initial shift range in the D position. (→P. 192) Driving procedures Changing shift ranges in S mode When the shift lever is in the S position, the shift lever can be set automatically to 5 or 4 according to 3 or 2 if AISHIFT has operated while the shift lever was in S mode is set to vehicle speed. 2-1.
However, the initial shift range may be operated as follows: For upshifting For downshifting 2 When driving The initial shift range in the D position. (→P. 192) Driving procedures Changing shift ranges in S mode When the shift lever is in the S position, the shift lever can be set automatically to 5 or 4 according to 3 or 2 if AISHIFT has operated while the shift lever was in S mode is set to vehicle speed. 2-1.
Owners Manual
Page 191
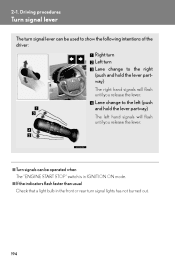
2-1. Driving procedures Turn signal lever The turn signal lever can be used to show the following intentions of the driver: Right turn Left turn Lane change to the right (push and hold the lever partway) The left (push and hold the lever partway) The right hand signals will flash until you release the lever. Lane change to the left hand signals will flash until you release the lever.
2-1. Driving procedures Turn signal lever The turn signal lever can be used to show the following intentions of the driver: Right turn Left turn Lane change to the right (push and hold the lever partway) The left (push and hold the lever partway) The right hand signals will flash until you release the lever. Lane change to the left hand signals will flash until you release the lever.
Owners Manual
Page 195
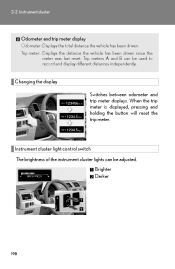
... control switch The brightness of the instrument cluster lights can be adjusted. Trip meters A and B can be used to record and display different distances independently. Changing the display Switches between odometer and trip meter displays. Brighter Darker 198 Trip meter: Displays the distance the vehicle has been driven since the meter...
... control switch The brightness of the instrument cluster lights can be adjusted. Trip meters A and B can be used to record and display different distances independently. Changing the display Switches between odometer and trip meter displays. Brighter Darker 198 Trip meter: Displays the distance the vehicle has been driven since the meter...
Owners Manual
Page 204
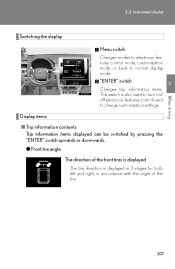
2-2. Instrument cluster Switching the display Menu switch Changes modes to electronic features control mode, customization mode or back to change customization settings. 2 When driving Display items "ENTER" switch Changes trip information items. This switch is also used to turn on/ off electronic features controls and to normal display mode.
2-2. Instrument cluster Switching the display Menu switch Changes modes to electronic features control mode, customization mode or back to change customization settings. 2 When driving Display items "ENTER" switch Changes trip information items. This switch is also used to turn on/ off electronic features controls and to normal display mode.
Owners Manual
Page 229
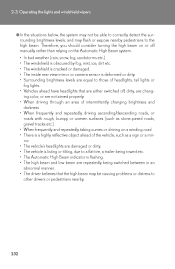
... manner. The vehicle is deformed or dirty. Therefore, you should consider turning the high beam on or off , dirty, are changing color, or are repeatedly being towed etc. The vehicle's headlights are equal to other drivers or pedestrians nearby. 232 Operating the ... Automatic High Beam system In bad weather (rain, snow, fog, sandstorms etc.) The windshield is a highly reflective object ahead of intermittently changing brightness and darkness When frequently and repeatedly driving ascending/descending roads, or roads with rough, bumpy or uneven surfaces (such as a sign ...
... manner. The vehicle is deformed or dirty. Therefore, you should consider turning the high beam on or off , dirty, are changing color, or are repeatedly being towed etc. The vehicle's headlights are equal to other drivers or pedestrians nearby. 232 Operating the ... Automatic High Beam system In bad weather (rain, snow, fog, sandstorms etc.) The windshield is a highly reflective object ahead of intermittently changing brightness and darkness When frequently and repeatedly driving ascending/descending roads, or roads with rough, bumpy or uneven surfaces (such as a sign ...
Owners Manual
Page 250
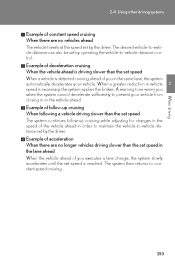
... ahead is driving slower than the set by operating the vehicle-to -vehicle distance set speed The system continues follow-up cruising while adjusting for changes in the speed of you when the system cannot decelerate sufficiently to constant speed cruising. 253 The system then returns to prevent your vehicle. 2-4. Example... ahead in vehicle speed is reached. When a greater reduction in order to maintain the vehicle-to -vehicle distance control. A warning tone warns you executes a lane change, the system slowly accelerates until the set by the driver.
... ahead is driving slower than the set by operating the vehicle-to -vehicle distance set speed The system continues follow-up cruising while adjusting for changes in the speed of you when the system cannot decelerate sufficiently to constant speed cruising. 253 The system then returns to prevent your vehicle. 2-4. Example... ahead in vehicle speed is reached. When a greater reduction in order to maintain the vehicle-to -vehicle distance control. A warning tone warns you executes a lane change, the system slowly accelerates until the set by the driver.
Owners Manual
Page 310
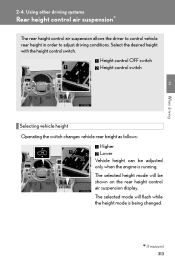
...is running. 2-4. Select the desired height with the height control switch. The selected mode will be adjusted only when the engine is being changed. ∗: If equipped 313 Using other driving systems Rear height control air suspension∗ The rear height control air suspension allows the driver...in order to adjust driving conditions. Height control OFF switch Height control switch 2 When driving Selecting vehicle height Operating the switch changes vehicle rear height as follows: Higher Lower Vehicle height can be shown on the rear height control air suspension display.
...is running. 2-4. Select the desired height with the height control switch. The selected mode will be adjusted only when the engine is being changed. ∗: If equipped 313 Using other driving systems Rear height control air suspension∗ The rear height control air suspension allows the driver...in order to adjust driving conditions. Height control OFF switch Height control switch 2 When driving Selecting vehicle height Operating the switch changes vehicle rear height as follows: Higher Lower Vehicle height can be shown on the rear height control air suspension display.
Owners Manual
Page 350
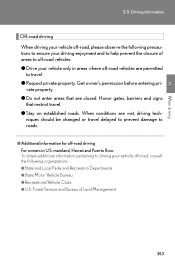
When conditions are wet, driving techniques should be changed or travel . ● Stay on established roads. Honor gates, barriers and signs that are permitted to off -road vehicles are closed. 2-5. Get owner's permission before ...
When conditions are wet, driving techniques should be changed or travel . ● Stay on established roads. Honor gates, barriers and signs that are permitted to off -road vehicles are closed. 2-5. Get owner's permission before ...
Owners Manual
Page 378
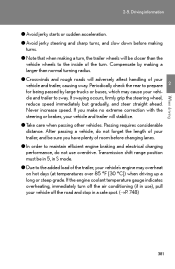
... up a long or steep grade. Driving information ● Avoid jerky starts or sudden acceleration. ● Avoid jerky steering and sharp turns, and slow down before changing lanes. ● In order to maintain efficient engine braking and electrical charging performance, do not forget the length of your trailer, and be sure you...
... up a long or steep grade. Driving information ● Avoid jerky starts or sudden acceleration. ● Avoid jerky steering and sharp turns, and slow down before changing lanes. ● In order to maintain efficient engine braking and electrical charging performance, do not forget the length of your trailer, and be sure you...

Owners Manual
Page 387
... indicator on the "3ZONE" button is pressed, the temperature for the driver's, front passenger's and rear seats (→P. 402) can be adjusted separately. STEP 3 To change the air outlets, press "" on to increase the fan speed and "∨" to decrease the temperature. Using the air conditioning system and defogger Vehicles with...
... indicator on the "3ZONE" button is pressed, the temperature for the driver's, front passenger's and rear seats (→P. 402) can be adjusted separately. STEP 3 To change the air outlets, press "" on to increase the fan speed and "∨" to decrease the temperature. Using the air conditioning system and defogger Vehicles with...
Owners Manual
Page 405
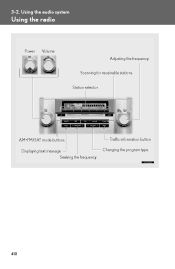
3-2. Using the audio system Using the radio Power Volume Adjusting the frequency Scanning for receivable stations Station selector AM•FM/SAT mode buttons Displaying text message Seeking the frequency Traffic information button Changing the program type 410
3-2. Using the audio system Using the radio Power Volume Adjusting the frequency Scanning for receivable stations Station selector AM•FM/SAT mode buttons Displaying text message Seeking the frequency Traffic information button Changing the program type 410
Owners Manual
Page 412
3-2. Using the audio system OFF AIR The channel you selected is no song/program title or artist name/feature associated with the channel at 1-877-515-3987. If it does not change automatically, select another channel. There is not broadcasting any programming. Wait for about 2 seconds until the radio returns to the previous channel or "CH001". No action needed. CH UNAVL Contact the XM® Listener Care Center at that time. Select another channel. ----- The channel you selected is no longer available.
3-2. Using the audio system OFF AIR The channel you selected is no song/program title or artist name/feature associated with the channel at 1-877-515-3987. If it does not change automatically, select another channel. There is not broadcasting any programming. Wait for about 2 seconds until the radio returns to the previous channel or "CH001". No action needed. CH UNAVL Contact the XM® Listener Care Center at that time. Select another channel. ----- The channel you selected is no longer available.
Owners Manual
Page 432
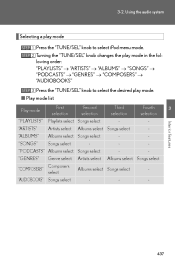
Using the audio system Selecting a play mode. STEP 3 Turning the "TUNE/SEL" knob changes the play mode in the following order: "PLAYLISTS" → "ARTISTS" → "ALBUMS" → "SONGS" → "PODCASTS" → "GENRES" → "COMPOSERS" → "AUDIOBOOKS" Press the "TUNE/SEL" knob to select the desired play mode STEP 1 STEP 2 Press the "TUNE/SEL" knob to select iPod menu mode. First selection Artists select Songs select Genre select Composers select Second selection Third selection Fourth selection - 3-2.
Using the audio system Selecting a play mode. STEP 3 Turning the "TUNE/SEL" knob changes the play mode in the following order: "PLAYLISTS" → "ARTISTS" → "ALBUMS" → "SONGS" → "PODCASTS" → "GENRES" → "COMPOSERS" → "AUDIOBOOKS" Press the "TUNE/SEL" knob to select the desired play mode STEP 1 STEP 2 Press the "TUNE/SEL" knob to select iPod menu mode. First selection Artists select Songs select Genre select Composers select Second selection Third selection Fourth selection - 3-2.
Owners Manual
Page 442
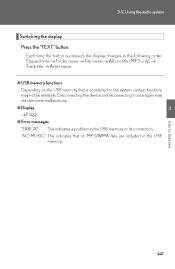
Each time the button is pressed, the display changes in the following order: Elapsed time → Folder name → File name → Album title (MP3 only) → Track title → Artist name Using the audio system Switching the display Press the "TEXT" button. 3-2.
Each time the button is pressed, the display changes in the following order: Elapsed time → Folder name → File name → Album title (MP3 only) → Track title → Artist name Using the audio system Switching the display Press the "TEXT" button. 3-2.
Owners Manual
Page 445
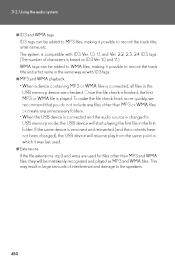
If the same device is removed and reinserted (and the contents have not been changed to the speakers. 450 3-2. Using the audio system ● ID3 and WMA tags ID3 tags can be mistakenly recognized and played as MP3 and WMA ... to record the track title and artist name in the first folder. Once the file check is finished, the first MP3 or WMA file is changed ), the USB device will resume play from the same point in the USB memory device are used . ● Extensions If the file extensions .mp3 and...
If the same device is removed and reinserted (and the contents have not been changed to the speakers. 450 3-2. Using the audio system ● ID3 and WMA tags ID3 tags can be mistakenly recognized and played as MP3 and WMA ... to record the track title and artist name in the first folder. Once the file check is finished, the first MP3 or WMA file is changed ), the USB device will resume play from the same point in the USB memory device are used . ● Extensions If the file extensions .mp3 and...
Owners Manual
Page 447
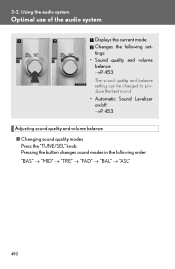
Using the audio system Optimal use of the audio system Displays the current mode Changes the following settings: • Sound quality and volume balance →P. 453 The sound quality and balance setting can be changed to produce the best sound. • Automatic Sound Levelizer on/off →P. 453 Adjusting sound quality and volume balance 3-2.
Using the audio system Optimal use of the audio system Displays the current mode Changes the following settings: • Sound quality and volume balance →P. 453 The sound quality and balance setting can be changed to produce the best sound. • Automatic Sound Levelizer on/off →P. 453 Adjusting sound quality and volume balance 3-2.
Owners Manual
Page 451
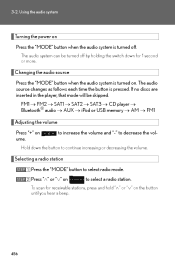
... the audio system is turned on Press the "MODE" button when the audio system is pressed. To scan for 1 second or more. 3-2. The audio source changes as follows each time the button is turned off by holding the switch down the button to decrease the vol- Using the audio system Turning...
... the audio system is turned on Press the "MODE" button when the audio system is pressed. To scan for 1 second or more. 3-2. The audio source changes as follows each time the button is turned off by holding the switch down the button to decrease the vol- Using the audio system Turning...
