
User Guide
Page 16
... wheel retracts automatically when the "POWER" switch is turned OFF to allow for easy exit and entry. Odometer/Trip Meter and Trip Meter Reset Buttons 1 Changes the display. 2 Resets the trip meter driving range to ACCESSORY or ON mode. The steering wheel returns automatically to its previously set position when the...
... wheel retracts automatically when the "POWER" switch is turned OFF to allow for easy exit and entry. Odometer/Trip Meter and Trip Meter Reset Buttons 1 Changes the display. 2 Resets the trip meter driving range to ACCESSORY or ON mode. The steering wheel returns automatically to its previously set position when the...
User Guide
Page 17
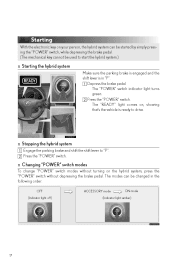
...brake pedal. The modes can be started by simply pressing the "POWER" switch, while depressing the brake pedal. (The mechanical key cannot be changed in "P". Press the "POWER" switch. n Stopping the hybrid system Engage the parking brake and shift the shift lever to drive. Starting With ... that's the vehicle is in the following order: OFF (Indicator light: off) ACCESSORY mode ON mode (Indicator light: amber) 17 n Changing "POWER" switch modes To change "POWER" switch modes without turning on the hybrid system, press the "POWER" switch without depressing the brake pedal.
...brake pedal. The modes can be started by simply pressing the "POWER" switch, while depressing the brake pedal. (The mechanical key cannot be changed in "P". Press the "POWER" switch. n Stopping the hybrid system Engage the parking brake and shift the shift lever to drive. Starting With ... that's the vehicle is in the following order: OFF (Indicator light: off) ACCESSORY mode ON mode (Indicator light: amber) 17 n Changing "POWER" switch modes To change "POWER" switch modes without turning on the hybrid system, press the "POWER" switch without depressing the brake pedal.
User Guide
Page 19
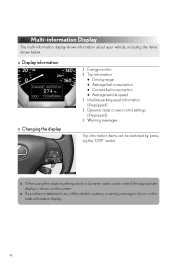
... fuel consumption • Current fuel consumption • Average vehicle speed l Intuitive parking assist information (if equipped) l Dynamic radar cruise control settings (if equipped) l Warning messages n Changing the display Trip information items can be switched by pressing the "DISP" switch.
... fuel consumption • Current fuel consumption • Average vehicle speed l Intuitive parking assist information (if equipped) l Dynamic radar cruise control settings (if equipped) l Warning messages n Changing the display Trip information items can be switched by pressing the "DISP" switch.

User Guide
Page 20
Turn Signal Lever 1 Right turn signal 2 Left turn signal lights to select the driving mode that best suits the driving and road conditions. 1 Power mode For more powerful acceleration and uphill driving. 2 Normal mode 3 Snow mode For starting or accelerating on when in power or snow mode. 20 Emergency Flasher Switch Engaging the emergency flasher switch causes all the turn signal To signal a lane change, move the lever partway and hold. Mode Select Switch Use the mode select switch to flash. An indicator comes on snow-covered roads or other slippery surfaces.
Turn Signal Lever 1 Right turn signal 2 Left turn signal lights to select the driving mode that best suits the driving and road conditions. 1 Power mode For more powerful acceleration and uphill driving. 2 Normal mode 3 Snow mode For starting or accelerating on when in power or snow mode. 20 Emergency Flasher Switch Engaging the emergency flasher switch causes all the turn signal To signal a lane change, move the lever partway and hold. Mode Select Switch Use the mode select switch to flash. An indicator comes on snow-covered roads or other slippery surfaces.
User Guide
Page 30
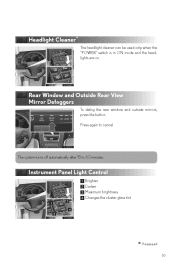
Instrument Panel Light Control 1 2 3 4 Brighter Darker Maximum brightness Changes the cluster glass tint ∗: If equipped 30 The system turns off automatically after 15 to cancel. Press again to 60 minutes. Rear Window and Outside Rear View Mirror Defoggers To defog the rear window and outside mirrors, press the button. Headlight Cleaner∗ The headlight cleaner can be used only when the "POWER" switch is in ON mode and the headlights are on.
Instrument Panel Light Control 1 2 3 4 Brighter Darker Maximum brightness Changes the cluster glass tint ∗: If equipped 30 The system turns off automatically after 15 to cancel. Press again to 60 minutes. Rear Window and Outside Rear View Mirror Defoggers To defog the rear window and outside mirrors, press the button. Headlight Cleaner∗ The headlight cleaner can be used only when the "POWER" switch is in ON mode and the headlights are on.

User Guide
Page 43
.... For Canadian owners: While pressing the HomeLink® button, repeatedly press and release (cycle) the button on the hand-held transmitter until the indicator light changes from a slow to a rapid flash. If your garage door is manufactured under license from a slow to a rapid flash. The garage door opener (HomeLink® Universal... and release the same button once again. 43 Press and hold down the button on the hand-held transmitter every 2 seconds until the indicator light changes from HomeLink®.
.... For Canadian owners: While pressing the HomeLink® button, repeatedly press and release (cycle) the button on the hand-held transmitter until the indicator light changes from a slow to a rapid flash. If your garage door is manufactured under license from a slow to a rapid flash. The garage door opener (HomeLink® Universal... and release the same button once again. 43 Press and hold down the button on the hand-held transmitter every 2 seconds until the indicator light changes from HomeLink®.
User Guide
Page 54
... to the Owner's Manual. *1 : *2: *3 Electronically Controlled Brake System If equipped : Turns on due to natural causes such as natural air leaks or tire inflation pressure changes caused by temperature excluding compact spare tire. Adjust the tire inflation pressure. 54 Have the malfunction repaired immediately.
... to the Owner's Manual. *1 : *2: *3 Electronically Controlled Brake System If equipped : Turns on due to natural causes such as natural air leaks or tire inflation pressure changes caused by temperature excluding compact spare tire. Adjust the tire inflation pressure. 54 Have the malfunction repaired immediately.

User Guide
Page 59
Some function settings are changed simultaneously with any door not closed 59 Contact your preferences. Programming these preferences requires specialized equipment and may be personalized to your Lexus dealer for further details. Item Function Smart access system with push-button start Operation signal (Emergency flashers) Operation ...) Trunk unlocking function Trunk unlocking operation Panic function Buzzer sounds when pushing with other functions being customized. Customizing Your Lexus Your vehicle includes a variety of electronic features that can be performed by an authorized...
Some function settings are changed simultaneously with any door not closed 59 Contact your preferences. Programming these preferences requires specialized equipment and may be personalized to your Lexus dealer for further details. Item Function Smart access system with push-button start Operation signal (Emergency flashers) Operation ...) Trunk unlocking function Trunk unlocking operation Panic function Buzzer sounds when pushing with other functions being customized. Customizing Your Lexus Your vehicle includes a variety of electronic features that can be performed by an authorized...

User Guide
Page 96
... and viscosity, refer to your Owner's Manual. Note: Initial replacement is at specified intervals. Replace the belt if it repaired immediately by a qualified technician. The GS 450h is damaged. Engine/Inverter Coolant When inspecting, visually check the engine/inverter coolant level on the see-through reservoir. Replace every 60 months/50,000... both at each differential component for signs of this booklet. EXPLANATION OF MAINTENANCE ITEMS Differential Oil Check for correct oil level and inspect each oil change.
... and viscosity, refer to your Owner's Manual. Note: Initial replacement is at specified intervals. Replace the belt if it repaired immediately by a qualified technician. The GS 450h is damaged. Engine/Inverter Coolant When inspecting, visually check the engine/inverter coolant level on the see-through reservoir. Replace every 60 months/50,000... both at each differential component for signs of this booklet. EXPLANATION OF MAINTENANCE ITEMS Differential Oil Check for correct oil level and inspect each oil change.
Owners Manual
Page 18
... malfunction. Depending on specifications, the vehicle shown in the illustration may differ from the modification may not be modified with non-genuine Lexus products could affect its performance, safety or durability, and may even violate governmental regulations. This vehicle should know that this manual are...effect they may have on, your Lexus vehicle. Therefore, you may hear sound coming from under warranty. 18 GS_HV_U (OM30C81U) June 30, 2011 9:20 am This is the sound of continual product improvement, we reserve the right to make changes at the time of color and ...
... malfunction. Depending on specifications, the vehicle shown in the illustration may differ from the modification may not be modified with non-genuine Lexus products could affect its performance, safety or durability, and may even violate governmental regulations. This vehicle should know that this manual are...effect they may have on, your Lexus vehicle. Therefore, you may hear sound coming from under warranty. 18 GS_HV_U (OM30C81U) June 30, 2011 9:20 am This is the sound of continual product improvement, we reserve the right to make changes at the time of color and ...

Owners Manual
Page 148
2-1. Driving procedures Power (ignition) switch Performing the following operations when carrying the electronic key on your person starts the hybrid system or changes "POWER" switch modes.
2-1. Driving procedures Power (ignition) switch Performing the following operations when carrying the electronic key on your person starts the hybrid system or changes "POWER" switch modes.

Owners Manual
Page 154
Upshifting Downshifting The initial shift range in "S" mode Shift the shift lever to "5". Driving procedures Changing shift ranges in "S" mode is automatically set to the "S" position and operate the shift lever. 2-1.
Upshifting Downshifting The initial shift range in "S" mode Shift the shift lever to "5". Driving procedures Changing shift ranges in "S" mode is automatically set to the "S" position and operate the shift lever. 2-1.

Owners Manual
Page 156
2-1. Driving procedures Turn signal lever Right turn Left turn Move and hold the lever partway to signal a lane change The left hand signal will flash until you release the lever. Move and hold the lever partway to signal a lane change The right hand signal will flash until you release the lever.
2-1. Driving procedures Turn signal lever Right turn Left turn Move and hold the lever partway to signal a lane change The left hand signal will flash until you release the lever. Move and hold the lever partway to signal a lane change The right hand signal will flash until you release the lever.

Owners Manual
Page 160
... the vehicle has been driven. Brighter Darker Maximum brightness 162 GS_HV_U (OM30C81U) June 30, 2011 9:20 am Odometer/trip meter and trip meter reset buttons Changes the display Resets the trip meter driving range to record and display different distances independently. Instrument panel light control The brightness of the instrument panel...
... the vehicle has been driven. Brighter Darker Maximum brightness 162 GS_HV_U (OM30C81U) June 30, 2011 9:20 am Odometer/trip meter and trip meter reset buttons Changes the display Resets the trip meter driving range to record and display different distances independently. Instrument panel light control The brightness of the instrument panel...

Owners Manual
Page 161
...of cluster glass tint.) 2 When driving 163 GS_HV_U (OM30C81U) June 30, 2011 9:20 am Display the present setting, then change the mode, press the button once and then again within 6 seconds. To change the mode. "AUTO - Lo" 3. Hi" 4. "MANUAL - 4" Mode 1 to 7: The cluster glass tint will... of sunlight is tinted automatically or manually. You can select a setting from 7 modes. "AUTO - Each time you press the button, the mode changes in the surrounding. ("Norm." to "Hi", "1" to "4" referring to the level of the instrument cluster, the cluster glass is reached in the ...
...of cluster glass tint.) 2 When driving 163 GS_HV_U (OM30C81U) June 30, 2011 9:20 am Display the present setting, then change the mode, press the button once and then again within 6 seconds. To change the mode. "AUTO - Lo" 3. Hi" 4. "MANUAL - 4" Mode 1 to 7: The cluster glass tint will... of sunlight is tinted automatically or manually. You can select a setting from 7 modes. "AUTO - Each time you press the button, the mode changes in the surrounding. ("Norm." to "Hi", "1" to "4" referring to the level of the instrument cluster, the cluster glass is reached in the ...
Owners Manual
Page 187
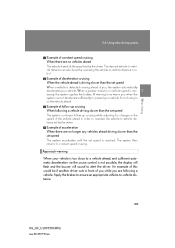
.... Using other driving systems Example of you are following a vehicle driving slower than the set speed The system continues follow-up cruising while adjusting for changes in the speed of the vehicle ahead in front of you while you , the system automatically decelerates your vehicle is too close to alert the...
.... Using other driving systems Example of you are following a vehicle driving slower than the set speed The system continues follow-up cruising while adjusting for changes in the speed of the vehicle ahead in front of you while you , the system automatically decelerates your vehicle is too close to alert the...

Owners Manual
Page 197
You can change the conditions under which information is displayed on the touch screen. (→P. 258) Multi-information display Dual sensor detection Steering guide symbol Rear corner sensor ...
You can change the conditions under which information is displayed on the touch screen. (→P. 258) Multi-information display Dual sensor detection Steering guide symbol Rear corner sensor ...

Owners Manual
Page 202
... As the vehicle moves closer to the obstacle, the interval of collision is less than 1.1 ft. (35 cm). ● If obstacles are reached, the beep changes from intermittent to continuous: • If the distance to the obstacle detected by the dual sensors or rear corner sensors is less than 0.8 ft. (25...
... As the vehicle moves closer to the obstacle, the interval of collision is less than 1.1 ft. (35 cm). ● If obstacles are reached, the beep changes from intermittent to continuous: • If the distance to the obstacle detected by the dual sensors or rear corner sensors is less than 0.8 ft. (25...

Owners Manual
Page 203
Using other driving systems ● If multiple obstacles are detected in front and behind the vehicle at the same time, the warning beep will change in the following manner: • If an obstacle has been detected within 0.8 ft. (25 cm) of the front or rear of the vehicle (a continuous... is detected within 0.8 ft. (25 cm) of a different area of the vehicle, the warning beeps will sound 2 beeps then one continuous beep. 2 ● You can change the volume of the warning beeps. (→P. 258) When driving Obstacle detection range About 10.0 ft. (300 cm) About 3.0 ft. (100 cm) About 5.0 ft. ...
Using other driving systems ● If multiple obstacles are detected in front and behind the vehicle at the same time, the warning beep will change in the following manner: • If an obstacle has been detected within 0.8 ft. (25 cm) of the front or rear of the vehicle (a continuous... is detected within 0.8 ft. (25 cm) of a different area of the vehicle, the warning beeps will sound 2 beeps then one continuous beep. 2 ● You can change the volume of the warning beeps. (→P. 258) When driving Obstacle detection range About 10.0 ft. (300 cm) About 3.0 ft. (100 cm) About 5.0 ft. ...

Owners Manual
Page 244
Page 1 Select language Beep on/off Automatic transition on/off (with navigation system) Select keyboard layout Select the unit Save settings Page 2 Make sure to on the "Setup" screen. Delete personal data 248 GS_HV_U (OM30C81U) June 30, 2011 9:20 am General settings This screen is used for language selection, and for setting operation sounds, automatic screen change the touch screen to your desired settings. Touch "General" on or off, etc. 3-1. Using the touch screen Setting the touch screen You can change to save after changing settings.
Page 1 Select language Beep on/off Automatic transition on/off (with navigation system) Select keyboard layout Select the unit Save settings Page 2 Make sure to on the "Setup" screen. Delete personal data 248 GS_HV_U (OM30C81U) June 30, 2011 9:20 am General settings This screen is used for language selection, and for setting operation sounds, automatic screen change the touch screen to your desired settings. Touch "General" on or off, etc. 3-1. Using the touch screen Setting the touch screen You can change to save after changing settings.
