Owners Manual
Page 309
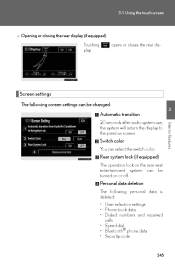
Interior features Switch color You can be changed: 3 Automatic transition 20 seconds after audio system use, the system will return the display to the previous screen. Rear system lock (... display (if equipped) Touching play. Personal data deletion The following screen settings can be turned on the rear seat entertainment system can select the switch color. opens or closes the rear dis- Screen settings The following personal data is deleted: • User selection settings • Phone book data • Dialed numbers...
Interior features Switch color You can be changed: 3 Automatic transition 20 seconds after audio system use, the system will return the display to the previous screen. Rear system lock (... display (if equipped) Touching play. Personal data deletion The following screen settings can be turned on the rear seat entertainment system can select the switch color. opens or closes the rear dis- Screen settings The following personal data is deleted: • User selection settings • Phone book data • Dialed numbers...

Owners Manual
Page 465
l Region code: Some DVD video discs have a region code, you can use it . If the DVD video disc is output.) 3 Interior features 401 Even if the DVD video disc does not have a region code indicating the region in which you may not be able to use ... disc. l The rear DVD player does not support multi-channel surround sound. (only 2-channel sound is not labeled as "ALL" or "1", you attempt to NTSC color TV formats. Using the rear seat entertainment system n DVD video discs l The DVD player conforms to play an inappropriate DVD video disc on this player...
l Region code: Some DVD video discs have a region code, you can use it . If the DVD video disc is output.) 3 Interior features 401 Even if the DVD video disc does not have a region code indicating the region in which you may not be able to use ... disc. l The rear DVD player does not support multi-channel surround sound. (only 2-channel sound is not labeled as "ALL" or "1", you attempt to NTSC color TV formats. Using the rear seat entertainment system n DVD video discs l The DVD player conforms to play an inappropriate DVD video disc on this player...

Owners Manual
Page 475
3-4. Interior features Select the brightness, contrast, tone or color, and make adjustments. Press or to input it. "Color" Red Green "Tone" "Contrast" "Brightness" Lighter Weaker Darker Darker Stronger Brighter 411 Using the rear seat entertainment system Changing other setting Setting the display mode Pressing changes the display modes sequentially as follows: Normal→Wide 1 →Wide 2 Adjusting the screen 3 Press .
3-4. Interior features Select the brightness, contrast, tone or color, and make adjustments. Press or to input it. "Color" Red Green "Tone" "Contrast" "Brightness" Lighter Weaker Darker Darker Stronger Brighter 411 Using the rear seat entertainment system Changing other setting Setting the display mode Pressing changes the display modes sequentially as follows: Normal→Wide 1 →Wide 2 Adjusting the screen 3 Press .
Owners Manual
Page 577
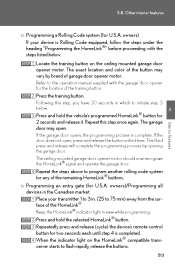
... The ceiling mounted garage door opener motor should now recognize the HomeLink® signal and operate the garage door. The exact location and color of the button may open , press and release the button a third time. If the garage door opens, the programming process is ...'s programmed HomeLink button for two seconds each until step 4 is complete. owners) If your transmitter 1 to 3 in view while programming. STEP 4 Interior features Repeat the steps above to the operation manual supplied with the steps listed below . 3 ® STEP 3 Press and hold the selected HomeLink®...
... The ceiling mounted garage door opener motor should now recognize the HomeLink® signal and operate the garage door. The exact location and color of the button may open , press and release the button a third time. If the garage door opens, the programming process is ...'s programmed HomeLink button for two seconds each until step 4 is complete. owners) If your transmitter 1 to 3 in view while programming. STEP 4 Interior features Repeat the steps above to the operation manual supplied with the steps listed below . 3 ® STEP 3 Press and hold the selected HomeLink®...
