
User Guide
Page 1
... do if the vehicle needs to be towed, gets a flat tire, or is involved in this manual. TABLE OF CONTENTS 1 Before driving Adjusting and operating features such as door locks, mirrors, and steering column. 2 When driving Driving, stopping and safe-driving information. 3 Interior features Air conditioning and audio systems, as well as other...
... do if the vehicle needs to be towed, gets a flat tire, or is involved in this manual. TABLE OF CONTENTS 1 Before driving Adjusting and operating features such as door locks, mirrors, and steering column. 2 When driving Driving, stopping and safe-driving information. 3 Interior features Air conditioning and audio systems, as well as other...
User Guide
Page 3
... (Pre-Collision System) ...167 2-5. Driving information ...170 Cargo and luggage...170 Vehicle load limits...173 Winter driving tips ...174 Trailer towing...179 Dinghy towing ...180 3 Interior features 3-1. 2-3.
... (Pre-Collision System) ...167 2-5. Driving information ...170 Cargo and luggage...170 Vehicle load limits...173 Winter driving tips ...174 Trailer towing...179 Dinghy towing ...180 3 Interior features 3-1. 2-3.
User Guide
Page 4
Other interior features...317 Sun visors...317 Vanity mirror...318 Clock...319 Outside temperature display ...320 Ashtrays ...321 Cigarette lighter ...322 Power outlet...323 Seat heaters ...324 Seat heaters and ventilators ...326 Armrest ...328 Rear sunshade...329 Floor mats...331 Trunk features...332 Garage door opener...334 Compass...339 4 Maintenance and care 4-1. Maintenance...349...
Other interior features...317 Sun visors...317 Vanity mirror...318 Clock...319 Outside temperature display ...320 Ashtrays ...321 Cigarette lighter ...322 Power outlet...323 Seat heaters ...324 Seat heaters and ventilators ...326 Armrest ...328 Rear sunshade...329 Floor mats...331 Trunk features...332 Garage door opener...334 Compass...339 4 Maintenance and care 4-1. Maintenance...349...
User Guide
Page 200
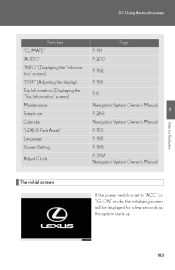
...) Trip Information. (Displaying the "Trip Information" screen) Maintenance Telephone Calendar "LEXUS Park Assist" Language Screen Setting Adjust Clock P. 191 P. 200 P. 182 P. 186 P. 6 Page Navigation System Owner's Manual P. 268 Navigation System Owner's Manual P. 153 P. 185 P. 188 P. 319/ Navigation System Owner's Manual 3 Interior features The initial screen If the power switch is set to "ACC...
...) Trip Information. (Displaying the "Trip Information" screen) Maintenance Telephone Calendar "LEXUS Park Assist" Language Screen Setting Adjust Clock P. 191 P. 200 P. 182 P. 186 P. 6 Page Navigation System Owner's Manual P. 268 Navigation System Owner's Manual P. 153 P. 185 P. 188 P. 319/ Navigation System Owner's Manual 3 Interior features The initial screen If the power switch is set to "ACC...
User Guide
Page 202
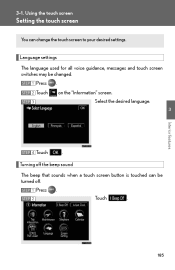
Select the desired language. 3 Interior features STEP 4 Touch . 3-1. STEP 1 STEP 2 STEP 3 Press Touch . on the "Information" screen. STEP 1 STEP 2 Press . Touch . 185 Using the touch screen Setting the touch screen You can be changed. Language settings The language used for all voice guidance, messages and touch screen switches may be turned off the beep sound The beep that sounds when a touch screen button is touched can change the touch screen to your desired settings. Turning off .
Select the desired language. 3 Interior features STEP 4 Touch . 3-1. STEP 1 STEP 2 STEP 3 Press Touch . on the "Information" screen. STEP 1 STEP 2 Press . Touch . 185 Using the touch screen Setting the touch screen You can be changed. Language settings The language used for all voice guidance, messages and touch screen switches may be turned off the beep sound The beep that sounds when a touch screen button is touched can change the touch screen to your desired settings. Turning off .
User Guide
Page 204
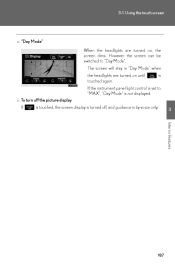
is If the instrument panel light control is set to "Day Mode". n To turn off the picture display If is touched, the screen display is turned off, and guidance is not displayed. 3-1. The screen will stay in "Day Mode" when the headlights are turned on until touched again. Using the touch screen n "Day Mode" When the headlights are turned on , the screen dims. However the screen can be switched to "MAX", "Day Mode" is by voice only. 3 Interior features 187
is If the instrument panel light control is set to "Day Mode". n To turn off the picture display If is touched, the screen display is turned off, and guidance is not displayed. 3-1. The screen will stay in "Day Mode" when the headlights are turned on until touched again. Using the touch screen n "Day Mode" When the headlights are turned on , the screen dims. However the screen can be switched to "MAX", "Day Mode" is by voice only. 3 Interior features 187
User Guide
Page 206
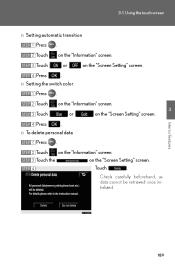
on the "Information" screen. on the "Information" screen. n Setting the switch color STEP 1 STEP 2 STEP 3 STEP 4 Interior features n To delete personal data STEP 1 STEP 2 STEP 3 STEP 4 Touch on the "Screen Setting" screen. Touch . Using the touch screen n Setting automatic transition STEP 1 STEP 2 STEP 3 ...
on the "Information" screen. on the "Information" screen. n Setting the switch color STEP 1 STEP 2 STEP 3 STEP 4 Interior features n To delete personal data STEP 1 STEP 2 STEP 3 STEP 4 Touch on the "Screen Setting" screen. Touch . Using the touch screen n Setting automatic transition STEP 1 STEP 2 STEP 3 ...
User Guide
Page 208
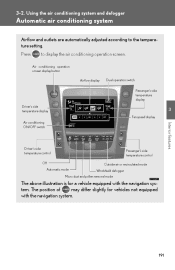
... operation screen display button Airflow display Dual operation switch Passenger's side temperature display Driver's side temperature display Fan speed display Air conditioning ON/OFF switch 3 Interior features Driver's side temperature control Off Automatic mode Passenger's side temperature control Outside air or recirculated mode Windshield defogger Micro dust and pollen removal mode The...
... operation screen display button Airflow display Dual operation switch Passenger's side temperature display Driver's side temperature display Fan speed display Air conditioning ON/OFF switch 3 Interior features Driver's side temperature control Off Automatic mode Passenger's side temperature control Outside air or recirculated mode Windshield defogger Micro dust and pollen removal mode The...
User Guide
Page 210
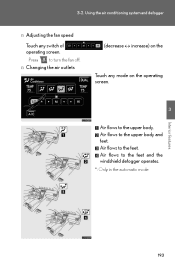
Air flows to the feet and the windshield defogger operates. *: Only in the automatic mode 193 Press to turn the fan off. (decrease ↔ increase) on the operating screen. 3 Interior features Air flows to the feet. Air flows to the upper body and feet. 3-2. Using the air conditioning system and defogger n Adjusting the fan speed Touch any mode on the n Changing the air outlets Touch any switch of operating screen. Air flows to the upper body.
Air flows to the feet and the windshield defogger operates. *: Only in the automatic mode 193 Press to turn the fan off. (decrease ↔ increase) on the operating screen. 3 Interior features Air flows to the feet. Air flows to the upper body and feet. 3-2. Using the air conditioning system and defogger n Adjusting the fan speed Touch any mode on the n Changing the air outlets Touch any switch of operating screen. Air flows to the upper body.

User Guide
Page 212
Using the air conditioning system and defogger Adjusting the sensitivity of and opening and closing the air outlets Interior features Center outlets Direct air flow to the left or right, up or down Turn the knob to open or close the vent 195 3-2. Touch any switch of (lower sensitivity ↔ higher sensitivity) on the operating screen. 3 Adjusting the position of the air intake control in automatic mode STEP 1 STEP 2 Press until the smog sensor screen appears while the vehicle is stopped.
Using the air conditioning system and defogger Adjusting the sensitivity of and opening and closing the air outlets Interior features Center outlets Direct air flow to the left or right, up or down Turn the knob to open or close the vent 195 3-2. Touch any switch of (lower sensitivity ↔ higher sensitivity) on the operating screen. 3 Adjusting the position of the air intake control in automatic mode STEP 1 STEP 2 Press until the smog sensor screen appears while the vehicle is stopped.
User Guide
Page 216
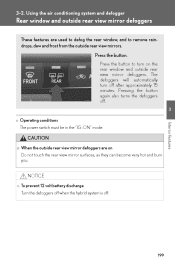
Using the air conditioning system and defogger Rear window and outside rear view mirror defoggers These features are on the rear window and outside rear view mirror defoggers. The defoggers will automatically turn on Do not touch the rear view mirror surfaces, ... Turn the defoggers off when the hybrid system is off after approximately 15 minutes. Pressing the button again also turns the defoggers off. 3 n Operating conditions Interior features The power switch must be in the "IG-ON" mode. Press the button to remove raindrops, dew and frost from the outside rear view mirror...
Using the air conditioning system and defogger Rear window and outside rear view mirror defoggers These features are on the rear window and outside rear view mirror defoggers. The defoggers will automatically turn on Do not touch the rear view mirror surfaces, ... Turn the defoggers off when the hybrid system is off after approximately 15 minutes. Pressing the button again also turns the defoggers off. 3 n Operating conditions Interior features The power switch must be in the "IG-ON" mode. Press the button to remove raindrops, dew and frost from the outside rear view mirror...
User Guide
Page 218
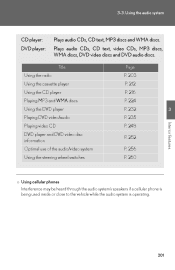
... the audio system CD player: DVD player: Plays audio CDs, CD text, MP3 discs and WMA discs. Title Page P. 203 P. 212 P. 216 P. 224 P. 232 P. 235 Interior features 3 Using the radio Using the cassette player Using the CD player Playing MP3 and WMA discs Using the DVD player Playing DVD video/audio Playing...
... the audio system CD player: DVD player: Plays audio CDs, CD text, MP3 discs and WMA discs. Title Page P. 203 P. 212 P. 216 P. 224 P. 232 P. 235 Interior features 3 Using the radio Using the cassette player Using the CD player Playing MP3 and WMA discs Using the DVD player Playing DVD video/audio Playing...
User Guide
Page 220
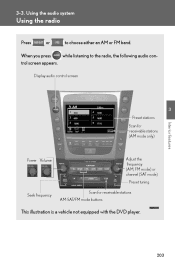
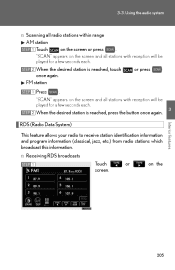
Display audio control screen 3 Preset stations Interior features Scan for receivable stations (AM mode only) Power Volume Adjust the frequency (AM, FM mode) or channel (SAT mode) Preset tuning Seek frequency Scan for receivable stations AM⋅SAT/FM mode buttons This illustration is a vehicle not equipped with the DVD player. 203 3-3. When you press while listening to choose either an AM or FM band. Using the audio system Using the radio Press or to the radio, the following audio control screen appears.
Display audio control screen 3 Preset stations Interior features Scan for receivable stations (AM mode only) Power Volume Adjust the frequency (AM, FM mode) or channel (SAT mode) Preset tuning Seek frequency Scan for receivable stations AM⋅SAT/FM mode buttons This illustration is a vehicle not equipped with the DVD player. 203 3-3. When you press while listening to choose either an AM or FM band. Using the audio system Using the radio Press or to the radio, the following audio control screen appears.
User Guide
Page 222
... reached, touch once again. n Receiving RDS broadcasts STEP 1 Touch screen. STEP 2 When the desired station is reached, press the button once again. 3 Interior features RDS (Radio Data System) This feature allows your radio to receive station identification information and program information (classical, jazz, etc.) from radio stations which broadcast this information. 3-3. "SCAN" appears...
... reached, touch once again. n Receiving RDS broadcasts STEP 1 Touch screen. STEP 2 When the desired station is reached, press the button once again. 3 Interior features RDS (Radio Data System) This feature allows your radio to receive station identification information and program information (classical, jazz, etc.) from radio stations which broadcast this information. 3-3. "SCAN" appears...
User Guide
Page 224
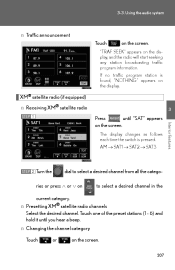
..., and the radio will start seeking any station broadcasting traffic program information. "TRAF SEEK" appears on the screen. AM → SAT1 → SAT2 → SAT3 Interior features STEP 2 Turn the dial to select a desired channel from all the categoto select a desired channel in the ries or press ∧ or ∨ on the...
..., and the radio will start seeking any station broadcasting traffic program information. "TRAF SEEK" appears on the screen. AM → SAT1 → SAT2 → SAT3 Interior features STEP 2 Turn the dial to select a desired channel from all the categoto select a desired channel in the ries or press ∧ or ∨ on the...
User Guide
Page 226
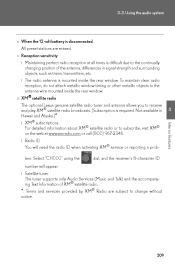
... the audio system n When the 12 volt battery is required. You will appear. n XM® satellite radio The optional Lexus genuine satellite radio tuner and antenna allows you to receive and play XM® satellite radio broadcasts. (Subscription is disconnected All preset...Services (Music and Talk) and the accompanying Text Information of the antenna, differences in Hawaii and Alaska.)* l XM® subscriptions 3 Interior features For detailed information about XM® satellite radio or to the continually changing position of XM® satellite radio. *: Terms and ...
... the audio system n When the 12 volt battery is required. You will appear. n XM® satellite radio The optional Lexus genuine satellite radio tuner and antenna allows you to receive and play XM® satellite radio broadcasts. (Subscription is disconnected All preset...Services (Music and Talk) and the accompanying Text Information of the antenna, differences in Hawaii and Alaska.)* l XM® subscriptions 3 Interior features For detailed information about XM® satellite radio or to the continually changing position of XM® satellite radio. *: Terms and ...
User Guide
Page 228
... previous channel or "CH001". The channel you selected is no longer available. If this equipment does cause harmful interference to radio or television reception, which 3 Interior features the receiver is encouraged to try to which can radiate radio frequency energy and, if not installed and used in accordance with the limits for...
... previous channel or "CH001". The channel you selected is no longer available. If this equipment does cause harmful interference to radio or television reception, which 3 Interior features the receiver is encouraged to try to which can radiate radio frequency energy and, if not installed and used in accordance with the limits for...
User Guide
Page 230
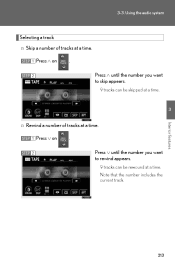
Using the audio system Selecting a track n Skip a number of tracks at a time. STEP 2 3 Interior features n Rewind a number of tracks at a time. Press ∧ until the number you want to skip appears. 9 tracks can be skipped at a time. STEP 1 Press ∨ on . STEP 1 Press ∧ on . Press ∨ until the number you want to rewind appears. 9 tracks can be rewound at a time. STEP 2 213 3-3. Note that the number includes the current track.
Using the audio system Selecting a track n Skip a number of tracks at a time. STEP 2 3 Interior features n Rewind a number of tracks at a time. Press ∧ until the number you want to skip appears. 9 tracks can be skipped at a time. STEP 1 Press ∨ on . STEP 1 Press ∧ on . Press ∨ until the number you want to rewind appears. 9 tracks can be rewound at a time. STEP 2 213 3-3. Note that the number includes the current track.
User Guide
Page 232
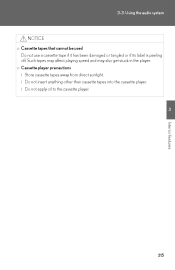
Such tapes may affect playing speed and may also get stuck in the player. l Do not apply oil to the cassette player. 3 Interior features 215 l Do not insert anything other than cassette tapes into the cassette player. n Cassette player precautions l Store cassette tapes away from direct sunlight. Using the audio system NOTICE n Cassette tapes that cannot be used Do not use a cassette tape if it has been damaged or tangled or if its label is peeling off. 3-3.
Such tapes may affect playing speed and may also get stuck in the player. l Do not apply oil to the cassette player. 3 Interior features 215 l Do not insert anything other than cassette tapes into the cassette player. n Cassette player precautions l Store cassette tapes away from direct sunlight. Using the audio system NOTICE n Cassette tapes that cannot be used Do not use a cassette tape if it has been damaged or tangled or if its label is peeling off. 3-3.
User Guide
Page 234
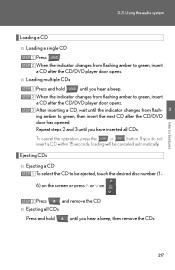
... Loading a CD n Loading a single CD STEP 1 STEP 2 Press . When the indicator changes from flashing amber to be canceled automatically. n Loading multiple CDs STEP 1 STEP 2 STEP 3 3 Interior features Ejecting CDs n Ejecting a CD STEP 1 To select the CD to green, insert a CD after the CD/DVD door has opened.
... Loading a CD n Loading a single CD STEP 1 STEP 2 Press . When the indicator changes from flashing amber to be canceled automatically. n Loading multiple CDs STEP 1 STEP 2 STEP 3 3 Interior features Ejecting CDs n Ejecting a CD STEP 1 To select the CD to green, insert a CD after the CD/DVD door has opened.