
Owners Manual
Page 34
... to the Owner's Manual. Tune to your cassette player. l Press with the disc inserted. n Playing the cassette player You have 2 methods to play your CD/DVD player. l Press with the tape inserted. For tuning adjustment and further information, refer to choose an AM or FM band. n Playing the CD...
... to the Owner's Manual. Tune to your cassette player. l Press with the disc inserted. n Playing the cassette player You have 2 methods to play your CD/DVD player. l Press with the tape inserted. For tuning adjustment and further information, refer to choose an AM or FM band. n Playing the CD...
Owners Manual
Page 61
......202 Using the cassette player ...211 Using the CD player...215 Playing MP3 and WMA discs ...223 Using the DVD player ...231 Playing DVD video/audio...234 Playing video CD...247 DVD player and DVD video disc information ...251 Optimal use of the audio/ video system...255 Using the steering switches...259 3-4. Using the...
......202 Using the cassette player ...211 Using the CD player...215 Playing MP3 and WMA discs ...223 Using the DVD player ...231 Playing DVD video/audio...234 Playing video CD...247 DVD player and DVD video disc information ...251 Optimal use of the audio/ video system...255 Using the steering switches...259 3-4. Using the...
Owners Manual
Page 260
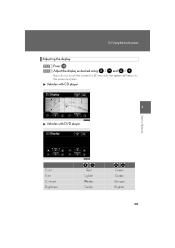
Vehicles with CD player 3 Interior features Vehicles with DVD player / Color Tone Contrast Brightness Red Lighter Weaker Darker / Green Darker Stronger Brighter 185 Using the touch screen Adjusting the display STEP 1 STEP 2 Press . Adjust the display as desired using / and / If you do not touch the screen for 20 seconds, the system will return to the previous screen. 3-1.
Vehicles with CD player 3 Interior features Vehicles with DVD player / Color Tone Contrast Brightness Red Lighter Weaker Darker / Green Darker Stronger Brighter 185 Using the touch screen Adjusting the display STEP 1 STEP 2 Press . Adjust the display as desired using / and / If you do not touch the screen for 20 seconds, the system will return to the previous screen. 3-1.

Owners Manual
Page 274
Using the audio system Audio system type CD and (optional) DVD player with changer, cassette player, and AM/ FM radio This illustration below is for a vehicle not equipped with the DVD player. 3 Interior features Vehicles with navigation system Vehicles without navigation system The audio system appearance and screen may differ slightly for vehicles equipped with the DVD player. 199 3-3.
Using the audio system Audio system type CD and (optional) DVD player with changer, cassette player, and AM/ FM radio This illustration below is for a vehicle not equipped with the DVD player. 3 Interior features Vehicles with navigation system Vehicles without navigation system The audio system appearance and screen may differ slightly for vehicles equipped with the DVD player. 199 3-3.

Owners Manual
Page 275
... P. 258 P. 262 Using the radio Using the cassette player Using the CD player Playing MP3 and WMA discs Using the DVD player Playing DVD video/audio Playing video CD DVD player and DVD video disc information Optimal use of the audio/video system Using the steering wheel switches n Using cellular phones Interference may be... if a cellular phone is being used inside or close to the vehicle while the audio system is operating. 200 Using the audio system CD player: DVD player: Plays audio CDs, CD text, MP3 discs and WMA discs. Plays audio CDs, CD text, video CDs, MP3 discs, WMA discs...
... P. 258 P. 262 Using the radio Using the cassette player Using the CD player Playing MP3 and WMA discs Using the DVD player Playing DVD video/audio Playing video CD DVD player and DVD video disc information Optimal use of the audio/video system Using the steering wheel switches n Using cellular phones Interference may be... if a cellular phone is being used inside or close to the vehicle while the audio system is operating. 200 Using the audio system CD player: DVD player: Plays audio CDs, CD text, MP3 discs and WMA discs. Plays audio CDs, CD text, video CDs, MP3 discs, WMA discs...

Owners Manual
Page 277
Using the audio system Using the radio Press or to the radio, the following audio control screen appears. When you press while listening to choose either an AM or FM band. 3-3. Display audio control screen Preset stations Scan for receivable stations (AM mode only) Power Volume Adjust the frequency (AM, FM mode) or channel (SAT mode) Preset tuning Seek frequency Scan for receivable stations AM⋅SAT/FM mode buttons This illustration is a vehicle not equipped with the DVD player. 202
Using the audio system Using the radio Press or to the radio, the following audio control screen appears. When you press while listening to choose either an AM or FM band. 3-3. Display audio control screen Preset stations Scan for receivable stations (AM mode only) Power Volume Adjust the frequency (AM, FM mode) or channel (SAT mode) Preset tuning Seek frequency Scan for receivable stations AM⋅SAT/FM mode buttons This illustration is a vehicle not equipped with the DVD player. 202

Owners Manual
Page 286
while listening to the tape, the following audio con- 3-3. with the DVD player. 211 Display audio control screen Rewind Fast forward 3 Interior features Change playback direction Repeat play Skip play Noise reduction Power Volume Playback Change playback direction Track selection Tape eject Tape slot This illustration is a vehicle not equipped with a tape inserted. Using the audio system Using the cassette player Insert a cassette tape or press When you press trol screen appears.
while listening to the tape, the following audio con- 3-3. with the DVD player. 211 Display audio control screen Rewind Fast forward 3 Interior features Change playback direction Repeat play Skip play Noise reduction Power Volume Playback Change playback direction Track selection Tape eject Tape slot This illustration is a vehicle not equipped with a tape inserted. Using the audio system Using the cassette player Insert a cassette tape or press When you press trol screen appears.

Owners Manual
Page 290
while listening to a CD, the following audio control Display audio control screen Display track list 3 Select CD Interior features Search playback Repeat play Random playback Power Volume CD slot Select CD Track selection CD eject CD load Playback This illustration is a vehicle equipped with a CD inserted. with the DVD player. 215 Using the audio system Using the CD player Insert a CD or press When you press screen appears. 3-3.
while listening to a CD, the following audio control Display audio control screen Display track list 3 Select CD Interior features Search playback Repeat play Random playback Power Volume CD slot Select CD Track selection CD eject CD load Playback This illustration is a vehicle equipped with a CD inserted. with the DVD player. 215 Using the audio system Using the CD player Insert a CD or press When you press screen appears. 3-3.

Owners Manual
Page 291
... hear a beep. Press and remove the CD. When the indicator changes from flashing amber to green, insert a CD after the CD/DVD player door opens. To cancel the operation, press the or button. until the indicator changes from flashing amber to be canceled automatically. If... you hear a beep, then remove the CDs. Ejecting CDs n Ejecting a CD STEP 1 To select the CD to green, insert a CD after the CD/DVD player door opens. n Ejecting all CDs. 3-3. n Loading multiple CDs STEP 1 STEP 1 STEP 2 STEP 3 Press and hold 216 Using the audio system Loading a ...
... hear a beep. Press and remove the CD. When the indicator changes from flashing amber to green, insert a CD after the CD/DVD player door opens. To cancel the operation, press the or button. until the indicator changes from flashing amber to be canceled automatically. If... you hear a beep, then remove the CDs. Ejecting CDs n Ejecting a CD STEP 1 To select the CD to green, insert a CD after the CD/DVD player door opens. n Ejecting all CDs. 3-3. n Loading multiple CDs STEP 1 STEP 1 STEP 2 STEP 3 Press and hold 216 Using the audio system Loading a ...

Owners Manual
Page 294
... , , or on the screen once again. Message No CD or No Disc Cause Correction Procedures 3 There is no disc in the CD Insert a disc or DVD changer • The disc X is dirty or damaged • The disc X is inserted upside down NO MUSIC FILE Eject the disc 219 n Error messages Refer... to the following table and take the vehicle to your Lexus dealer. If the problem is playable with the player CD Error or DVD Error • Eject the disc • Eject the disc and allow the player to cool down • The disc...
... , , or on the screen once again. Message No CD or No Disc Cause Correction Procedures 3 There is no disc in the CD Insert a disc or DVD changer • The disc X is dirty or damaged • The disc X is inserted upside down NO MUSIC FILE Eject the disc 219 n Error messages Refer... to the following table and take the vehicle to your Lexus dealer. If the problem is playable with the player CD Error or DVD Error • Eject the disc • Eject the disc and allow the player to cool down • The disc...

Owners Manual
Page 298
Display audio control screen Display folder list 3 Select folder Repeat play Search playback Random playback Power Volume Interior features CD slot Select file Select CD Select file CD eject CD load Playback This illustration is a vehicle equipped with a disc inserted. 3-3. Using the audio system Playing MP3 and WMA discs Insert an MP3 or WMA disc or press with the DVD player. 223 When you press during playback of the disc, the following audio control screen appears.
Display audio control screen Display folder list 3 Select folder Repeat play Search playback Random playback Power Volume Interior features CD slot Select file Select CD Select file CD eject CD load Playback This illustration is a vehicle equipped with a disc inserted. 3-3. Using the audio system Playing MP3 and WMA discs Insert an MP3 or WMA disc or press with the DVD player. 223 When you press during playback of the disc, the following audio control screen appears.

Owners Manual
Page 306
Using the audio system Using the DVD player (if equipped) Insert a disc or press with a disc inserted. Display audio/video control screen 3 Select disc Interior features Power Volume Disc slot Select file Change disc Track, file and chapter selection/fast forward/ rewind Disc eject Disc load Playback 231 3-3. When you press during the playback of the disc, the following audio/ video control screen appears.
Using the audio system Using the DVD player (if equipped) Insert a disc or press with a disc inserted. Display audio/video control screen 3 Select disc Interior features Power Volume Disc slot Select file Change disc Track, file and chapter selection/fast forward/ rewind Disc eject Disc load Playback 231 3-3. When you press during the playback of the disc, the following audio/ video control screen appears.

Owners Manual
Page 307
After inserting a disc, wait until the indicator changes from flashing amber to green, insert a disc after the DVD player door opens. n DVD hint screen This screen appears when a DVD video, DVD audio or video CD is first selected with the engine switch in "ACC" or "IG-ON" mode. Touch once you hear a ...beep. STEP 2 When the indicator changes from flashing amber to green, insert a disc after the DVD player door has opened. n Loading multiple discs STEP 1 STEP 1 STEP 2 STEP 3 STEP 4 Press and hold until you do not insert a disc within 15 ...
After inserting a disc, wait until the indicator changes from flashing amber to green, insert a disc after the DVD player door opens. n DVD hint screen This screen appears when a DVD video, DVD audio or video CD is first selected with the engine switch in "ACC" or "IG-ON" mode. Touch once you hear a ...beep. STEP 2 When the indicator changes from flashing amber to green, insert a disc after the DVD player door has opened. n Loading multiple discs STEP 1 STEP 1 STEP 2 STEP 3 STEP 4 Press and hold until you do not insert a disc within 15 ...

Owners Manual
Page 308
Press and remove the disc. Interior features 233 3-3. until you hear a beep, then remove the discs. 3 n Ejecting all discs Press and hold Selecting a disc n To select a disc to be ejected, touch the desired disc on the screen or press ∧ or ∨ on l Audio CD, CD text→P. 216 l MP3/WMA disc→P. 224 l DVD video/audio→P. 236 l Video CD→P. 249 . Using the audio system Ejecting discs n Ejecting a disc STEP 1 To select the disc to play Touch the desired disc on the screen or press ∧ or ∨ on STEP 2 .
Press and remove the disc. Interior features 233 3-3. until you hear a beep, then remove the discs. 3 n Ejecting all discs Press and hold Selecting a disc n To select a disc to be ejected, touch the desired disc on the screen or press ∧ or ∨ on l Audio CD, CD text→P. 216 l MP3/WMA disc→P. 224 l DVD video/audio→P. 236 l Video CD→P. 249 . Using the audio system Ejecting discs n Ejecting a disc STEP 1 To select the disc to play Touch the desired disc on the screen or press ∧ or ∨ on STEP 2 .

Owners Manual
Page 309
n Video control screen Press while the disc is completely stopped with the engine switch in "ACC" or "IG-ON" mode and the parking brake applied. Using the audio system Playing DVD video/audio For safety reasons, you are driving, only audio contents may be played. While you can enjoy the visual contents of discs only when the vehicle is playing, the following screen appears. Return to video screen Change screen mode (→P. 261) 234 3-3.
n Video control screen Press while the disc is completely stopped with the engine switch in "ACC" or "IG-ON" mode and the parking brake applied. Using the audio system Playing DVD video/audio For safety reasons, you are driving, only audio contents may be played. While you can enjoy the visual contents of discs only when the vehicle is playing, the following screen appears. Return to video screen Change screen mode (→P. 261) 234 3-3.

Owners Manual
Page 310
...the audio system n Control icon screen Touch any part of the screen if no icons are shown while watching video, the following screen appears. 3-3. DVD video mode Return to top menu screen Page 1 Menu control key Hide control icons Go to page 2 Return to menu screen Stop Rewind 3 ...Fast forward Interior features Playback Pause Page 2 Initial DVD setup Return to page 1 Change angle Search desired screen Return to menu screen Change subtitle language Change audio language If appears on the screen when...
...the audio system n Control icon screen Touch any part of the screen if no icons are shown while watching video, the following screen appears. 3-3. DVD video mode Return to top menu screen Page 1 Menu control key Hide control icons Go to page 2 Return to menu screen Stop Rewind 3 ...Fast forward Interior features Playback Pause Page 2 Initial DVD setup Return to page 1 Change angle Search desired screen Return to menu screen Change subtitle language Change audio language If appears on the screen when...

Owners Manual
Page 311
... to top menu screen Page 1 Menu control key Hide control icons Go to page 2 Change the audio format Rewind Stop Fast forward Playback Pause Initial DVD setup Select menu number Return to page 1 Page 2 Search desired screen Return to registered screen Return to previous screen Change angle Change subtitle language Go...
... to top menu screen Page 1 Menu control key Hide control icons Go to page 2 Change the audio format Rewind Stop Fast forward Playback Pause Initial DVD setup Select menu number Return to page 1 Page 2 Search desired screen Return to registered screen Return to previous screen Change angle Change subtitle language Go...

Owners Manual
Page 312
... mode) STEP 1 Touch in the control icons. to previous 237 to previous 3 Interior features n Searching by title (DVD video mode) STEP 1 Touch in the control icons. 3-3. To display the icons, touch . : returns screen. To display the icons, touch . : returns screen. Using the audio ...
... mode) STEP 1 Touch in the control icons. to previous 237 to previous 3 Interior features n Searching by title (DVD video mode) STEP 1 Touch in the control icons. 3-3. To display the icons, touch . : returns screen. To display the icons, touch . : returns screen. Using the audio ...

Owners Manual
Page 313
Using the audio system n Playing a bonus group (DVD audio mode only, if the DVD has bonus options) STEP 1 Touch in the control icons. n Searching by chapter/track Press ∧ or ∨ on to previous screen. . Input the desired menu number on the group search screen and touch : deletes the number. : returns to select a chapter/track. Input the desired bonus group STEP 2 number on STEP 2 the screen and touch . 238 n Selecting a menu number (DVD audio mode only) STEP 1 Touch in the control icons. 3-3.
Using the audio system n Playing a bonus group (DVD audio mode only, if the DVD has bonus options) STEP 1 Touch in the control icons. n Searching by chapter/track Press ∧ or ∨ on to previous screen. . Input the desired menu number on the group search screen and touch : deletes the number. : returns to select a chapter/track. Input the desired bonus group STEP 2 number on STEP 2 the screen and touch . 238 n Selecting a menu number (DVD audio mode only) STEP 1 Touch in the control icons. 3-3.

Owners Manual
Page 314
3-3. Touch , , or to select a menu item, then touch to another. to previous 3 Interior features Note that comes with the DVD disc. (The above image is selected. : hides the control icons. : returns to previous screen. 239 Touch if the menu control key does not appear on... touch the button, the next available language is an example.) Changing the subtitle language Touch in the control icons. Using the audio system Using the DVD menu STEP 1 STEP 2 Touch or in the control icons. To display icons, touch . : returns screen. Refer to the manual that specific items or the operating...
3-3. Touch , , or to select a menu item, then touch to another. to previous 3 Interior features Note that comes with the DVD disc. (The above image is selected. : hides the control icons. : returns to previous screen. 239 Touch if the menu control key does not appear on... touch the button, the next available language is an example.) Changing the subtitle language Touch in the control icons. Using the audio system Using the DVD menu STEP 1 STEP 2 Touch or in the control icons. To display icons, touch . : returns screen. Refer to the manual that specific items or the operating...
