

Owners Manual
Page 3
... CONTROLS The vehicle's equipment is briefly explained in an easily understandable way for quick reference. Keys and doors Switches Gauges, meters and service reminder indicators Interior equipment Exterior equipment Comfort adjustment iii BASIC OPERATION - QUICK REFERENCE Operation of the equipment is explained, including any points you enjoy safe and comfortable driving...
... CONTROLS The vehicle's equipment is briefly explained in an easily understandable way for quick reference. Keys and doors Switches Gauges, meters and service reminder indicators Interior equipment Exterior equipment Comfort adjustment iii BASIC OPERATION - QUICK REFERENCE Operation of the equipment is explained, including any points you enjoy safe and comfortable driving...

Owners Manual
Page 39
..." on for about 1 second, you keep the button pushed for 15 seconds if the interior light switch is in , the locking or unlocking operation is not opened by then, all the doors will be automatically locked again. Release the button ...and then push again. Together with the activation of unlocking, the interior light comes on page 66. If a door is not repeated. Even if the "LOCK" or "UNLOCK" switch is kept pressed in "DOOR" position. This function...
..." on for about 1 second, you keep the button pushed for 15 seconds if the interior light switch is in , the locking or unlocking operation is not opened by then, all the doors will be automatically locked again. Release the button ...and then push again. Together with the activation of unlocking, the interior light comes on page 66. If a door is not repeated. Even if the "LOCK" or "UNLOCK" switch is kept pressed in "DOOR" position. This function...

Owners Manual
Page 83
SECTION INSTRUMENTS AND CONTROLS Interior equipment Vanity mirrors ...65 Interior light ...66 Personal lights ...67 Ignition switch light ...68 Clock ...69 Cigarette lighter and ashtray ...69 Glovebox ...72 Garage door opener ...73 Cup holders ...76 Floor mat ...78 Luggage stowage precautions ...80 1- 4 VANITY MIRRORS 65
SECTION INSTRUMENTS AND CONTROLS Interior equipment Vanity mirrors ...65 Interior light ...66 Personal lights ...67 Ignition switch light ...68 Clock ...69 Cigarette lighter and ashtray ...69 Glovebox ...72 Garage door opener ...73 Cup holders ...76 Floor mat ...78 Luggage stowage precautions ...80 1- 4 VANITY MIRRORS 65
Owners Manual
Page 84
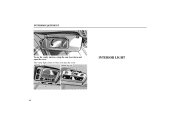
INTERIOR LIGHT 66 INTERIOR EQUIPMENT To use the vanity mirrors, swing the sun visor down and open the cover. The vanity light comes on when you open the cover.
INTERIOR LIGHT 66 INTERIOR EQUIPMENT To use the vanity mirrors, swing the sun visor down and open the cover. The vanity light comes on when you open the cover.

Owners Manual
Page 85
INTERIOR EQUIPMENT To turn on for about 15 seconds and then goes out. Both doors are locked when the light is locked. However, in the "DOOR" ... . 3. PERSONAL LIGHTS 67 With the switch in the following cases, the light goes out immediately: 1. After both doors are closed , the light remains on the interior light, slide the switch.
INTERIOR EQUIPMENT To turn on for about 15 seconds and then goes out. Both doors are locked when the light is locked. However, in the "DOOR" ... . 3. PERSONAL LIGHTS 67 With the switch in the following cases, the light goes out immediately: 1. After both doors are closed , the light remains on the interior light, slide the switch.

Owners Manual
Page 86
INTERIOR EQUIPMENT To turn it off, push the switch again. The light remains on for about 15 seconds and goes out after both doors are closed. IGNITION SWITCH LIGHT For easy access to the ignition switch, the ignition switch light comes on the personal light, push the switch. However, the light goes out immediately when both side doors are locked or the ignition key is opened. To turn on when either of the side doors is in the "ACC" or "ON" position. 68
INTERIOR EQUIPMENT To turn it off, push the switch again. The light remains on for about 15 seconds and goes out after both doors are closed. IGNITION SWITCH LIGHT For easy access to the ignition switch, the ignition switch light comes on the personal light, push the switch. However, the light goes out immediately when both side doors are locked or the ignition key is opened. To turn on when either of the side doors is in the "ACC" or "ON" position. 68

Owners Manual
Page 87
... be set to the nearest hour, press the ":00" button. To reset the minutes, press the "M" button. To adjust the time to 1:00 (one o'clock). INTERIOR EQUIPMENT CLOCK The digital clock indicates the time with the ignition key at the "ON" position. CIGARETTE LIGHTER AND ASHTRAY Front cigarette lighter and ashtray...
... be set to the nearest hour, press the ":00" button. To reset the minutes, press the "M" button. To adjust the time to 1:00 (one o'clock). INTERIOR EQUIPMENT CLOCK The digital clock indicates the time with the ignition key at the "ON" position. CIGARETTE LIGHTER AND ASHTRAY Front cigarette lighter and ashtray...

Owners Manual
Page 88
After using the ashtray, push it automatically pops out ready for replacement. 70 Use a Lexus genuine cigarette lighter or equivalent for use the cigarette lighter and ashtray, first pull the button. When it becomes heated, it back in . Do not .... If the engine is not running, the ignition key must be in the "ACC" position. To remove the ashtray, pull it in the cigarette lighter. INTERIOR EQUIPMENT To use .
After using the ashtray, push it automatically pops out ready for replacement. 70 Use a Lexus genuine cigarette lighter or equivalent for use the cigarette lighter and ashtray, first pull the button. When it becomes heated, it back in . Do not .... If the engine is not running, the ignition key must be in the "ACC" position. To remove the ashtray, pull it in the cigarette lighter. INTERIOR EQUIPMENT To use .

Owners Manual
Page 89
To remove the ashtray, pull it in case of an accident or sudden stop while driving, always close the lid completely. After using the ashtray, close the ashtray completely after using. 71 When finished with your cigarette, thoroughly extinguish it out while pressing on the lid. CAUTION To reduce the chance of injury in the ashtray to release the catch. INTERIOR EQUIPMENT Rear ashtray To use the ashtray, pull on the snuffer bridge to prevent other cigarette butts from catching fire.
To remove the ashtray, pull it in case of an accident or sudden stop while driving, always close the lid completely. After using the ashtray, close the ashtray completely after using. 71 When finished with your cigarette, thoroughly extinguish it out while pressing on the lid. CAUTION To reduce the chance of injury in the ashtray to release the catch. INTERIOR EQUIPMENT Rear ashtray To use the ashtray, pull on the snuffer bridge to prevent other cigarette butts from catching fire.

Owners Manual
Page 90
INTERIOR EQUIPMENT GLOVEBOX To open . CAUTION To reduce the chance of injury in case of an accident or a sudden stop, always keep the glovebox door closed while driving. 72 To lock the glovebox door, insert the master key and turn it clockwise. With the tail lights on, the glovebox light will come on when the glovebox door is open the glovebox door, push the lock release button.
INTERIOR EQUIPMENT GLOVEBOX To open . CAUTION To reduce the chance of injury in case of an accident or a sudden stop, always keep the glovebox door closed while driving. 72 To lock the glovebox door, insert the master key and turn it clockwise. With the tail lights on, the glovebox light will come on when the glovebox door is open the glovebox door, push the lock release button.

Owners Manual
Page 91
INTERIOR EQUIPMENT GARAGE DOOR OPENER The garage door opener is manufactured under license from HomeLink R and can be programmed to operate garage doors, estate gates, security ...
INTERIOR EQUIPMENT GARAGE DOOR OPENER The garage door opener is manufactured under license from HomeLink R and can be programmed to operate garage doors, estate gates, security ...

Owners Manual
Page 92
... remaining buttons, repeat steps "1" through "3". Locate the "training" or "learning" button on the in .) of the button may require you want to the vehicle's opener. 3. INTERIOR EQUIPMENT 2. This includes any garage door opener that lacks the safety stop and reverse feature as required by the garage door opener manufacturer. 2. The signal...
... remaining buttons, repeat steps "1" through "3". Locate the "training" or "learning" button on the in .) of the button may require you want to the vehicle's opener. 3. INTERIOR EQUIPMENT 2. This includes any garage door opener that lacks the safety stop and reverse feature as required by the garage door opener manufacturer. 2. The signal...

Owners Manual
Page 93
... someone is no one around the moving door. FCC ID: CB2V94800 This device complies with FCC and DOC/MDC rules. The indicator light comes on. INTERIOR EQUIPMENT CAUTION When programming or operating the garage door opener, make sure there is caught. (b) Operating the garage door opener Push the appropriate button to...
... someone is no one around the moving door. FCC ID: CB2V94800 This device complies with FCC and DOC/MDC rules. The indicator light comes on. INTERIOR EQUIPMENT CAUTION When programming or operating the garage door opener, make sure there is caught. (b) Operating the garage door opener Push the appropriate button to...

Owners Manual
Page 94
INTERIOR EQUIPMENT CUP HOLDERS To use the cup holder: Push the end of the cup holder portion of the console box. Grasp the cup holder lever and pull it down completely. 76 The cup holder is designed for holding cups or drink-cans securely in its holes.
INTERIOR EQUIPMENT CUP HOLDERS To use the cup holder: Push the end of the cup holder portion of the console box. Grasp the cup holder lever and pull it down completely. 76 The cup holder is designed for holding cups or drink-cans securely in its holes.

Owners Manual
Page 95
INTERIOR EQUIPMENT CAUTION D Do not place anything else other than cups or drink-cans on the cup holder, as such item may be thrown about in the compartment and possibly injure people in use. 77 D To reduce the chance of injury in case of an accident or sudden stop while driving, keep the cup holder closed when not in the vehicle during sudden braking or an accident.
INTERIOR EQUIPMENT CAUTION D Do not place anything else other than cups or drink-cans on the cup holder, as such item may be thrown about in the compartment and possibly injure people in use. 77 D To reduce the chance of injury in case of an accident or sudden stop while driving, keep the cup holder closed when not in the vehicle during sudden braking or an accident.

Owners Manual
Page 96
Fix the floor mat with a locking clip. INTERIOR EQUIPMENT FLOOR MAT Use a floor mat of the correct size. If the floor carpet and floor mat have a hole, then it is designed for use with locking clip into the hole in the floor carpet. 78
Fix the floor mat with a locking clip. INTERIOR EQUIPMENT FLOOR MAT Use a floor mat of the correct size. If the floor carpet and floor mat have a hole, then it is designed for use with locking clip into the hole in the floor carpet. 78

Owners Manual
Page 97
INTERIOR EQUIPMENT CAUTION Make sure the floor mat is properly placed on the floor carpet. If the floor mat slips and interferes with the movement of the pedals during driving, it may cause an accident. 79
INTERIOR EQUIPMENT CAUTION Make sure the floor mat is properly placed on the floor carpet. If the floor mat slips and interferes with the movement of the pedals during driving, it may cause an accident. 79

Owners Manual
Page 98
... top of the instrument panel. CAUTION D Do not place anything on the tire pressure label. 80 D For better fuel economy, do not carry unnecessary weight. INTERIOR EQUIPMENT LUGGAGE STOWAGE PRECAUTIONS When stowing luggage or cargo in the vehicle, observe the following: D Put luggage or cargo in the trunk when at all...
... top of the instrument panel. CAUTION D Do not place anything on the tire pressure label. 80 D For better fuel economy, do not carry unnecessary weight. INTERIOR EQUIPMENT LUGGAGE STOWAGE PRECAUTIONS When stowing luggage or cargo in the vehicle, observe the following: D Put luggage or cargo in the trunk when at all...

Owners Manual
Page 135
.... they need cleaning, use bleach, dye, or abrasive cleaners - The entire assembly should be replaced. If they may severely weaken the belts. (See "Cleaning the interior" on page 409 for cuts, fraying, and loose parts. Check for instructions.) D Replace the belt assembly (including bolts) if it locks in raised position. Do...
.... they need cleaning, use bleach, dye, or abrasive cleaners - The entire assembly should be replaced. If they may severely weaken the belts. (See "Cleaning the interior" on page 409 for cuts, fraying, and loose parts. Check for instructions.) D Replace the belt assembly (including bolts) if it locks in raised position. Do...

Owners Manual
Page 143
This helps prevent damage to the seat belt, insert the tab into the buckle. It cannot protect an adult occupant or your Lexus dealer. When releasing the seat belt, press on the buckle release button on the extender, not on the buckle release buttons of the extender and ... future use the seat until the seat belt is not twisted. Front seat belt pretensioners 125 COMFORT ADJUSTMENT To connect the extender to the vehicle interior and extender itself. D If the seat belt does not function normally, immediately contact your child from properly latching the tab and buckle.
This helps prevent damage to the seat belt, insert the tab into the buckle. It cannot protect an adult occupant or your Lexus dealer. When releasing the seat belt, press on the buckle release button on the extender, not on the buckle release buttons of the extender and ... future use the seat until the seat belt is not twisted. Front seat belt pretensioners 125 COMFORT ADJUSTMENT To connect the extender to the vehicle interior and extender itself. D If the seat belt does not function normally, immediately contact your child from properly latching the tab and buckle.
