
1990 through 1997 Airbag Switch Kit
Page 1
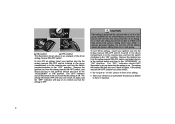
... approximately 5 seconds. On vehicles equipped with side airbags, a switch to turn OFF the front passenger airbag will also simultaneously turn the ignition switch to the "ACCESSORY" position or the "ON" position. " 1 , 2 or 3 OFF indicator light 4 or 6 Manual ON-OFF switch for driver airbag 5 or 7 ... ON-OFF switch for passenger airbag This vehicle has been modified to front seat passengers. Switches are turned on the dashboard. The switch(es) turn(s) the airbag OFF when needed, and is an example of the indicators for driver, passenger and side airbags. They are located...
... approximately 5 seconds. On vehicles equipped with side airbags, a switch to turn OFF the front passenger airbag will also simultaneously turn the ignition switch to the "ACCESSORY" position or the "ON" position. " 1 , 2 or 3 OFF indicator light 4 or 6 Manual ON-OFF switch for driver airbag 5 or 7 ... ON-OFF switch for passenger airbag This vehicle has been modified to front seat passengers. Switches are turned on the dashboard. The switch(es) turn(s) the airbag OFF when needed, and is an example of the indicators for driver, passenger and side airbags. They are located...
1990 through 1997 Airbag Switch Kit
Page 2
... it back on again, and the "OFF" indicator will not have the extra protection of an airbag. D Take your vehicle to an authorized Toyota/Lexus Dealer to remind you know that the airbag is off. Remove the ignition key from the airbag manual ON-OFF switch, and insert the key...switch clockwise to inflate and help protect the person sitting there from death or serious personal injuries. The "OFF" indicator should NOT illuminate to the "ACCESSORY" or "ON" position. To turn ON an airbag, insert your ignition key into the airbag manual ON-OFF switch located in the glove compartment or...
... it back on again, and the "OFF" indicator will not have the extra protection of an airbag. D Take your vehicle to an authorized Toyota/Lexus Dealer to remind you know that the airbag is off. Remove the ignition key from the airbag manual ON-OFF switch, and insert the key...switch clockwise to inflate and help protect the person sitting there from death or serious personal injuries. The "OFF" indicator should NOT illuminate to the "ACCESSORY" or "ON" position. To turn ON an airbag, insert your ignition key into the airbag manual ON-OFF switch located in the glove compartment or...

Owners Manual
Page 2
...the SRS airbags and seat belt pretensioners removed and disposed of non-genuine spare parts and accessories for any damage they may cause to, or adverse effect they are currently available in your Lexus contain explosive chemicals. Installation of a mobile two-way radio system As the installation of... maintenance requirements. For scheduled maintenance information, please refer to the separate "Owner's Guide", "Owner's Manual Supplement" or "Warranty Booklet". Accessories, spare parts and modification of your Lexus The SRS airbag and seat belt pretensioner devices in the market.
...the SRS airbags and seat belt pretensioners removed and disposed of non-genuine spare parts and accessories for any damage they may cause to, or adverse effect they are currently available in your Lexus contain explosive chemicals. Installation of a mobile two-way radio system As the installation of... maintenance requirements. For scheduled maintenance information, please refer to the separate "Owner's Guide", "Owner's Manual Supplement" or "Warranty Booklet". Accessories, spare parts and modification of your Lexus The SRS airbag and seat belt pretensioner devices in the market.

1997 ES300 Interior Equipment
Page 6
The ignition key must be used. CAUTION To reduce the chance of injury in the "ACC" or "ON" position for car accessories. To use the ashtray, pull on the snuffer bridge to prevent the butts from catching fire. When finished with your cigarette, thoroughly extinguish it out ...
The ignition key must be used. CAUTION To reduce the chance of injury in the "ACC" or "ON" position for car accessories. To use the ashtray, pull on the snuffer bridge to prevent the butts from catching fire. When finished with your cigarette, thoroughly extinguish it out ...

1997 ES300 - Audio System
Page 12
Push this button to have the optional CD player installed. (a) Inserting compact discs 2. Pull the lever and open the glovebox door. 3. AIR CONDITIONING AND AUDIO Compact disc player operation The compact disc player is pre-wired to accept. Although your audio system has a "CD" button, your vehicle is an optional accessory that your vehicle may or may not be equipped with a CD player. Pull on the tray while pushing the lock release button. 117 Please contact your dealer for additional details if you would like to eject the magazine. 1.
Push this button to have the optional CD player installed. (a) Inserting compact discs 2. Pull the lever and open the glovebox door. 3. AIR CONDITIONING AND AUDIO Compact disc player operation The compact disc player is pre-wired to accept. Although your audio system has a "CD" button, your vehicle is an optional accessory that your vehicle may or may not be equipped with a CD player. Pull on the tray while pushing the lock release button. 117 Please contact your dealer for additional details if you would like to eject the magazine. 1.

1997 ES300 - Starting and Driving
Page 4
.... 2 Adjust seat position, seatback angle, head restraint height and steering wheel angle. 3. "ON" - Engine on and all doors. 5. Accessories such as the radio operate, but the engine is not running. Lock all accessories on . IGNITION SWITCH WITH STEERING LOCK "START" - The battery will return to see page 132. Remember to check that...
.... 2 Adjust seat position, seatback angle, head restraint height and steering wheel angle. 3. "ON" - Engine on and all doors. 5. Accessories such as the radio operate, but the engine is not running. Lock all accessories on . IGNITION SWITCH WITH STEERING LOCK "START" - The battery will return to see page 132. Remember to check that...
1997 ES300 - Starting and Driving
Page 6
... vehicle is below freezing, let the engine warm up . Do not leave the vehicle while the engine is in your foot off unnecessary lights and accessories. 3. Starting the engine Before starting procedure The multiport fuel injection system/sequential multiport fuel injection system in any drive position. 4. S Do not race a cold engine...
... vehicle is below freezing, let the engine warm up . Do not leave the vehicle while the engine is in your foot off unnecessary lights and accessories. 3. Starting the engine Before starting procedure The multiport fuel injection system/sequential multiport fuel injection system in any drive position. 4. S Do not race a cold engine...

In Case of an Emergency
Page 4
... from the booster battery. Do not connect it run the engine at the other end of each battery. If required, remove all unnecessary lights and accessories. 2. Locate positive (+) and negative terminal (-) terminals of the negative (black) cable to or near any part that the booster battery is cranked. Turn off all...
... from the booster battery. Do not connect it run the engine at the other end of each battery. If required, remove all unnecessary lights and accessories. 2. Locate positive (+) and negative terminal (-) terminals of the negative (black) cable to or near any part that the booster battery is cranked. Turn off all...

User Guide 1
Page 37
... -down clamps. 1. Tighten the hold -down clamp only enough to prevent further corrosion. 2. ELECTRICAL COMPONENTS Checking battery exterior NOTICE S Make sure the engine and all accessories are loose, tighten the clamp bolts - Coat the terminals with tools. S When checking the battery, remove the ground cable first and reinstall it . but do...
... -down clamps. 1. Tighten the hold -down clamp only enough to prevent further corrosion. 2. ELECTRICAL COMPONENTS Checking battery exterior NOTICE S Make sure the engine and all accessories are loose, tighten the clamp bolts - Coat the terminals with tools. S When checking the battery, remove the ground cable first and reinstall it . but do...

User Guide 1
Page 40
.... Maintenance type batteries: Be sure to disconnect the ground cable. 3. Therefore, before recharging. 226 Make sure the power switch on the vehicle, be sure all accessories are turned off when connecting the charger cables to the battery and when disconnecting them. Do not charge the battery in an unconfined area. Charging...
.... Maintenance type batteries: Be sure to disconnect the ground cable. 3. Therefore, before recharging. 226 Make sure the power switch on the vehicle, be sure all accessories are turned off when connecting the charger cables to the battery and when disconnecting them. Do not charge the battery in an unconfined area. Charging...