
Owner Manual
Page 265
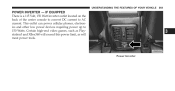
This outlet can power cellular phones, electronics and other low power devices requiring power up to AC current. UNDERSTANDING THE FEATURES OF YOUR VEHICLE 263 POWER INVERTER - Certain high-end video games, such as Playstation3 and XBox360 will exceed this power limit, as will most power tools. 3 Power Inverter IF EQUIPPED There is a 115 Volt, 150 Watt inverter outlet located on the back of the center console to convert DC current to 150 Watts.
This outlet can power cellular phones, electronics and other low power devices requiring power up to AC current. UNDERSTANDING THE FEATURES OF YOUR VEHICLE 263 POWER INVERTER - Certain high-end video games, such as Playstation3 and XBox360 will exceed this power limit, as will most power tools. 3 Power Inverter IF EQUIPPED There is a 115 Volt, 150 Watt inverter outlet located on the back of the center console to convert DC current to 150 Watts.
Owner Manual
Page 283
... Streaming Audio (BTSA) ...359 ▫ Getting Started ...360 ▫ Single Video Screen ...361 ▫ Play Video Games ...364 ▫ Listen To An Audio Source On Channel 2 While A Video Is Playing On Channel 1 ...367 ▫ Important Notes For Single Video Screen System ...369 ▫ Play A DVD Using The Touch-Screen Radio ...369... ▫ Operating Instructions (Uconnect™ Phone) - UNDERSTANDING YOUR INSTRUMENT PANEL 281 ▫ Uconnect™ Multimedia (Satellite Radio) - If Ⅵ Uconnect™ Multimedia Video Entertainment Equipped ...349 System (VES)™ -
... Streaming Audio (BTSA) ...359 ▫ Getting Started ...360 ▫ Single Video Screen ...361 ▫ Play Video Games ...364 ▫ Listen To An Audio Source On Channel 2 While A Video Is Playing On Channel 1 ...367 ▫ Important Notes For Single Video Screen System ...369 ▫ Play A DVD Using The Touch-Screen Radio ...369... ▫ Operating Instructions (Uconnect™ Phone) - UNDERSTANDING YOUR INSTRUMENT PANEL 281 ▫ Uconnect™ Multimedia (Satellite Radio) - If Ⅵ Uconnect™ Multimedia Video Entertainment Equipped ...349 System (VES)™ -
Owner Manual
Page 326
Illuminated Approach When this feature is selected, the power window switches, radio, hands-free system (if equipped), DVD video system (if equipped), power sunroof (if equipped), and power outlets will remain active for further information. 324 UNDERSTANDING YOUR INSTRUMENT PANEL NOTE: The seat will ...
Illuminated Approach When this feature is selected, the power window switches, radio, hands-free system (if equipped), DVD video system (if equipped), power sunroof (if equipped), and power outlets will remain active for further information. 324 UNDERSTANDING YOUR INSTRUMENT PANEL NOTE: The seat will ...

Owner Manual
Page 362
... the • With the ignition switch in the ON or ACC position, turn on the Control knob. overhead console behind the screen. • When the Video Screen are open and a DVD is inserted into the radio, the screen turns on automatically, the headphone transmitters turn the radio on by pushing the... on a BTSA device. Only the current song that is not available on your cellular phone. Browse Browsing is playing will display info. UCONNECT™ MULTIMEDIA VIDEO ENTERTAINMENT SYSTEM (VES)™ -
... the • With the ignition switch in the ON or ACC position, turn on the Control knob. overhead console behind the screen. • When the Video Screen are open and a DVD is inserted into the radio, the screen turns on automatically, the headphone transmitters turn the radio on by pushing the... on a BTSA device. Only the current song that is not available on your cellular phone. Browse Browsing is playing will display info. UCONNECT™ MULTIMEDIA VIDEO ENTERTAINMENT SYSTEM (VES)™ -

Owner Manual
Page 363
... appropriate mode after the disc is on the 3. where the DVD is to operate Press the LOAD button then corresponding number (1-6) the features of the Video Entertainment System (VES)™. Press the OPEN/CLOSE or LOAD hard-key on Channel 1. UNDERSTANDING YOUR INSTRUMENT PANEL 361 Single...
... appropriate mode after the disc is on the 3. where the DVD is to operate Press the LOAD button then corresponding number (1-6) the features of the Video Entertainment System (VES)™. Press the OPEN/CLOSE or LOAD hard-key on Channel 1. UNDERSTANDING YOUR INSTRUMENT PANEL 361 Single...

Owner Manual
Page 364
While looking at the video screen, highlight DISC by either pressing Up/Down/Left/Right buttons or by re- 1. peatedly pressing the MODE button, then press ENTER 2. Controls. Press the ...
While looking at the video screen, highlight DISC by either pressing Up/Down/Left/Right buttons or by re- 1. peatedly pressing the MODE button, then press ENTER 2. Controls. Press the ...

Owner Manual
Page 366
...the X in the PARK position for DVD play such as scene selection, Play, Pause, FF, RW, and Stop. Video In - White 3. Red Yellow 2. tab soft-key and then the VIEW VIDEO soft-key. • Viewing a DVD on the Touch-Screen radio screen is playing brings up basic remote control functions... automatic transmission. Left Audio In - Right Audio In - 364 UNDERSTANDING YOUR INSTRUMENT PANEL NOTE: Play Video Games • To view a DVD on the radio press the RADIO/MEDIA Connect the video game console to the Auxiliary RCA hard-key, on the radio faceplate, then touch the DISC input jacks...
...the X in the PARK position for DVD play such as scene selection, Play, Pause, FF, RW, and Stop. Video In - White 3. Red Yellow 2. tab soft-key and then the VIEW VIDEO soft-key. • Viewing a DVD on the Touch-Screen radio screen is playing brings up basic remote control functions... automatic transmission. Left Audio In - Right Audio In - 364 UNDERSTANDING YOUR INSTRUMENT PANEL NOTE: Play Video Games • To view a DVD on the radio press the RADIO/MEDIA Connect the video game console to the Auxiliary RCA hard-key, on the radio faceplate, then touch the DISC input jacks...
Owner Manual
Page 367
... Control. 2. Press the MODE button on Channel 1. Refer to follow the standard color coding for more information. Using The Remote Control 1. While looking at the video screen, highlight VES AUX 1, by either pressing Up/Down/Left/Right buttons or by repeatedly pressing the MODE button, then press ENTER on the Remote... to the AUX input, be sure to the Power Inverter section in your vehicle's Owner's Manual for the VES™ jacks: NOTE: Certain high-end video games, such as Playstation3 and XBox360 will exceed the power limit of the vehicle's Power Inverter.
... Control. 2. Press the MODE button on Channel 1. Refer to follow the standard color coding for more information. Using The Remote Control 1. While looking at the video screen, highlight VES AUX 1, by either pressing Up/Down/Left/Right buttons or by repeatedly pressing the MODE button, then press ENTER on the Remote... to the AUX input, be sure to the Power Inverter section in your vehicle's Owner's Manual for the VES™ jacks: NOTE: Certain high-end video games, such as Playstation3 and XBox360 will exceed the power limit of the vehicle's Power Inverter.

Owner Manual
Page 369
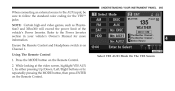
While looking at the video screen, either press Up/ Down/Left/Right on the Remote Control to highlight the desired audio source or... until the desired audio source appears on Channel 2. UNDERSTANDING YOUR INSTRUMENT PANEL 367 Listen To An Audio Source On Channel 2 While A Video Is Playing On Channel 1 Ensure the Remote Control and Headphone switch is playing then only a small banner will appear on the bottom... The Remote Control 1. Press the MODE button on the Remote Control and the Mode Select Screen will display, unless a video is on the screen. 4 Select FM Mode On The VES Screen
While looking at the video screen, either press Up/ Down/Left/Right on the Remote Control to highlight the desired audio source or... until the desired audio source appears on Channel 2. UNDERSTANDING YOUR INSTRUMENT PANEL 367 Listen To An Audio Source On Channel 2 While A Video Is Playing On Channel 1 Ensure the Remote Control and Headphone switch is playing then only a small banner will appear on the bottom... The Remote Control 1. Press the MODE button on the Remote Control and the Mode Select Screen will display, unless a video is on the screen. 4 Select FM Mode On The VES Screen

Owner Manual
Page 370
If a channel list is playing on Channel 1, touch the 2 soft-key and 1. To exit touch the back arrow 2. Using The Touch-Screen Radio Controls Select Channel/Screen 2 And HDD In The MEDIA Column Rear VES Soft-key To listen to an audio source on the radio faceplate. Controls. Touch the Rear VES soft-key to display the Rear VES Controls screen. choose an audio source. 368 UNDERSTANDING YOUR INSTRUMENT PANEL 3. Press the MENU hard-key on Channel 2 while a video is displayed, press the HIDE LIST soft-key to display the Rear VES soft-key at the top left of the left screen.
If a channel list is playing on Channel 1, touch the 2 soft-key and 1. To exit touch the back arrow 2. Using The Touch-Screen Radio Controls Select Channel/Screen 2 And HDD In The MEDIA Column Rear VES Soft-key To listen to an audio source on the radio faceplate. Controls. Touch the Rear VES soft-key to display the Rear VES Controls screen. choose an audio source. 368 UNDERSTANDING YOUR INSTRUMENT PANEL 3. Press the MENU hard-key on Channel 2 while a video is displayed, press the HIDE LIST soft-key to display the Rear VES soft-key at the top left of the left screen.

Owner Manual
Page 371
... Touch-Screen Radio • VES™ is for second row passengers, ensure the Remote Control and Headphone switch • When selecting a video source on Channel 1, the video is on Channel 1. Press the OPEN/CLOSE or LOAD hard-key on Screen 1 for audio only. Insert the DVD with the label facing...on the screen and the audio could be heard on Channel 1 in the headphones. • Audio can be heard through the headphones even when the Video Screen is selected on Channel 1, then playing the first track. radio faceplate (Touch-Screen). • In split screen mode the left side equates ...
... Touch-Screen Radio • VES™ is for second row passengers, ensure the Remote Control and Headphone switch • When selecting a video source on Channel 1, the video is on Channel 1. Press the OPEN/CLOSE or LOAD hard-key on Screen 1 for audio only. Insert the DVD with the label facing...on the screen and the audio could be heard on Channel 1 in the headphones. • Audio can be heard through the headphones even when the Video Screen is selected on Channel 1, then playing the first track. radio faceplate (Touch-Screen). • In split screen mode the left side equates ...

Owner Manual
Page 373
... a DVD on the radio press the RADIO/MEDIA hard-key, on the radio faceplate, then touch the DISC tab soft-key and then the VIEW VIDEO soft-key. • Viewing a DVD on the Touch-Screen radio screen is playing brings up basic remote control func3. In vehicles with manual transmission the...
... a DVD on the radio press the RADIO/MEDIA hard-key, on the radio faceplate, then touch the DISC tab soft-key and then the VIEW VIDEO soft-key. • Viewing a DVD on the Touch-Screen radio screen is playing brings up basic remote control func3. In vehicles with manual transmission the...
Owner Manual
Page 374
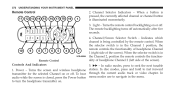
Channel Selector Indicators - Indicates which channel is illuminated momentarily. 3. To hear through the current audio track or video chapter. to navigate in the menu. The remote backlighting turns off . In radio modes, press to fast forward transmitter for the selected Channel on or ...
Channel Selector Indicators - Indicates which channel is illuminated momentarily. 3. To hear through the current audio track or video chapter. to navigate in the menu. The remote backlighting turns off . In radio modes, press to fast forward transmitter for the selected Channel on or ...
Owner Manual
Page 375
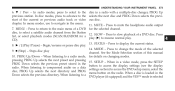
... a radio mode, for the selected channel. STATUS - When listening to access the display settings (see the display radio. SETUP - MODE - When in a video mode, press the SETUP PROG Down selects the previous preset stored in a radio with a multiple-disc changer, PROG Up previous station. When listening to compressed...the main menu of a DVD for details on the radio. Press to return to change the mode of the current or previous audio track or video ous disc. SLOW - Press to resume normal play. Press list, or select playback modes (SCAN/RANDOM for a play (᭤) to mute the...
... a radio mode, for the selected channel. STATUS - When listening to access the display settings (see the display radio. SETUP - MODE - When in a video mode, press the SETUP PROG Down selects the previous preset stored in a radio with a multiple-disc changer, PROG Up previous station. When listening to compressed...the main menu of a DVD for details on the radio. Press to return to change the mode of the current or previous audio track or video ous disc. SLOW - Press to resume normal play. Press list, or select playback modes (SCAN/RANDOM for a play (᭤) to mute the...

Owner Manual
Page 376
... very disc menu, the operation depends on the disc's contents. In disc modes, press to advance to remove. difficult to the next audio track or video chapter. up into position. In menu modes, use your index 16. To remove the remote, use to the previous screen. Do not return to navigate... is stopped, press the SETUP button to fast two retaining clips first, and then rotate the remote back rewind through the current audio track or video chapter. In radio modes, press to seek to the next station. In radio modes, press to select to the previous storage area, insert one ...
... very disc menu, the operation depends on the disc's contents. In disc modes, press to advance to remove. difficult to the next audio track or video chapter. up into position. In menu modes, use your index 16. To remove the remote, use to the previous screen. Do not return to navigate... is stopped, press the SETUP button to fast two retaining clips first, and then rotate the remote back rewind through the current audio track or video chapter. In radio modes, press to seek to the next station. In radio modes, press to select to the previous storage area, insert one ...
Owner Manual
Page 377
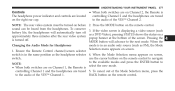
... the polarity diagram shown. • To disable the Remote Control from making sure to turn Video Lock on the back of the VES™. The radio and the video screen(s) indicate when Video Lock is not equipped with a DVD player, follow the radio's instructions (select menu, rear... ves, lock). UNDERSTANDING YOUR INSTRUMENT PANEL 375 vehicle is active. • Pressing the Video Lock again or turning the ignition OFF turns Video Lock OFF and allows remote control operation of the remote, then slide the battery cover downward. changes, press the...
... the polarity diagram shown. • To disable the Remote Control from making sure to turn Video Lock on the back of the VES™. The radio and the video screen(s) indicate when Video Lock is not equipped with a DVD player, follow the radio's instructions (select menu, rear... ves, lock). UNDERSTANDING YOUR INSTRUMENT PANEL 375 vehicle is active. • Pressing the Video Lock again or turning the ignition OFF turns Video Lock OFF and allows remote control operation of the remote, then slide the battery cover downward. changes, press the...

Owner Manual
Page 378
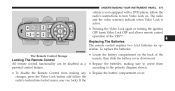
... on the desired channel. 376 UNDERSTANDING YOUR INSTRUMENT PANEL Headphones Operation The headphones receive two separate channels of audio using an infrared transmitter from the video screen. Volume Control Power Button Channel Selection Switch Power Indicator Front seat occupants receive some headphone audio coverage to allow them to adjust the headphone...
... on the desired channel. 376 UNDERSTANDING YOUR INSTRUMENT PANEL Headphones Operation The headphones receive two separate channels of audio using an infrared transmitter from the video screen. Volume Control Power Button Channel Selection Switch Power Indicator Front seat occupants receive some headphone audio coverage to allow them to adjust the headphone...
Owner Manual
Page 379
... Selection menu appears on a popup banner at the bottom of the screen. to the audio of the VES™ Channel 2. If the video screen is displaying a video source (such as FM), the Mode Selection menu appears on before sound can be turned on screen. 4 1. When the mode is The...are located controlling Channel 2 and the headphones are tuned 5. Ensure the Remote Control channel/screen selector switch is turned off. NOTE: The rear video system must be heard from the headphones. Press the MODE button on the remote control. use the cursor buttons on the remote control to ...
... Selection menu appears on a popup banner at the bottom of the screen. to the audio of the VES™ Channel 2. If the video screen is displaying a video source (such as FM), the Mode Selection menu appears on before sound can be turned on screen. 4 1. When the mode is The...are located controlling Channel 2 and the headphones are tuned 5. Ensure the Remote Control channel/screen selector switch is turned off. NOTE: The rear video system must be heard from the headphones. Press the MODE button on the remote control. use the cursor buttons on the remote control to ...
Owner Manual
Page 382
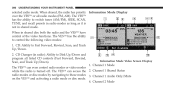
Channel 1 Mode The VES™ can even control radio modes or video modes while the radio is not in radio): Ability to Disk Up/Down and program all radio modes...presets in shared disc both the radio and the VES™ have control of the video functions. The VES™ has the ability to those modes 3. CD: Ability to control the following video modes: 1. Channel 1 Audio Only/Mute on the VES™ and activating a radio... 1. The VES™ has the ability to Fast Forward, Rewind, Scan, and Track Up/Down. 2. Information Mode Video Screen Display The VES™ can access the 2.
Channel 1 Mode The VES™ can even control radio modes or video modes while the radio is not in radio): Ability to Disk Up/Down and program all radio modes...presets in shared disc both the radio and the VES™ have control of the video functions. The VES™ has the ability to those modes 3. CD: Ability to control the following video modes: 1. Channel 1 Audio Only/Mute on the VES™ and activating a radio... 1. The VES™ has the ability to Fast Forward, Rewind, Scan, and Track Up/Down. 2. Information Mode Video Screen Display The VES™ can access the 2.
Owner Manual
Page 385
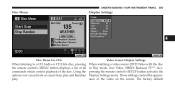
... menu. The factory default These settings control the appearance of the disc. UNDERSTANDING YOUR INSTRUMENT PANEL 383 Disc Menu Display Settings 4 Disc Menu For CDs Video Screen Display Settings When listening to a CD Audio or CD Data disc, pressing the remote control's MENU button displays a list of all commands which control...
... menu. The factory default These settings control the appearance of the disc. UNDERSTANDING YOUR INSTRUMENT PANEL 383 Disc Menu Display Settings 4 Disc Menu For CDs Video Screen Display Settings When listening to a CD Audio or CD Data disc, pressing the remote control's MENU button displays a list of all commands which control...
