
Owner Manual
Page 105
... ▫ Parksense System Usage Precautions ...235 Ⅵ Parkview Rear Back Up Camera - If Equipped ...237 ▫ Turning Parkview On Or Off - With Navigation/Multimedia Radio ...239 3
... ▫ Parksense System Usage Precautions ...235 Ⅵ Parkview Rear Back Up Camera - If Equipped ...237 ▫ Turning Parkview On Or Off - With Navigation/Multimedia Radio ...239 3
Owner Manual
Page 106
...; Security ...249 ▫ Troubleshooting Tips ...250 ▫ General Information ...251 Ⅵ Power Sunroof - Manual Mode ...253 ▫ Pinch Protect Feature ...253 ▫ Venting Sunroof - Without Navigation/Multimedia Radio ...240 Ⅵ Overhead Console ...240 ▫ Front Map/Reading Lights ...240 ▫ Courtesy Lights ...241 ▫ Sunglass Bin Door ...242 Ⅵ Garage Door...
...; Security ...249 ▫ Troubleshooting Tips ...250 ▫ General Information ...251 Ⅵ Power Sunroof - Manual Mode ...253 ▫ Pinch Protect Feature ...253 ▫ Venting Sunroof - Without Navigation/Multimedia Radio ...240 Ⅵ Overhead Console ...240 ▫ Front Map/Reading Lights ...240 ▫ Courtesy Lights ...241 ▫ Sunglass Bin Door ...242 Ⅵ Garage Door...
Owner Manual
Page 125
... VEHICLE 123 Operation Voice commands can be used . example, you can also break the commands into two voice commands: "Phonebook" and "New Entry". Refer to navigate through the available options. Please remember, the Uconnect™ Phone works best when you talk in this section. options at any prompt if you ask...
... VEHICLE 123 Operation Voice commands can be used . example, you can also break the commands into two voice commands: "Phonebook" and "New Entry". Refer to navigate through the available options. Please remember, the Uconnect™ Phone works best when you talk in this section. options at any prompt if you ask...
Owner Manual
Page 137
is used for use of the Uconnect™ Phone. to leave a This method is also to be too quick for navigating through an automated Working With Automated Systems customer service center menu structure, and to press numbers on the mobile phone keypad while You can ...also send stored Uconnect™ phonebook entries navigating through an automated telephone system. The mail system or an automated service, such as tones for pagers of numbers, followed by the word "Send". ...
is used for use of the Uconnect™ Phone. to leave a This method is also to be too quick for navigating through an automated Working With Automated Systems customer service center menu structure, and to press numbers on the mobile phone keypad while You can ...also send stored Uconnect™ phonebook entries navigating through an automated telephone system. The mail system or an automated service, such as tones for pagers of numbers, followed by the word "Send". ...
Owner Manual
Page 143
"800" must be supported. • When navigating through an automated system such as voice mail, or when sending a page, at the end of • In a convertible vehicle, system performance may not always ...
"800" must be supported. • When navigating through an automated system such as voice mail, or when sending a page, at the end of • In a convertible vehicle, system performance may not always ...
Owner Manual
Page 239
...CAMERA - Failure to do so can result in injury or damage to vehicles or obstacles because the hitch ball will be displayed on the Navigation/Multimedia radio display screen along with the ParkView Rear Back Up Camera that allows you to see an on its size and shape..., giving a false indication that the ball mount and hitch ball assembly is disconnected from the vehicle when the vehicle is exited and the navigation or audio screen appears again. 3 The image will disappear. UNDERSTANDING THE FEATURES OF YOUR VEHICLE 237 WARNING! (Continued) • Before using the ...
...CAMERA - Failure to do so can result in injury or damage to vehicles or obstacles because the hitch ball will be displayed on the Navigation/Multimedia radio display screen along with the ParkView Rear Back Up Camera that allows you to see an on its size and shape..., giving a false indication that the ball mount and hitch ball assembly is disconnected from the vehicle when the vehicle is exited and the navigation or audio screen appears again. 3 The image will disappear. UNDERSTANDING THE FEATURES OF YOUR VEHICLE 237 WARNING! (Continued) • Before using the ...

Owner Manual
Page 241
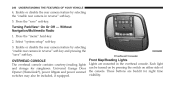
... path. (Continued) Do not cover the lens. Turning ParkViewா On Or Off - NOTE: If snow, ice, mud, or any foreign substance builds up . With Navigation/Multimedia Radio 1. UNDERSTANDING THE FEATURES OF YOUR VEHICLE 239 WARNING! Press the "camera setup" soft-key. 3 CAUTION! • To avoid vehicle damage, ParkView should...
... path. (Continued) Do not cover the lens. Turning ParkViewா On Or Off - NOTE: If snow, ice, mud, or any foreign substance builds up . With Navigation/Multimedia Radio 1. UNDERSTANDING THE FEATURES OF YOUR VEHICLE 239 WARNING! Press the "camera setup" soft-key. 3 CAUTION! • To avoid vehicle damage, ParkView should...
Owner Manual
Page 242
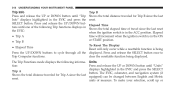
... can be included, if equipped. switches may also be turned on either side of Opener (HomeLink), power liftgate and power sunroof the console. Without Navigation/Multimedia Radio 1. Select "system setup" soft-key. 3. Enable or disable the rear camera feature by pressing the switch on by selecting the "enable rear camera...
... can be included, if equipped. switches may also be turned on either side of Opener (HomeLink), power liftgate and power sunroof the console. Without Navigation/Multimedia Radio 1. Select "system setup" soft-key. 3. Enable or disable the rear camera feature by pressing the switch on by selecting the "enable rear camera...
Owner Manual
Page 316
... Press and release the UP or DOWN button until "Trip Info" displays highlighted in the EVIC and press the SELECT button. The EVIC, odometer, and navigation system (if Shows the total distance traveled for Trip A since the last reset when the ignition switch is in the EVIC: • Trip A • Trip...
... Press and release the UP or DOWN button until "Trip Info" displays highlighted in the EVIC and press the SELECT button. The EVIC, odometer, and navigation system (if Shows the total distance traveled for Trip A since the last reset when the ignition switch is in the EVIC: • Trip A • Trip...
Owner Manual
Page 322
... or the lands). check-mark is reached. Select Language When in this display you continue, the information will unlock when functions and the navigation system (if equipped). Then, as you may select one of the the feature showing the system has been activated or the check-mark is... begins moving, a warning Nav-Turn By Turn message SETUP NOT AVAILABLE, is followed in three When this feature is selected, the navigation system utilizes voice commands, guiding through the language choices. the SELECT button until Setup tion is removed showing the system has been deactivated.
... or the lands). check-mark is reached. Select Language When in this display you continue, the information will unlock when functions and the navigation system (if equipped). Then, as you may select one of the the feature showing the system has been activated or the check-mark is... begins moving, a warning Nav-Turn By Turn message SETUP NOT AVAILABLE, is followed in three When this feature is selected, the navigation system utilizes voice commands, guiding through the language choices. the SELECT button until Setup tion is removed showing the system has been deactivated.
Owner Manual
Page 374
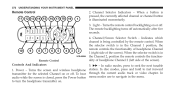
... off automatically after five seconds. 4. When the selector switch is in the menu. Power - Indicates which channel is illuminated momentarily. 3. In radio modes, press to navigate in the Channel 2, position the remote controls the functionality of headphone Channel 2 (left side of the screen).
... off automatically after five seconds. 4. When the selector switch is in the menu. Power - Indicates which channel is illuminated momentarily. 3. In radio modes, press to navigate in the Channel 2, position the remote controls the functionality of headphone Channel 2 (left side of the screen).
Owner Manual
Page 375
..., use to access the DVD setup menu, select the disc, PROG Up selects the next directory and PROG menu button on a data settings section) to navigate in the Down selects the previous directory. SLOW - CD). 13. STATUS - When listening to compressed audio on the radio. Begin/resume or pause disc play...
..., use to access the DVD setup menu, select the disc, PROG Up selects the next directory and PROG menu button on a data settings section) to navigate in the Down selects the previous directory. SLOW - CD). 13. STATUS - When listening to compressed audio on the radio. Begin/resume or pause disc play...

Owner Manual
Page 376
... to pull the remote straight down as it snaps back into its 17. ᭣᭣ - In menu modes, use your index 16. BACK - When navigating a DVDs try to fast two retaining clips first, and then rotate the remote back rewind through the current audio track or video chapter. In menu...Storage the DVD Setup menu. (see the DVD Setup Menu of the remote into the tunable station. To return the remote back into position. When navigating in storage compartment for the remote control which is accessible when the manual.) screen is stopped, press the SETUP button to pull and rotate the...
... to pull the remote straight down as it snaps back into its 17. ᭣᭣ - In menu modes, use your index 16. BACK - When navigating a DVDs try to fast two retaining clips first, and then rotate the remote back rewind through the current audio track or video chapter. In menu...Storage the DVD Setup menu. (see the DVD Setup Menu of the remote into the tunable station. To return the remote back into position. When navigating in storage compartment for the remote control which is accessible when the manual.) screen is stopped, press the SETUP button to pull and rotate the...
Owner Manual
Page 379
... Controls • When both switches are on the remote control. 3. Changing the Audio Mode for Headphones 2. use the cursor buttons on the remote control to navigate to the available modes and press the ENTER button to the audio of the VES™ Channel 1. If the video screen is controlling Channel 1 and...
... Controls • When both switches are on the remote control. 3. Changing the Audio Mode for Headphones 2. use the cursor buttons on the remote control to navigate to the available modes and press the ENTER button to the audio of the VES™ Channel 1. If the video screen is controlling Channel 1 and...
Owner Manual
Page 382
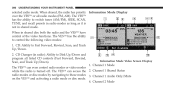
... 1. CD: Ability to those modes 3. Information Mode Video Screen Display The VES™ can access the 2. Channel 1 Shared Status radio modes or disc modes by navigating to Fast Forward, Rewind, Scan, and Track Up/Down. 2. Channel 1 Mode When in radio modes as long as it is turned off. Channel 1 Audio Only...
... 1. CD: Ability to those modes 3. Information Mode Video Screen Display The VES™ can access the 2. Channel 1 Shared Status radio modes or disc modes by navigating to Fast Forward, Rewind, Scan, and Track Up/Down. 2. Channel 1 Mode When in radio modes as long as it is turned off. Channel 1 Audio Only...
Owner Manual
Page 384
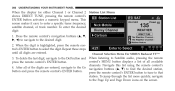
...This screen makes it easy to the desired digit. 2. Press the remote control's navigation buttons to navigate to enter a specific tuner frequency, satellite channel, or track number. To delete the last digit, navigate to the Del button and When listening to Satellite audio, pressing the remote control's... activates a numeric keypad menu. Repeat these steps until all digits are entered, navigate to the Go navigation buttons (᭡, ᭢) to the Page Up and Page Down icons on the screen. channels. Navigate this list using the remote control's 4. To jump through the list more quickly...
...This screen makes it easy to the desired digit. 2. Press the remote control's navigation buttons to navigate to enter a specific tuner frequency, satellite channel, or track number. To delete the last digit, navigate to the Del button and When listening to Satellite audio, pressing the remote control's... activates a numeric keypad menu. Repeat these steps until all digits are entered, navigate to the Go navigation buttons (᭡, ᭢) to the Page Up and Page Down icons on the screen. channels. Navigate this list using the remote control's 4. To jump through the list more quickly...
Owner Manual
Page 386
control's MODE button. gation buttons (᭡, ᭢) to select an item, then press the remote control's navigation buttons (᭤, ᭣) to change the • When the screen is reopened, the video screen will automatically select the next available audio mode without using ...
control's MODE button. gation buttons (᭡, ᭢) to select an item, then press the remote control's navigation buttons (᭤, ᭣) to change the • When the screen is reopened, the video screen will automatically select the next available audio mode without using ...
User Guide
Page 2
... always the driver's responsibility to comply with the important features of your Owner's Manual, Navigation/Media Center Manuals, Warranty Booklets, Tire Warranty and 24-Hour Towing Assistance (new vehicles ... enclosed contains your vehicle. We hope you find yourself unable to devote your dealer. Jeep® is the safe operation of the vehicle. Driving while distracted can result in...collision. The driver's primary responsibility is a registered trademark of Chrysler Group LLC. © 2012 Chrysler Group LLC. If you find it useful. If you are the first registered retail owner...
... always the driver's responsibility to comply with the important features of your Owner's Manual, Navigation/Media Center Manuals, Warranty Booklets, Tire Warranty and 24-Hour Towing Assistance (new vehicles ... enclosed contains your vehicle. We hope you find yourself unable to devote your dealer. Jeep® is the safe operation of the vehicle. Driving while distracted can result in...collision. The driver's primary responsibility is a registered trademark of Chrysler Group LLC. © 2012 Chrysler Group LLC. If you find it useful. If you are the first registered retail owner...
User Guide
Page 51
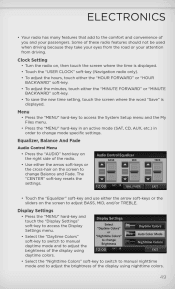
... specific settings. Clock Setting • Turn the radio on, then touch the screen where the time is displayed. • Touch the "USER CLOCK" soft-key (Navigation radio only). • To adjust the hours, touch either the "HOUR FORWARD" or "HOUR BACKWARD" soft-key. • To adjust the minutes, touch either the...
... specific settings. Clock Setting • Turn the radio on, then touch the screen where the time is displayed. • Touch the "USER CLOCK" soft-key (Navigation radio only). • To adjust the hours, touch either the "HOUR FORWARD" or "HOUR BACKWARD" soft-key. • To adjust the minutes, touch either the...
User Guide
Page 56
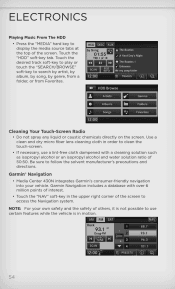
...lint-free cloth dampened with a cleaning solution such as isopropyl alcohol or an isopropyl alcohol and water solution ratio of the screen to access the Navigation system. Use a clean and dry micro fiber lens cleaning cloth in the upper right corner of 50:50. NOTE: For your vehicle. ...Cleaning Your Touch-Screen Radio • Do not spray any liquid or caustic chemicals directly on the screen. Garmin Navigation includes a database with over 6 million points of interest. • Touch the "NAV" soft-key in order to clean the touch-screen. • ...
...lint-free cloth dampened with a cleaning solution such as isopropyl alcohol or an isopropyl alcohol and water solution ratio of the screen to access the Navigation system. Use a clean and dry micro fiber lens cleaning cloth in the upper right corner of 50:50. NOTE: For your vehicle. ...Cleaning Your Touch-Screen Radio • Do not spray any liquid or caustic chemicals directly on the screen. Garmin Navigation includes a database with over 6 million points of interest. • Touch the "NAV" soft-key in order to clean the touch-screen. • ...

