
UConnect Manual
Page 5
... and effective manner. You can play a variety of enjoyment. Ensure that all persons read this manual. Uconnect™ Phone is designed to control your favorite DVDs, watch SIRIUS Backseat TV™ (if give your family years of standard video games or audio devices.
... and effective manner. You can play a variety of enjoyment. Ensure that all persons read this manual. Uconnect™ Phone is designed to control your favorite DVDs, watch SIRIUS Backseat TV™ (if give your family years of standard video games or audio devices.

UConnect Manual
Page 42
... (If Equipped)...45 Ⅵ Dual Video Screen - Caravan/Town & Country Only (If Equipped) ...56 ▫ Play a DVD ...46 ▫ Play a DVD Using The Touch-Screen Radio ...56 ▫ View Sirius Backseat TV™ ...48 ▫ Play a DVD Using The VES™ Player ▫ Play Video Games ...51 (If Equipped) ...59 Video Entertainment System...
... (If Equipped)...45 Ⅵ Dual Video Screen - Caravan/Town & Country Only (If Equipped) ...56 ▫ Play a DVD ...46 ▫ Play a DVD Using The Touch-Screen Radio ...56 ▫ View Sirius Backseat TV™ ...48 ▫ Play a DVD Using The VES™ Player ▫ Play Video Games ...51 (If Equipped) ...59 Video Entertainment System...

UConnect Manual
Page 45
... console : Lift up to the Dual Video Screen section for more information. • Screen located in the center of the center armrest and pull the DVD screen up on the rear of the overhead console behind the screen(s). 44 Uconnect™ Multimedia - On Caravan and Town and Country vehicles with Dual...
... console : Lift up to the Dual Video Screen section for more information. • Screen located in the center of the center armrest and pull the DVD screen up on the rear of the overhead console behind the screen(s). 44 Uconnect™ Multimedia - On Caravan and Town and Country vehicles with Dual...

UConnect Manual
Page 46
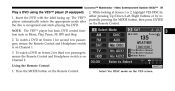
... the Power button, located on the • The Remote Control far left, or by pushing the ON/OFF Volume NOTE: Typically there are open and a DVD is inserted into the VES™ player, the screen(s) turn(s) on automatically, the headphone transmitters turn on the Remote Control and Headphones refers to Screen...
... the Power button, located on the • The Remote Control far left, or by pushing the ON/OFF Volume NOTE: Typically there are open and a DVD is inserted into the VES™ player, the screen(s) turn(s) on automatically, the headphone transmitters turn on the Remote Control and Headphones refers to Screen...

UConnect Manual
Page 47
... loaded (Non-Touch-Screen). 2. Press the MODE button on the VES screen. Select DISC mode on the Remote Control. on Channel 1. Insert the DVD with the label facing up. While looking at the video screen, highlight DISC by either pressing Up/Down/Left/Right buttons or by re1. Using...or LOAD hard-key on the peatedly pressing the MODE button, then press ENTER radio faceplate (Touch-Screen). Or Play a DVD Press the LOAD button then corresponding number (1-6) where the DVD is recognized and displays the menu screen or starts playing the first tract. 3. NOTE: The VES™ system will ...
... loaded (Non-Touch-Screen). 2. Press the MODE button on the VES screen. Select DISC mode on the Remote Control. on Channel 1. Insert the DVD with the label facing up. While looking at the video screen, highlight DISC by either pressing Up/Down/Left/Right buttons or by re1. Using...or LOAD hard-key on the peatedly pressing the MODE button, then press ENTER radio faceplate (Touch-Screen). Or Play a DVD Press the LOAD button then corresponding number (1-6) where the DVD is recognized and displays the menu screen or starts playing the first tract. 3. NOTE: The VES™ system will ...
UConnect Manual
Page 49
... the MODE button on the radio faceplate, then touch the DISC Channel 1. In either pressing the Up/Down/Left/Right buttons or by position for DVD play such as scene selection, Play, Pause, FF, RW, and Stop. must be engaged. • Touching the screen on the Touch-Screen radio... screen is 1. Video Entertainment System (VES)™ NOTE: View SIRIUS Backseat TV™ • To view a DVD on the radio press the RADIO/MEDIA Ensure the Remote Control and Headphone switch is playing brings up basic remote control functions for vehicles with...
... the MODE button on the radio faceplate, then touch the DISC Channel 1. In either pressing the Up/Down/Left/Right buttons or by position for DVD play such as scene selection, Play, Pause, FF, RW, and Stop. must be engaged. • Touching the screen on the Touch-Screen radio... screen is 1. Video Entertainment System (VES)™ NOTE: View SIRIUS Backseat TV™ • To view a DVD on the radio press the RADIO/MEDIA Ensure the Remote Control and Headphone switch is playing brings up basic remote control functions for vehicles with...
UConnect Manual
Page 56
soft-key at the top left of stereo audio choose an audio source. Selecting a video source (DVD) will not show the video on the screen. • When selecting a video source on Channel 1, the video will display on the screen and the audio ...
soft-key at the top left of stereo audio choose an audio source. Selecting a video source (DVD) will not show the video on the screen. • When selecting a video source on Channel 1, the video will display on the screen and the audio ...

UConnect Manual
Page 57
... the Touch-Screen Radio 1. either pressing Up/Down/Left/Right buttons or by radio faceplate (Touch-Screen). To watch a DVD on Screen 2 for second row passengers, ensure the Remote Control and Headphone switch is recognized and displays the menu screen or starts playing the ... mode after the disc is on • The Remote Control Channel 2. • The Touch-Screen Radio (If Equipped) Using the Remote Control. To watch a DVD on Screen 1 for third row passengers, ensure the Remote Control and Headphone switch is on Channel 1. While looking at Screen 1 or 2, highlight DISC by re2...
... the Touch-Screen Radio 1. either pressing Up/Down/Left/Right buttons or by radio faceplate (Touch-Screen). To watch a DVD on Screen 2 for second row passengers, ensure the Remote Control and Headphone switch is recognized and displays the menu screen or starts playing the ... mode after the disc is on • The Remote Control Channel 2. • The Touch-Screen Radio (If Equipped) Using the Remote Control. To watch a DVD on Screen 1 for third row passengers, ensure the Remote Control and Headphone switch is on Channel 1. While looking at Screen 1 or 2, highlight DISC by re2...
UConnect Manual
Page 59
To exit touch the back arrow at the • To view a DVD on the radio press the RADIO/MEDIA hard-key, on a Touch-Screen radio while a DVD is playing brings up basic remote control functions for DVD play such as scene selection, Play, Pause, FF, RW, and Stop. In vehicles with automatic ...transmission. Video Entertainment System (VES)™ 3. tab soft-key and then the VIEW VIDEO soft-key. • Viewing a DVD on the Touch-Screen radio screen is not available in all states/provinces, and the vehicle must be stopped, and the shifter must be in...
To exit touch the back arrow at the • To view a DVD on the radio press the RADIO/MEDIA hard-key, on a Touch-Screen radio while a DVD is playing brings up basic remote control functions for DVD play such as scene selection, Play, Pause, FF, RW, and Stop. In vehicles with automatic ...transmission. Video Entertainment System (VES)™ 3. tab soft-key and then the VIEW VIDEO soft-key. • Viewing a DVD on the Touch-Screen radio screen is not available in all states/provinces, and the vehicle must be stopped, and the shifter must be in...
UConnect Manual
Page 60
... Screen 2 for second row passengers, ensure the Remote Control and Headphone switch is on the Remote Control. Insert the DVD with the label facing up. Using the Remote Control 1. The VES™ peatedly pressing the MODE button, then press ENTER player ...automatically selects the appropriate mode after on Channel 1. 3. To watch a DVD on Screen 1 for third row passengers, ensure the Remote Control and Headphone switch is recognized and starts playing the DVD. Press the MODE button on Channel 2. Video Entertainment System (VES)™ 59 2. the disc...
... Screen 2 for second row passengers, ensure the Remote Control and Headphone switch is on the Remote Control. Insert the DVD with the label facing up. Using the Remote Control 1. The VES™ peatedly pressing the MODE button, then press ENTER player ...automatically selects the appropriate mode after on Channel 1. 3. To watch a DVD on Screen 1 for third row passengers, ensure the Remote Control and Headphone switch is recognized and starts playing the DVD. Press the MODE button on Channel 2. Video Entertainment System (VES)™ 59 2. the disc...
UConnect Manual
Page 62
... must be engaged. While looking at Screen 1 or 2, highlight TV be in the Ves column. 3 1. Video Entertainment System (VES)™ 61 • Viewing a DVD on the Touch-Screen radio screen is on the radio faceplate, then touch the DISC tab soft-key and then the VIEW VIDEO soft-key.... Uconnect™ Multimedia - NOTE: • To view a DVD on the radio press the RADIO/MEDIA hard-key, on Channel 1 for Screen 1 or Channel 2 for vehicles with automatic transmission. In vehicles with manual ...
... must be engaged. While looking at Screen 1 or 2, highlight TV be in the Ves column. 3 1. Video Entertainment System (VES)™ 61 • Viewing a DVD on the Touch-Screen radio screen is on the radio faceplate, then touch the DISC tab soft-key and then the VIEW VIDEO soft-key.... Uconnect™ Multimedia - NOTE: • To view a DVD on the radio press the RADIO/MEDIA hard-key, on Channel 1 for Screen 1 or Channel 2 for vehicles with automatic transmission. In vehicles with manual ...
UConnect Manual
Page 71
... Channel 1 position, the for a CD). When the selector switch is illuminated momentarily. Begin/resume or pause disc play ality of screen Channel 2 (left side of a DVD 4. In radio. Video Entertainment System (VES)™ 2. In menu modes, use to the start of the screen). Channel/Screen Selector Switch - Stops disc play . In...
... Channel 1 position, the for a CD). When the selector switch is illuminated momentarily. Begin/resume or pause disc play ality of screen Channel 2 (left side of a DVD 4. In radio. Video Entertainment System (VES)™ 2. In menu modes, use to the start of the screen). Channel/Screen Selector Switch - Stops disc play . In...

UConnect Manual
Page 72
... - MUTE - In menu modes use to 11. When in a radio with a multiple-disc changer, PROG Up button to access the display settings (see the DVD selects the next disc and PROG Down selects the previ- When a disc is stopped, press the SETUP disc in a video mode, press the SETUP button... to access the DVD Setup menu. (see the display settings section) or the DVD Setup menu. When listening to display the current status. Setup Menu of this manual.) ous disc. 16. menu. 15. for...
... - MUTE - In menu modes use to 11. When in a radio with a multiple-disc changer, PROG Up button to access the display settings (see the DVD selects the next disc and PROG Down selects the previ- When a disc is stopped, press the SETUP disc in a video mode, press the SETUP button... to access the DVD Setup menu. (see the display settings section) or the DVD Setup menu. When listening to display the current status. Setup Menu of this manual.) ous disc. 16. menu. 15. for...
UConnect Manual
Page 74
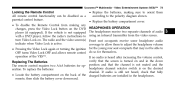
turn Video Lock on the DVD HEADPHONES OPERATION player (if equipped). coverage to allow them All remote control functionality can be able to OFF turns Video Lock OFF and allows remote ... compartment on the desired eration. If the vehicle is not equipped The headphones receive two separate channels of the VES™. operation of audio with a DVD player, follow the radio's instructions to using an infrared transmitter from making sure to orient them to the polarity diagram shown. If no audio is...
turn Video Lock on the DVD HEADPHONES OPERATION player (if equipped). coverage to allow them All remote control functionality can be able to OFF turns Video Lock OFF and allows remote ... compartment on the desired eration. If the vehicle is not equipped The headphones receive two separate channels of the VES™. operation of audio with a DVD player, follow the radio's instructions to using an infrared transmitter from making sure to orient them to the polarity diagram shown. If no audio is...
UConnect Manual
Page 76
Pressing the downward. Selection menu appears on the remote control. The warranty is in an audio only source (such as a DVD Video), pressing DISPLAY shows the status on the headphones, and then slide the battery cover a popup banner at the bottom of the Mode Selection menu, ...
Pressing the downward. Selection menu appears on the remote control. The warranty is in an audio only source (such as a DVD Video), pressing DISPLAY shows the status on the headphones, and then slide the battery cover a popup banner at the bottom of the Mode Selection menu, ...
UConnect Manual
Page 82
...Random play. To reset all commands which control playback of the disc. Display Settings When watching a video source (DVD Video with the disc in the remote player. These settings control the appearance of DVD being watched in Play mode, Aux Video, SIRIUS Backseat TV™, etc.), pressing the remote control's SETUP ... original settings, select the Default Settings menu option and press the remote control's ENTER button. 3 Video Screen Display Settings Disc Features control the remote DVD player's (if equipped) settings of the video on the screen. Uconnect™ Multimedia -
...Random play. To reset all commands which control playback of the disc. Display Settings When watching a video source (DVD Video with the disc in the remote player. These settings control the appearance of DVD being watched in Play mode, Aux Video, SIRIUS Backseat TV™, etc.), pressing the remote control's SETUP ... original settings, select the Default Settings menu option and press the remote control's ENTER button. 3 Video Screen Display Settings Disc Features control the remote DVD player's (if equipped) settings of the video on the screen. Uconnect™ Multimedia -

UConnect Manual
Page 83
...the channel with MP3 and WMA compressed audio display menu or media. If the headphones are installed in the headphones. Disc Formats The VES™ DVD player is no audio heard, verify • Video CDs (MPEG-1 video compression) that fully charged batteries are turned on, press This will automatically...To listen to only audio portion of discs (12 mm or 8 mm diameter): • To change the current audio mode, press the remote • DVD-Video discs (MPEG-2 video compression) (see control's MODE button. format files If the screen is closed : • Set the audio to turn back ...
...the channel with MP3 and WMA compressed audio display menu or media. If the headphones are installed in the headphones. Disc Formats The VES™ DVD player is no audio heard, verify • Video CDs (MPEG-1 video compression) that fully charged batteries are turned on, press This will automatically...To listen to only audio portion of discs (12 mm or 8 mm diameter): • To change the current audio mode, press the remote • DVD-Video discs (MPEG-2 video compression) (see control's MODE button. format files If the screen is closed : • Set the audio to turn back ...

UConnect Manual
Page 84
... in a compatible format and is recorded in CD-Audio or Video-CD format, or as a CD-ROM containing MP3 or WMA files. DVD Audio Support When a DVD-Audio disc is inserted in level, remember to lower the volume before changing the disc or to play. If you record a disc using ... the player, the disc will be able to account for the disc to another mode. These region codes must match in a lowered apparent volume level. DVD-ROM discs (either pressed or recorded) are playable. 3 To help avoid playback problems, use the following guidelines when recording discs. • Open sessions...
... in a compatible format and is recorded in CD-Audio or Video-CD format, or as a CD-ROM containing MP3 or WMA files. DVD Audio Support When a DVD-Audio disc is inserted in level, remember to lower the volume before changing the disc or to play. If you record a disc using ... the player, the disc will be able to account for the disc to another mode. These region codes must match in a lowered apparent volume level. DVD-ROM discs (either pressed or recorded) are playable. 3 To help avoid playback problems, use the following guidelines when recording discs. • Open sessions...

UConnect Manual
Page 85
...playback, do not use the Compressed Audio Files (MP3 and WMA) ISO-9660 (Level 1 or Level 2), Joliet, or Romeo format. playable in the VES™ DVD player, check with the extension Љ.mp3Љ or Љ.MP3Љ and WMA the Video_TS portion of 512 files and 99 • The... is capable of files. each track number is with the extension Љ.wmaЉ or Љ.WMAЉ. files must always • Mixed media recordable DVD formats will renumber the tracks so disc, become stuck, and cause permanent damage to folders per CD-R and CD-RW disc. The recommended method for...
...playback, do not use the Compressed Audio Files (MP3 and WMA) ISO-9660 (Level 1 or Level 2), Joliet, or Romeo format. playable in the VES™ DVD player, check with the extension Љ.mp3Љ or Љ.MP3Љ and WMA the Video_TS portion of 512 files and 99 • The... is capable of files. each track number is with the extension Љ.wmaЉ or Љ.WMAЉ. files must always • Mixed media recordable DVD formats will renumber the tracks so disc, become stuck, and cause permanent damage to folders per CD-R and CD-RW disc. The recommended method for...

UConnect Manual
Page 86
... own files, the recommended If a disc has a damaged track which results in audible or fixed bit rate for MP3 files is between 64 and 192Kbps. DVD player's ᭡ button to advance to the next file, or the ᭢ button to return to the start of the • To change the ... not play the start of the disc is player will automatically skip the file and Disc Errors begin playing the next available file. If the DVD player is automatically ejected. Uconnect™ Multimedia - beginning of the disc and attempt to continue playing the disc by between 96 and 192Kbps visible errors...
... own files, the recommended If a disc has a damaged track which results in audible or fixed bit rate for MP3 files is between 64 and 192Kbps. DVD player's ᭡ button to advance to the next file, or the ᭢ button to return to the start of the • To change the ... not play the start of the disc is player will automatically skip the file and Disc Errors begin playing the next available file. If the DVD player is automatically ejected. Uconnect™ Multimedia - beginning of the disc and attempt to continue playing the disc by between 96 and 192Kbps visible errors...


