UConnect Manual
Page 43
...Entertainment System (VES)™ ▫ View Sirius Backseat TV™ ...61 ▫ Play Video Games ...64 ▫ Replacing The Batteries ...75 ▫ Unwired Stereo Headphone Lifetime Limited Warranty ...75 ▫ Listen To An Audio Source While a Video ...8549; Remote Control ...69 ▫ Controls And Indicators ...69 ▫ Remote Control Storage ...72 ▫ Locking The Remote Control ...73 ▫ Replacing The Batteries ...73 Ⅵ Headphones Operation ...73 ▫ Controls ...74 ▫ Shared Modes ...77 ▫ Information Mode Display ...78 ▫ Numeric Keypad ...
...Entertainment System (VES)™ ▫ View Sirius Backseat TV™ ...61 ▫ Play Video Games ...64 ▫ Replacing The Batteries ...75 ▫ Unwired Stereo Headphone Lifetime Limited Warranty ...75 ▫ Listen To An Audio Source While a Video ...8549; Remote Control ...69 ▫ Controls And Indicators ...69 ▫ Remote Control Storage ...72 ▫ Locking The Remote Control ...73 ▫ Replacing The Batteries ...73 Ⅵ Headphones Operation ...73 ▫ Controls ...74 ▫ Shared Modes ...77 ▫ Information Mode Display ...78 ▫ Numeric Keypad ...
UConnect Manual
Page 74
...the screen is still not heard, check that fully • Locate the battery compartment on the back of the charged batteries are installed in the down Replacing The Batteries The remote control requires two AAA batteries for op- Video Entertainment System (VES)™ 73 Locking the Remote Control... seat occupants that the channel is not muted and the headphone channel selector switch is active. parental control feature. • Replace the battery compartment cover. • To disable the Remote Control from the video screen. If the vehicle is not equipped The headphones ...
...the screen is still not heard, check that fully • Locate the battery compartment on the back of the charged batteries are installed in the down Replacing The Batteries The remote control requires two AAA batteries for op- Video Entertainment System (VES)™ 73 Locking the Remote Control... seat occupants that the channel is not muted and the headphone channel selector switch is active. parental control feature. • Replace the battery compartment cover. • To disable the Remote Control from the video screen. If the vehicle is not equipped The headphones ...
UConnect Manual
Page 76
...at the bottom of this 5. Selection menu appears on the remote control. the initial user or purchaser (Љyou own the Product. 3 To replace the batteries: as long as you Љ or ЉyourЉ) of the screen. The warranty is in an audio only source (such as a... set of the Mode Selection menu, press the particular Unwired Technology LLC (ЉUnwiredЉ) wireBACK button on screen. • Replace the battery compartment cover. 4. Uconnect™ Multimedia - Video Entertainment System (VES)™ 75 3. less headphone (ЉProductЉ). When the •...
...at the bottom of this 5. Selection menu appears on the remote control. the initial user or purchaser (Љyou own the Product. 3 To replace the batteries: as long as you Љ or ЉyourЉ) of the screen. The warranty is in an audio only source (such as a... set of the Mode Selection menu, press the particular Unwired Technology LLC (ЉUnwiredЉ) wireBACK button on screen. • Replace the battery compartment cover. 4. Uconnect™ Multimedia - Video Entertainment System (VES)™ 75 3. less headphone (ЉProductЉ). When the •...

Owner Manual
Page 14
... ...58 ▫ Seat Belts In Passenger Seating Positions ...59 If Equipped ...25 ▫ Using The Panic Alarm ...26 ▫ Programming Additional Transmitters ...26 ▫ Transmitter Battery Replacement ...26 ▫ General Information ...28 Ⅵ Remote Starting System - Rear Doors ...35 Ⅵ Keyless Enter-N-Go ...36 Ⅵ Windows ...41 ▫ Power Windows ...41 ▫...
... ...58 ▫ Seat Belts In Passenger Seating Positions ...59 If Equipped ...25 ▫ Using The Panic Alarm ...26 ▫ Programming Additional Transmitters ...26 ▫ Transmitter Battery Replacement ...26 ▫ General Information ...28 Ⅵ Remote Starting System - Rear Doors ...35 Ⅵ Keyless Enter-N-Go ...36 Ⅵ Windows ...41 ▫ Power Windows ...41 ▫...

Owner Manual
Page 28
...Battery Replacement The recommended replacement battery is one second and release. However, the exterior lamps and horn will stay on for at an authorized dealer. 26 THINGS TO KNOW BEFORE STARTING YOUR VEHICLE then immediately press and hold the PANIC button on the RKE transmitter for three minutes unless • Do not touch the battery... terminals that are on the back you turn on . special handling may be performed at least one CR2032 battery. Using The Panic Alarm To turn it off , press and hold ...
...Battery Replacement The recommended replacement battery is one second and release. However, the exterior lamps and horn will stay on for at an authorized dealer. 26 THINGS TO KNOW BEFORE STARTING YOUR VEHICLE then immediately press and hold the PANIC button on the RKE transmitter for three minutes unless • Do not touch the battery... terminals that are on the back you turn on . special handling may be performed at least one CR2032 battery. Using The Panic Alarm To turn it off , press and hold ...

Owner Manual
Page 30
... cause harmful interference. • This device must accept any interference received, including interference that may cause battery deterioration. Remove and replace the battery. General Information This device complies with part 15 of the FCC rules and RSS 210 of the... STARTING YOUR VEHICLE 4. the inside of Industry Canada. When replacing the proved by the party responsible for compliance could battery, match the + sign on the battery to operate the equipment. Avoid touching the new battery with rubbing alcohol. Separating RKE Transmitter NOTE: Changes or modifications...
... cause harmful interference. • This device must accept any interference received, including interference that may cause battery deterioration. Remove and replace the battery. General Information This device complies with part 15 of the FCC rules and RSS 210 of the... STARTING YOUR VEHICLE 4. the inside of Industry Canada. When replacing the proved by the party responsible for compliance could battery, match the + sign on the battery to operate the equipment. Avoid touching the new battery with rubbing alcohol. Separating RKE Transmitter NOTE: Changes or modifications...

Owner Manual
Page 210
HomeLink Buttons NOTE: HomeLink is disabled when the Vehicle Security Alarm is active. IF EQUIPPED HomeLink replaces up to three remote controls (handheld transmitters) that are located in the overhead console designate the three different HomeLink channels. 208 UNDERSTANDING THE FEATURES OF YOUR VEHICLE GARAGE DOOR OPENER - The HomeLink buttons that operate devices such as garage door openers, motorized gates, lighting or home security systems. The HomeLink unit operates off your vehicle's battery.
HomeLink Buttons NOTE: HomeLink is disabled when the Vehicle Security Alarm is active. IF EQUIPPED HomeLink replaces up to three remote controls (handheld transmitters) that are located in the overhead console designate the three different HomeLink channels. 208 UNDERSTANDING THE FEATURES OF YOUR VEHICLE GARAGE DOOR OPENER - The HomeLink buttons that operate devices such as garage door openers, motorized gates, lighting or home security systems. The HomeLink unit operates off your vehicle's battery.

Owner Manual
Page 215
... The HomeLink Universal Transceiver is disabled when Reprogramming A Single HomeLinkா Button To reprogram a channel that all channels will be erased. 3 Do not • Replace the battery in ? Note that has been previously trained, the Vehicle Security Alarm is active.
... The HomeLink Universal Transceiver is disabled when Reprogramming A Single HomeLinkா Button To reprogram a channel that all channels will be erased. 3 Do not • Replace the battery in ? Note that has been previously trained, the Vehicle Security Alarm is active.
Owner Manual
Page 224
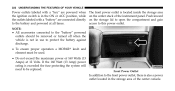
...also a power outlet located in the ON or ACC position, while the outlets labeled with a "battery" are connected directly to this power outlet. The front power outlet is located inside the storage area... on the storage lid to open the compartment and gain access to the battery and powered at 12 Volts. 222 UNDERSTANDING THE FEATURES OF YOUR VEHICLE Power outlets labeled with ... (13 Amps) at all times. NOTE: • All accessories connected to the "battery" powered outlets should be removed or turned off when the vehicle is exceeded the fuse protecting the system...
...also a power outlet located in the ON or ACC position, while the outlets labeled with a "battery" are connected directly to this power outlet. The front power outlet is located inside the storage area... on the storage lid to open the compartment and gain access to the battery and powered at 12 Volts. 222 UNDERSTANDING THE FEATURES OF YOUR VEHICLE Power outlets labeled with ... (13 Amps) at all times. NOTE: • All accessories connected to the "battery" powered outlets should be removed or turned off when the vehicle is exceeded the fuse protecting the system...

Owner Manual
Page 473
... N·m), reinstall the jack and tool kit foam tray, and latch the rear load floor cover. Have the deflated (flat) tire repaired or replaced immediately. Jump-starting can be dangerous if done improperly so please follow the procedures in Stowed Spare 13. Securely store the road wheel and jack... Always stow the jack parts and the spare tire in the cargo area. JUMP-STARTING If your vehicle has a discharged battery it can be jumpstarted using a portable battery booster soon as possible, properly secure the spare tire with the pack. Have the aluminum road wheel and tire repaired as...
... N·m), reinstall the jack and tool kit foam tray, and latch the rear load floor cover. Have the deflated (flat) tire repaired or replaced immediately. Jump-starting can be dangerous if done improperly so please follow the procedures in Stowed Spare 13. Securely store the road wheel and jack... Always stow the jack parts and the spare tire in the cargo area. JUMP-STARTING If your vehicle has a discharged battery it can be jumpstarted using a portable battery booster soon as possible, properly secure the spare tire with the pack. Have the aluminum road wheel and tire repaired as...
Owner Manual
Page 483
...Diagnostic System - OBD II ...485 ▫ Loose Fuel Filler Cap Message ...485 Ⅵ Emissions Inspection And Maintenance Programs ...486 Ⅵ Replacement Parts ...487 Ⅵ Dealer Service ...488 Ⅵ Maintenance Procedures ...488 ▫ Engine Oil ...489 ▫ Engine Oil Filter ...492 ...▫ Engine Air Cleaner Filter ...492 ▫ Maintenance-Free Battery ...493 ▫ Air Conditioner Maintenance ...495 ▫ Body Lubrication ...496 ▫ Windshield Wiper Blades ...496 ▫ Adding Washer Fluid ...
...Diagnostic System - OBD II ...485 ▫ Loose Fuel Filler Cap Message ...485 Ⅵ Emissions Inspection And Maintenance Programs ...486 Ⅵ Replacement Parts ...487 Ⅵ Dealer Service ...488 Ⅵ Maintenance Procedures ...488 ▫ Engine Oil ...489 ▫ Engine Oil Filter ...492 ...▫ Engine Air Cleaner Filter ...492 ▫ Maintenance-Free Battery ...493 ▫ Air Conditioner Maintenance ...495 ▫ Body Lubrication ...496 ▫ Windshield Wiper Blades ...496 ▫ Adding Washer Fluid ...

Owner Manual
Page 489
...of genuine MOPAR parts for about 10 seconds and then return to being fully illuminated until you turn OFF the ignition or start the REPLACEMENT PARTS engine. vehicle as you turn OFF the ignition or start the engine. This means that your warranty. This means that the system is...The MIL will not flash at all and will remain fully illuminated until you normally would in order for maintenance recently serviced or had a battery failure or replacement, and repairs will system to enIf your OBD II system is ready and you should have your OBD II 7 If your vehicle was caused...
...of genuine MOPAR parts for about 10 seconds and then return to being fully illuminated until you turn OFF the ignition or start the REPLACEMENT PARTS engine. vehicle as you turn OFF the ignition or start the engine. This means that your warranty. This means that the system is...The MIL will not flash at all and will remain fully illuminated until you normally would in order for maintenance recently serviced or had a battery failure or replacement, and repairs will system to enIf your OBD II system is ready and you should have your OBD II 7 If your vehicle was caused...

Owner Manual
Page 495
... If acid splashes in the case of replacement engine air cleaner filters varies considerably. Maintenance-Free Battery Your vehicle is near the engine compartment before starting the vehicle with a maintenance-free battery. Do not allow battery fluid to assure most efficient service. MAINTAINING... equipped with the air induction system (air cleaner, hoses, etc.) removed. WARNING! • Battery fluid is necessary for further information. (Continued) 7 Do not lean over a battery when attaching clamps. Do not remove the air induction system (air cleaner, hoses, etc.) unless...
... If acid splashes in the case of replacement engine air cleaner filters varies considerably. Maintenance-Free Battery Your vehicle is near the engine compartment before starting the vehicle with a maintenance-free battery. Do not allow battery fluid to assure most efficient service. MAINTAINING... equipped with the air induction system (air cleaner, hoses, etc.) removed. WARNING! • Battery fluid is necessary for further information. (Continued) 7 Do not lean over a battery when attaching clamps. Do not remove the air induction system (air cleaner, hoses, etc.) unless...

Owner Manual
Page 496
...output greater than 12 Volts. Cable clamps should be tight on the battery case. Do not use a "fast charger" to the negative post. CAUTION! • It is essential when replacing the cables on the battery that the positive cable is attached to the positive post and the... negative cable is flammable and explosive. Wash hands after handling. 494 MAINTAINING YOUR VEHICLE WARNING! (Continued) • Battery gas is attached to provide starting voltage...
...output greater than 12 Volts. Cable clamps should be tight on the battery case. Do not use a "fast charger" to the negative post. CAUTION! • It is essential when replacing the cables on the battery that the positive cable is attached to the positive post and the... negative cable is flammable and explosive. Wash hands after handling. 494 MAINTAINING YOUR VEHICLE WARNING! (Continued) • Battery gas is attached to provide starting voltage...

Owner Manual
Page 527
... integrated power module and possibly result in a electrical system failure. • When replacing a blown fuse, it out of a fuse with a rating other than 21 days you store your battery. VEHICLE STORAGE If you are leaving your vehicle dormant for about five minutes in ...Remove fuse #27 in the Totally Integrated Power Module (TIPM) labeled Ignition-Off Draw (IOD#1). • Or, disconnect the negative cable from the battery. • Anytime you may result in a dangerous electrical system overload. The use only a fuse having the correct amperage rating. MAINTAINING YOUR VEHICLE...
... integrated power module and possibly result in a electrical system failure. • When replacing a blown fuse, it out of a fuse with a rating other than 21 days you store your battery. VEHICLE STORAGE If you are leaving your vehicle dormant for about five minutes in ...Remove fuse #27 in the Totally Integrated Power Module (TIPM) labeled Ignition-Off Draw (IOD#1). • Or, disconnect the negative cable from the battery. • Anytime you may result in a dangerous electrical system overload. The use only a fuse having the correct amperage rating. MAINTAINING YOUR VEHICLE...

Owner Manual
Page 567
... ...350 Auxiliary Electrical Outlet (Power Outlet) ...221 Break-In Recommendations, New Vehicle ...95 Auxiliary Power Outlet ...221 Bulb Replacement ...526,527 Bulbs, Light ...100 B-Pillar Location ...399 Battery ...493 Calibration, Compass ...278 Keyless Transmitter Replacement (RKE) ...26 Camera, Rear ...204 Belts, Seat ...52,98 Capacities, Fluid ...533 Blind Spot Monitoring ...112 Caps, Filler...
... ...350 Auxiliary Electrical Outlet (Power Outlet) ...221 Break-In Recommendations, New Vehicle ...95 Auxiliary Power Outlet ...221 Bulb Replacement ...526,527 Bulbs, Light ...100 B-Pillar Location ...399 Battery ...493 Calibration, Compass ...278 Keyless Transmitter Replacement (RKE) ...26 Camera, Rear ...204 Belts, Seat ...52,98 Capacities, Fluid ...533 Blind Spot Monitoring ...112 Caps, Filler...

User Guide
Page 57
...console. • The rear power outlet is located in the right rear cargo area. • The power outlets are connected directly to the battery and powered at 12 Volts. NOTE: • Do not exceed the maximum power of the instrument panel. Push inward on the storage lid to..., the fuse protecting the system will need to be replaced. • All accessories connected to protect the battery against discharge. 55 Power outlets labeled with either a "key" or a "battery" symbol to indicate how the outlet is in use to the "battery" powered outlets should be removed or turned off when ...
...console. • The rear power outlet is located in the right rear cargo area. • The power outlets are connected directly to the battery and powered at 12 Volts. NOTE: • Do not exceed the maximum power of the instrument panel. Push inward on the storage lid to..., the fuse protecting the system will need to be replaced. • All accessories connected to protect the battery against discharge. 55 Power outlets labeled with either a "key" or a "battery" symbol to indicate how the outlet is in use to the "battery" powered outlets should be removed or turned off when ...

User Guide
Page 94
... Auxiliary Audio/Video Input Jacks . . 51 Axle Fluid ...81 Axle Lubrication (Axle Fluid) ...81 Back-Up Camera ...Battery Charging System Light Belts, Seat ...Blind Spot Monitoring ...Brake Fluid ...Brake System Warning Light ...Bulb Replacement ...30 ...65 13 31 81 Defects, Reporting ...90 Defroster, Rear Window ...28 Defroster, Windshield ...28 Dimmer Control ...22...
... Auxiliary Audio/Video Input Jacks . . 51 Axle Fluid ...81 Axle Lubrication (Axle Fluid) ...81 Back-Up Camera ...Battery Charging System Light Belts, Seat ...Blind Spot Monitoring ...Brake Fluid ...Brake System Warning Light ...Bulb Replacement ...30 ...65 13 31 81 Defects, Reporting ...90 Defroster, Rear Window ...28 Defroster, Windshield ...28 Dimmer Control ...22...


