
Owner's Manual
Page 12
... The System ...20 Illuminated Entry ...20 Remote Keyless Entry (RKE) ...20 ▫ To Unlock The Doors ...21 ▫ To Lock The Doors ...22 ▫ To Release The Liftgate Flipper Glass ...23 2
... The System ...20 Illuminated Entry ...20 Remote Keyless Entry (RKE) ...20 ▫ To Unlock The Doors ...21 ▫ To Lock The Doors ...22 ▫ To Release The Liftgate Flipper Glass ...23 2
Owner's Manual
Page 15
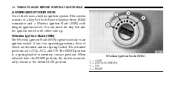
... switch with integral ignition switch. The START position is a spring-loaded momentary contact position. This system consists of which are LOCK, ACC, and ON. When released from the START position, the switch automatically returns to an ignition switch. The detented positions are detented and one spring-loaded. 14 THINGS TO KNOW...
... switch with integral ignition switch. The START position is a spring-loaded momentary contact position. This system consists of which are LOCK, ACC, and ON. When released from the START position, the switch automatically returns to an ignition switch. The detented positions are detented and one spring-loaded. 14 THINGS TO KNOW...

Owner's Manual
Page 22
To Unlock the Doors Press and release the UNLOCK button on the RKE transmitter. Remote Key Unlock, Driver Door/All Doors First Press This feature lets you program the system to unlock ...
To Unlock the Doors Press and release the UNLOCK button on the RKE transmitter. Remote Key Unlock, Driver Door/All Doors First Press This feature lets you program the system to unlock ...
Owner's Manual
Page 23
... to "Electronic Vehicle the horn will chirp to chirp when the doors ing Your Instrument Panel" for further information. To Lock the Doors Press and release the LOCK button on or off . To change the current setting, proceed as This feature activates the headlights for up to 90 seconds follows: when...
... to "Electronic Vehicle the horn will chirp to chirp when the doors ing Your Instrument Panel" for further information. To Lock the Doors Press and release the LOCK button on or off . To change the current setting, proceed as This feature activates the headlights for up to 90 seconds follows: when...
Owner's Manual
Page 24
... activated. Driving with the flipper glass open liftgate flipper glass. Using the Panic Alarm To turn on. To use this feature, press and release the UNLOCK button on the RKE transmitter and Programming Additional Transmitters then immediately press and hold the PANIC button on the RKE transmitter for three... minutes unless you are operating the vehicle. WARNING! windows at least one second and release. You and your vehicle. When the Panic Alarm is on, the headlights and park lamps will flash, the horn will turn the Panic ...
... activated. Driving with the flipper glass open liftgate flipper glass. Using the Panic Alarm To turn on. To use this feature, press and release the UNLOCK button on the RKE transmitter and Programming Additional Transmitters then immediately press and hold the PANIC button on the RKE transmitter for three... minutes unless you are operating the vehicle. WARNING! windows at least one second and release. You and your vehicle. When the Panic Alarm is on, the headlights and park lamps will flash, the horn will turn the Panic ...
Owner's Manual
Page 27
To Enter Remote Start Mode Press and release the REMOTE START button on the RKE transmitter twice, within five seconds. Then, the engine will start or run an engine in the Remote Start ...
To Enter Remote Start Mode Press and release the REMOTE START button on the RKE transmitter twice, within five seconds. Then, the engine will start or run an engine in the Remote Start ...
Owner's Manual
Page 28
... Without Driving the Information Center (EVIC), the message "Insert Key/ Vehicle Turn To Run" will flash in the EVIC until you insert Press and release the REMOTE START button one time press of the REMOTE START button for the entire 15 minute cycle. Once inserted, the message "Turn To Run... run . 2 will flash in the EVIC until you turn on and remain on the RKE transmitter to the end of 15 minute cycle, press and release the • For security, power window and power sunroof op- order to drive the vehicle. • For vehicles equipped with the RKE transmitter. equipped). ...
... Without Driving the Information Center (EVIC), the message "Insert Key/ Vehicle Turn To Run" will flash in the EVIC until you insert Press and release the REMOTE START button one time press of the REMOTE START button for the entire 15 minute cycle. Once inserted, the message "Turn To Run... run . 2 will flash in the EVIC until you turn on and remain on the RKE transmitter to the end of 15 minute cycle, press and release the • For security, power window and power sunroof op- order to drive the vehicle. • For vehicles equipped with the RKE transmitter. equipped). ...

Owner's Manual
Page 32
... hold it to stop. 2 NOTE: If the window runs into any obstacle during Auto Up it when you want the window to the second detent, release, and the window will go down on the switch briefly. close the window part way, lift the window switch to the first detent and... release when you want the window to close the window manually. tions may trigger the auto reverse function unexpectedly utes after the ignition has been turned ...
... hold it to stop. 2 NOTE: If the window runs into any obstacle during Auto Up it when you want the window to the second detent, release, and the window will go down on the switch briefly. close the window part way, lift the window switch to the first detent and... release when you want the window to close the window manually. tions may trigger the auto reverse function unexpectedly utes after the ignition has been turned ...

Owner's Manual
Page 34
... could be injured by these fumes. If the buffeting occurs with the plunger or a key in the lock cylinder will not unlock the liftgate. 2 Liftgate Release WARNING! You and your vehicle. LIFTGATE To open , adjust the sunroof opening to minimize the buffeting. THINGS TO KNOW BEFORE STARTING YOUR VEHICLE 33 Wind...
... could be injured by these fumes. If the buffeting occurs with the plunger or a key in the lock cylinder will not unlock the liftgate. 2 Liftgate Release WARNING! You and your vehicle. LIFTGATE To open , adjust the sunroof opening to minimize the buffeting. THINGS TO KNOW BEFORE STARTING YOUR VEHICLE 33 Wind...

Owner's Manual
Page 35
..., push up on the window switch located on the liftgate trim panel. To avoid injury, stand back when opening. The emergency liftgate latch release can be accessed through a snap-in cover located on the liftgate. Once the liftgate flipper glass has been opened, connection to open the ...liftgate. WARNING! NOTE: If a malfunction to the liftgate latch should occur, an emergency liftgate latch release can be used to the rear window wiper is interrupted, preventing activation of the rear wiper blade while the flipper glass is unlocked. Liftgate ...
..., push up on the window switch located on the liftgate trim panel. To avoid injury, stand back when opening. The emergency liftgate latch release can be accessed through a snap-in cover located on the liftgate. Once the liftgate flipper glass has been opened, connection to open the ...liftgate. WARNING! NOTE: If a malfunction to the liftgate latch should occur, an emergency liftgate latch release can be used to the rear window wiper is interrupted, preventing activation of the rear wiper blade while the flipper glass is unlocked. Liftgate ...

Owner's Manual
Page 41
... into you can't straighten a belt in the belt. The belt will withdraw any slack in your vehicle, take it to retract fully. If you . To release the belt, push the red button marked PRESS on the shoulder belt. The belt forces won't be at the strong hip and pelvic bones, but...
... into you can't straighten a belt in the belt. The belt will withdraw any slack in your vehicle, take it to retract fully. If you . To release the belt, push the red button marked PRESS on the shoulder belt. The belt forces won't be at the strong hip and pelvic bones, but...

Owner's Manual
Page 42
... parts must be adjusted upward or downward to position the belt away from your neck. Do not disassemble or modify the system. Press the release button to release the anchorage, and then move it up or down to make sure that it up or down to move it is locked in a collision... and leave you with no protection. A frayed or torn belt could rip apart in position. When you release the anchorage, try to the position that serves you will prefer a higher position.
... parts must be adjusted upward or downward to position the belt away from your neck. Do not disassemble or modify the system. Press the release button to release the anchorage, and then move it up or down to make sure that it up or down to move it is locked in a collision... and leave you with no protection. A frayed or torn belt could rip apart in position. When you release the anchorage, try to the position that serves you will prefer a higher position.
Owner's Manual
Page 43
... with an Energy Management feature in the front seating positions to help reduce the belt force acting on all passenger-seating positions with a combinadesigned to release webbing in a controlled manner. feature is able on When To Use The Automatic Locking Mode the occupant's chest. WARNING! Buckle the combination lap and shoulder...
... with an Energy Management feature in the front seating positions to help reduce the belt force acting on all passenger-seating positions with a combinadesigned to release webbing in a controlled manner. feature is able on When To Use The Automatic Locking Mode the occupant's chest. WARNING! Buckle the combination lap and shoulder...

Owner's Manual
Page 61
... parameters that does not identify particular vehicles or crashes may be disclosed by police under a legal warrant. 4. depending on vehicle Confidential data will not be released for incorporation in defense of personal data is thereafter configuration preserved. 2. Used for electronically-controlled safety systems, including the airbag system • Vehicle speed •...
... parameters that does not identify particular vehicles or crashes may be disclosed by police under a legal warrant. 4. depending on vehicle Confidential data will not be released for incorporation in defense of personal data is thereafter configuration preserved. 2. Used for electronically-controlled safety systems, including the airbag system • Vehicle speed •...
Owner's Manual
Page 64
... pass it through the child restraint and slide the latch plate into the shoulder portion of the lap/shoulder belt will the buckle with the release button facing out. however, any seat belt system will keep the lap portion tight around the child restraint. Then, pull the belt until there is...
... pass it through the child restraint and slide the latch plate into the shoulder portion of the lap/shoulder belt will the buckle with the release button facing out. however, any seat belt system will keep the lap portion tight around the child restraint. Then, pull the belt until there is...

Owner's Manual
Page 70
.... To attach a child restraint tether strap: Route the tether strap over the head rests, and attach the hook to return into the buckle with the release button facing out. Allow the belt to the tether anchor located on the back of the seat. 2 Insert the latch plate into the retractor, pulling...
.... To attach a child restraint tether strap: Route the tether strap over the head rests, and attach the hook to return into the buckle with the release button facing out. Allow the belt to the tether anchor located on the back of the seat. 2 Insert the latch plate into the retractor, pulling...

Owner's Manual
Page 86
... you could be seriously injured or killed. • Be sure everyone in a seat and using the adjustment outboard side of the seat, lean back and release the lever bar. Lift up on the bar located on the front of your vehicle that is in your vehicle is not equipped with seats... moving is parked. 3 Front Seat Adjustment - Recline To adjust the seatback, lift the lever located on the seat to lose control. lever, lean forward and release the lever. WARNING! UNDERSTANDING THE FEATURES OF YOUR VEHICLE 85 WARNING! • DO NOT allow people to be injured.
... you could be seriously injured or killed. • Be sure everyone in a seat and using the adjustment outboard side of the seat, lean back and release the lever bar. Lift up on the bar located on the front of your vehicle that is in your vehicle is not equipped with seats... moving is parked. 3 Front Seat Adjustment - Recline To adjust the seatback, lift the lever located on the seat to lose control. lever, lean forward and release the lever. WARNING! UNDERSTANDING THE FEATURES OF YOUR VEHICLE 85 WARNING! • DO NOT allow people to be injured.

Owner's Manual
Page 94
...: Do not fold the rear seat down easily. 3 1. fold down with the center seat belt buckled. Rear Seat Release NOTE: Be sure that the front seats are fully upright and positioned forward. Pull the release strap (toward the front of the rear seat can be lowered to allow the rear seatback to...
...: Do not fold the rear seat down easily. 3 1. fold down with the center seat belt buckled. Rear Seat Release NOTE: Be sure that the front seats are fully upright and positioned forward. Pull the release strap (toward the front of the rear seat can be lowered to allow the rear seatback to...
Owner's Manual
Page 98
...ON position. 4. to the desired 11. position, using the other numbered memory button, or to memory. Vehicle Information Center (EVIC). 9. Press and release the S (SET) button located on the driver's door. If a recall is attempted when the vehicle is not performed within five seconds if you ... 12. Refer positions. Memory Position Recall 8. Adjust the driver's seat, recliner, and driver's sideview 10. Within five seconds, press and release MEMORY NOTE: The vehicle must be set the next memory remove the key. UNDERSTANDING THE FEATURES OF YOUR VEHICLE 97 3. The next step...
...ON position. 4. to the desired 11. position, using the other numbered memory button, or to memory. Vehicle Information Center (EVIC). 9. Press and release the S (SET) button located on the driver's door. If a recall is attempted when the vehicle is not performed within five seconds if you ... 12. Refer positions. Memory Position Recall 8. Adjust the driver's seat, recliner, and driver's sideview 10. Within five seconds, press and release MEMORY NOTE: The vehicle must be set the next memory remove the key. UNDERSTANDING THE FEATURES OF YOUR VEHICLE 97 3. The next step...

Owner's Manual
Page 99
... be cancelled by pressing any memory settings stored in "Understanding remove the key. The system will occur before continuing to Step 3. 3. Press and release the memory S (SET) button located on the drivers door during a recall (S, 1, or 2). Turn the ignition switch to the LOCK position,...memory recall before another RKE transmitter linked to memory position 2. To disable another recall can be selected. Within five seconds, press and release the UNLOCK button on the RKE transmitter linked to either memory position, repeat steps 1 through 5 for each RKE transmitter. NOTE: ...
... be cancelled by pressing any memory settings stored in "Understanding remove the key. The system will occur before continuing to Step 3. 3. Press and release the memory S (SET) button located on the drivers door during a recall (S, 1, or 2). Turn the ignition switch to the LOCK position,...memory recall before another RKE transmitter linked to memory position 2. To disable another recall can be selected. Within five seconds, press and release the UNLOCK button on the RKE transmitter linked to either memory position, repeat steps 1 through 5 for each RKE transmitter. NOTE: ...