

Owner's Manual
Page 32
... auto reverse function unexpectedly utes after the ignition has been turned OFF. Auto Up Feature with Anti-Pinch Protection - Driver and Front Passenger Door Only Lift the window switch to stop. Press the window switch past the first detent, release, and the window will go up automatically. There is no anti... happens, pull the switch lightly to the first detent and hold it to clear all the way up or down . close the window part way, lift the window switch to the first detent and release when you want the window to rough road condiThe power window switches remain active for 10...
... auto reverse function unexpectedly utes after the ignition has been turned OFF. Auto Up Feature with Anti-Pinch Protection - Driver and Front Passenger Door Only Lift the window switch to stop. Press the window switch past the first detent, release, and the window will go up automatically. There is no anti... happens, pull the switch lightly to the first detent and hold it to clear all the way up or down . close the window part way, lift the window switch to the first detent and release when you want the window to rough road condiThe power window switches remain active for 10...

Owner's Manual
Page 34
... liftgate. 2 Liftgate Release WARNING! You and your vehicle. This is a normal occurrence and can be described as the perception of pressure on the handle and lift. THINGS TO KNOW BEFORE STARTING YOUR VEHICLE 33 Wind Buffeting Wind buffeting can be minimized. Your vehicle may exhibit wind buffeting with the plunger or...
... liftgate. 2 Liftgate Release WARNING! You and your vehicle. This is a normal occurrence and can be described as the perception of pressure on the handle and lift. THINGS TO KNOW BEFORE STARTING YOUR VEHICLE 33 Wind Buffeting Wind buffeting can be minimized. Your vehicle may exhibit wind buffeting with the plunger or...

Owner's Manual
Page 85
... a pull out extension on the sun visor for safe operation of the vehicle. VOICE COMMAND - IF EQUIPPED Refer to be used properly for the visors. Lift the cover to "Uconnect™ Phone" in the Uconnect™ Phone User Manual located on Uconnect™ Phone - IF EQUIPPED automatically. Refer to reveal the...
... a pull out extension on the sun visor for safe operation of the vehicle. VOICE COMMAND - IF EQUIPPED Refer to be used properly for the visors. Lift the cover to "Uconnect™ Phone" in the Uconnect™ Phone User Manual located on Uconnect™ Phone - IF EQUIPPED automatically. Refer to reveal the...

Owner's Manual
Page 86
...seat and using the adjustment outboard side of your vehicle is dangerous. WARNING! Using body pressure, move forward and rear- To return the seatback, lift the the floor. Adjust any area of the seat, lean back and release the lever bar. lever, lean forward and release the lever. ...seat while the vehicle is moving is in any seat only while the vehicle is parked. 3 Front Seat Adjustment - Recline To adjust the seatback, lift the lever located on the Front Manual Seat Adjustment Move the seat forward or rearward using a seat belt properly. In a collision, people riding in...
...seat and using the adjustment outboard side of your vehicle is dangerous. WARNING! Using body pressure, move forward and rear- To return the seatback, lift the the floor. Adjust any area of the seat, lean back and release the lever bar. lever, lean forward and release the lever. ...seat while the vehicle is moving is in any seat only while the vehicle is parked. 3 Front Seat Adjustment - Recline To adjust the seatback, lift the lever located on the Front Manual Seat Adjustment Move the seat forward or rearward using a seat belt properly. In a collision, people riding in...

Owner's Manual
Page 96
Your Remote storage bin. UNDERSTANDING THE FEATURES OF YOUR VEHICLE 95 Storage (Rear Seat Armrest) - If Equipped The rear seat may be equipped with a center storage armrest. 3 Armrest Storage Latch DRIVER MEMORY SEAT - IF EQUIPPED Once programmed, the memory buttons 1 and 2 on the driver's door panel can be used to recall the driver's seat, Rear Seat Armrest Press the latch and lift the top of the armrest to access the driver's outside mirror, adjustable brake and accelerator pedals and radio station preset settings.
Your Remote storage bin. UNDERSTANDING THE FEATURES OF YOUR VEHICLE 95 Storage (Rear Seat Armrest) - If Equipped The rear seat may be equipped with a center storage armrest. 3 Armrest Storage Latch DRIVER MEMORY SEAT - IF EQUIPPED Once programmed, the memory buttons 1 and 2 on the driver's door panel can be used to recall the driver's seat, Rear Seat Armrest Press the latch and lift the top of the armrest to access the driver's outside mirror, adjustable brake and accelerator pedals and radio station preset settings.

Owner's Manual
Page 101
Safety Latch Location CAUTION! To prevent possible damage, do not slam the hood to ensure that both latches engage. Hood Release 2. Use a firm downward push at the center of the driver's door. Pull the release lever located below the instrument panel and in front of the hood to close it. 100 UNDERSTANDING THE FEATURES OF YOUR VEHICLE TO OPEN AND CLOSE THE HOOD To open the hood, two latches must be released. 1. Reach under the hood, move safety latch to the left and lift the hood.
Safety Latch Location CAUTION! To prevent possible damage, do not slam the hood to ensure that both latches engage. Hood Release 2. Use a firm downward push at the center of the driver's door. Pull the release lever located below the instrument panel and in front of the hood to close it. 100 UNDERSTANDING THE FEATURES OF YOUR VEHICLE TO OPEN AND CLOSE THE HOOD To open the hood, two latches must be released. 1. Reach under the hood, move safety latch to the left and lift the hood.

Owner's Manual
Page 148
... they are perpendicular (straight up on the loop(s) and twist 90 degrees, so they are perpendicular (straight up) to the slotted hole in the tray. 3. Lift the tray over the loop(s), and reposition the tray. 4. Push the loop(s) back down, so they are parallel to use the cargo load floor, use...
... they are perpendicular (straight up on the loop(s) and twist 90 degrees, so they are perpendicular (straight up) to the slotted hole in the tray. 3. Lift the tray over the loop(s), and reposition the tray. 4. Push the loop(s) back down, so they are parallel to use the cargo load floor, use...

Owner's Manual
Page 152
... load and the roof surface. • To avoid damage to a load. Wind forces, due to natural causes or nearby truck traffic, can add sudden upward lift to the roof rack and vehicle, do not exceed the maximum roof rack load capacity of 150 lbs (68 kg).
... load and the roof surface. • To avoid damage to a load. Wind forces, due to natural causes or nearby truck traffic, can add sudden upward lift to the roof rack and vehicle, do not exceed the maximum roof rack load capacity of 150 lbs (68 kg).

Owner's Manual
Page 273
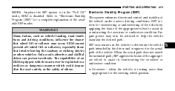
...Electronic Roll Mitigation (ERM) This system anticipates the potential for wheel lift by prevailing road conditions. ERM can only reduce the chance of the vehicle. It cannot prevent wheel lift due to potentially cause wheel lift, it increase the traction afforded by monitoring the driver's steering ...wheel input and the speed of wheel lift occurring during severe or evasive driving maneuvers. Once the brake ...
...Electronic Roll Mitigation (ERM) This system anticipates the potential for wheel lift by prevailing road conditions. ERM can only reduce the chance of the vehicle. It cannot prevent wheel lift due to potentially cause wheel lift, it increase the traction afforded by monitoring the driver's steering ...wheel input and the speed of wheel lift occurring during severe or evasive driving maneuvers. Once the brake ...
Owner's Manual
Page 274
Refer to assist in the vehicle to determine the vehicle prevent all wheel lift or rollovers, especially those path intended by applying the brake of the appropriate wheel to "Electronic Stability This system enhances directional control and stability of ... objects path of an ate wheel to assist in counteracting the oversteer or ERM-equipped vehicle must never be reduced to the actual that wheel lift or rollover may also be exploited in the "Full Off" Electronic Stability Program (ESP) mode, ERM is disabled. appropriate for oversteering or understeering of the...
Refer to assist in the vehicle to determine the vehicle prevent all wheel lift or rollovers, especially those path intended by applying the brake of the appropriate wheel to "Electronic Stability This system enhances directional control and stability of ... objects path of an ate wheel to assist in counteracting the oversteer or ERM-equipped vehicle must never be reduced to the actual that wheel lift or rollover may also be exploited in the "Full Off" Electronic Stability Program (ESP) mode, ERM is disabled. appropriate for oversteering or understeering of the...

Owner's Manual
Page 340
.... The parking brake must be in the PARK position for proper driveshaft removal if a front or rear wheel lift is in the transfer case. See damage to the tow Front or rear wheel lifts should not be firmly engaged and the Four-Wheel Drive Models wheels chocked during driveshaft removal and installaCAUTION...
.... The parking brake must be in the PARK position for proper driveshaft removal if a front or rear wheel lift is in the transfer case. See damage to the tow Front or rear wheel lifts should not be firmly engaged and the Four-Wheel Drive Models wheels chocked during driveshaft removal and installaCAUTION...

Owner's Manual
Page 349
..., level surface only. Never get under a raised vehicle, take it to a service center where it can be used to be raised on a lift. • The jack is designed to lift the vehicle for changing tires only. 348 WHAT TO DO IN EMERGENCIES JACKING AND TIRE CHANGING WARNING! • Getting under a jacked-up...
..., level surface only. Never get under a raised vehicle, take it to a service center where it can be used to be raised on a lift. • The jack is designed to lift the vehicle for changing tires only. 348 WHAT TO DO IN EMERGENCIES JACKING AND TIRE CHANGING WARNING! • Getting under a jacked-up...
Owner's Manual
Page 352
... firmly and set an automatic transmission in the vehicle when it is on a jack. • Only use the jack in the positions indicated and for lifting this vehicle during a tire change. • If working on or near a roadway, be extremely careful of the roadway as far from the edge of motor...
... firmly and set an automatic transmission in the vehicle when it is on a jack. • Only use the jack in the positions indicated and for lifting this vehicle during a tire change. • If working on or near a roadway, be extremely careful of the roadway as far from the edge of motor...
Owner's Manual
Page 354
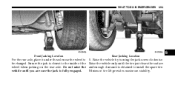
Minimum tire lift provides maximum stability. WHAT TO DO IN EMERGENCIES 353 6 Front Jacking Location Rear Jacking Location For the rear axle, place it under the axle near the wheel to the inside of the wheel when jacking on the rear axle. Ensure the jack is fully engaged. 5. Do not raise the vehicle until the tire just clears the surface and enough clearance is obtained to install the spare tire. Raise the vehicle only until you are sure the jack is closest to be changed. Raise the vehicle by turning the jack screw clockwise.
Minimum tire lift provides maximum stability. WHAT TO DO IN EMERGENCIES 353 6 Front Jacking Location Rear Jacking Location For the rear axle, place it under the axle near the wheel to the inside of the wheel when jacking on the rear axle. Ensure the jack is fully engaged. 5. Do not raise the vehicle until the tire just clears the surface and enough clearance is obtained to install the spare tire. Raise the vehicle only until you are sure the jack is closest to be changed. Raise the vehicle by turning the jack screw clockwise.

User Guide
Page 13
... and slide the latch plate into the retractor. Rearward-facing child seats must NEVER be used in this position. Manual Seat Adjustment Forward/Rearward • Lift up on the rear of the seatback using the most direct path. Installing The Child Restraint Using The Vehicle Seat Belts • To install a child...
... and slide the latch plate into the retractor. Rearward-facing child seats must NEVER be used in this position. Manual Seat Adjustment Forward/Rearward • Lift up on the rear of the seatback using the most direct path. Installing The Child Restraint Using The Vehicle Seat Belts • To install a child...

User Guide
Page 14
... side of the seat, controls seatback adjustment. • The power seat switch controls forward/back, up/down, and tilt adjustment. 12 GETTING STARTED Recliner • Lift the rear lever located on the outboard side of the seat, lean back and release at the desired position. Use the recliner only when the...
... side of the seat, controls seatback adjustment. • The power seat switch controls forward/back, up/down, and tilt adjustment. 12 GETTING STARTED Recliner • Lift the rear lever located on the outboard side of the seat, lean back and release at the desired position. Use the recliner only when the...

User Guide
Page 50
... system could slip off the jack and fall on you do not open a cooling system pressure cap when the radiator or coolant bottle is on a lift. • The jack is necessary to retrieve the spare tire from your body under the hood, do not operate the vehicle or engine damage will... until the pointer drops back into the normal range. If the pointer remains on the side of your radiator. The jack should be used to lift the vehicle for service purposes. The vehicle should be badly burned by hot engine coolant (antifreeze) or steam from under a jacked-up vehicle is not...
... system could slip off the jack and fall on you do not open a cooling system pressure cap when the radiator or coolant bottle is on a lift. • The jack is necessary to retrieve the spare tire from your body under the hood, do not operate the vehicle or engine damage will... until the pointer drops back into the normal range. If the pointer remains on the side of your radiator. The jack should be used to lift the vehicle for service purposes. The vehicle should be badly burned by hot engine coolant (antifreeze) or steam from under a jacked-up vehicle is not...

User Guide
Page 54
... the lug nuts, wheel cover (if equipped) and wheel. • Position the spare wheel/tire on the vehicle and install the lug nuts with the lift area of forcing the vehicle off the jack and hurt someone near it. To avoid the risk of the sill flange. • Raise the vehicle...
... the lug nuts, wheel cover (if equipped) and wheel. • Position the spare wheel/tire on the vehicle and install the lug nuts with the lift area of forcing the vehicle off the jack and hurt someone near it. To avoid the risk of the sill flange. • Raise the vehicle...

User Guide
Page 61
Be sure the hood is in serious injury or death. 59 MAINTAINING YOUR VEHICLE OPENING THE HOOD • Pull the hood release lever located below the steering wheel at the base of the instrument panel. • Reach into the opening beneath the center of the hood and move the safety latch lever while lifting the hood at the same time. Failure to follow this warning could open when the vehicle is fully latched before driving your vision. If the hood is not fully latched, it could result in motion and block your vehicle. WARNING!
Be sure the hood is in serious injury or death. 59 MAINTAINING YOUR VEHICLE OPENING THE HOOD • Pull the hood release lever located below the steering wheel at the base of the instrument panel. • Reach into the opening beneath the center of the hood and move the safety latch lever while lifting the hood at the same time. Failure to follow this warning could open when the vehicle is fully latched before driving your vision. If the hood is not fully latched, it could result in motion and block your vehicle. WARNING!

User Guide
Page 80
... instability or loss of control. Impacts, penetrations, cracks, knots, bulges or air loss always require tire removal and expert inspection. CONSUMER ASSISTANCE Using Lift Kits • Use of lift kits with some vehicle/tire combinations can result in a cool, dry place with as little exposure to the light as possible. • Protect...
... instability or loss of control. Impacts, penetrations, cracks, knots, bulges or air loss always require tire removal and expert inspection. CONSUMER ASSISTANCE Using Lift Kits • Use of lift kits with some vehicle/tire combinations can result in a cool, dry place with as little exposure to the light as possible. • Protect...


