Owner's Manual
Page 62
... ignoring it. THINGS TO KNOW BEFORE STARTING YOUR VEHICLE 61 Child Restraints Everyone in your vehicle needs to be buckled up in a rear seat, if available.
... ignoring it. THINGS TO KNOW BEFORE STARTING YOUR VEHICLE 61 Child Restraints Everyone in your vehicle needs to be buckled up in a rear seat, if available.
Owner's Manual
Page 66
.... Never allow a also have features for installation using lower anchorages and upper tether straps from the child restraint to the top tether anchorages, have been available for those anchorages will continue to child closer to be low on tether Child restraints having attachments for some older child restraints, many child restraint...
.... Never allow a also have features for installation using lower anchorages and upper tether straps from the child restraint to the top tether anchorages, have been available for those anchorages will continue to child closer to be low on tether Child restraints having attachments for some older child restraints, many child restraint...
Owner's Manual
Page 67
... seats with the child restraint system. If your child restraints are capable of lower attachment, NEVER install LATCH-compatible child seats such that all the available attachments provided with , and never leave your child restraint. System All three rear seating positions have lower anchorages We urge you can only install the...
... seats with the child restraint system. If your child restraints are capable of lower attachment, NEVER install LATCH-compatible child seats such that all the available attachments provided with , and never leave your child restraint. System All three rear seating positions have lower anchorages We urge you can only install the...
Owner's Manual
Page 100
... will move forward to the memory/ further information. 3 The Easy into the vehicle. Entry/Exit feature is removed from the factory. At this position, there available: is no benefit to the driver by moving the seat for switch.
... will move forward to the memory/ further information. 3 The Easy into the vehicle. Entry/Exit feature is removed from the factory. At this position, there available: is no benefit to the driver by moving the seat for switch.
Owner's Manual
Page 181
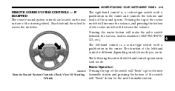
... (Y) or NO (N) appears. button until "0," selection, press and release the FUNCTION SELECT "30," "60," or "90" appears. Auto High Beams (Available with Automatic Headlamps Only) LECT button until YES (Y) or NO (N) appears. To make your and release the FUNCTION SELECT button until YES (Y) or NO ...(N) appears. Headlamps On with Wipers (Available with SmartBeam™ Only) When this feature is selected, the driver can choose to When YES (Y) is selected, the front and rear turn ...
... (Y) or NO (N) appears. button until "0," selection, press and release the FUNCTION SELECT "30," "60," or "90" appears. Auto High Beams (Available with Automatic Headlamps Only) LECT button until YES (Y) or NO (N) appears. To make your and release the FUNCTION SELECT button until YES (Y) or NO ...(N) appears. Headlamps On with Wipers (Available with SmartBeam™ Only) When this feature is selected, the driver can choose to When YES (Y) is selected, the front and rear turn ...
Owner's Manual
Page 182
To make your selection, press and release the FUNCTION SELECT button until "Off," "45 sec.," "5 min.," or "10 min." appears. 4 Easy Entry/Exit Seat (Available with Remote Key Unlock is set to ON) when the RKE transmitter is selected, the headlights will automatically activate the windshield wipers if it senses ...
To make your selection, press and release the FUNCTION SELECT button until "Off," "45 sec.," "5 min.," or "10 min." appears. 4 Easy Entry/Exit Seat (Available with Remote Key Unlock is set to ON) when the RKE transmitter is selected, the headlights will automatically activate the windshield wipers if it senses ...
Owner's Manual
Page 199
...Uconnect™ User Manual located on the DVD for further Clock Setting Procedure details. 1. Refer to the new station until the hours blink. available on your vehicle is not Manual located on the radio screen. Press and hold the TIME button until you release it. Voice Command Button... Command" in the Uconnect™ User Manual located on the DVD for further details. Uconnect" message will display on your vehicle is not available on the radio screen. Adjust the hours by turning the right side TUNE/ SCROLL control knob. Phone Button Uconnect™ Phone - If ...
...Uconnect™ User Manual located on the DVD for further Clock Setting Procedure details. 1. Refer to the new station until the hours blink. available on your vehicle is not Manual located on the radio screen. Press and hold the TIME button until you release it. Voice Command Button... Command" in the Uconnect™ User Manual located on the DVD for further details. Uconnect" message will display on your vehicle is not available on the radio screen. Adjust the hours by turning the right side TUNE/ SCROLL control knob. Phone Button Uconnect™ Phone - If ...
Owner's Manual
Page 209
... in sequence if the selection does not contain playable files). NOTE: The AUX device must be turned on the disc. Name, and Folder Name (if available). Press and hold the INFO button again for each file. If the AUX audio sounds distorted, turn the device's volume up a list of all folders...
... in sequence if the selection does not contain playable files). NOTE: The AUX device must be turned on the disc. Name, and Folder Name (if available). Press and hold the INFO button again for each file. If the AUX audio sounds distorted, turn the device's volume up a list of all folders...

Owner's Manual
Page 210
... 16-pin connector port (in the Uconnect™ User Manual located on some vehicles). 4 NOTE: This section is for five seconds (when the ignition is available only if equipped as an option with uconnect™. For playing an iPod , use the UCI REL/RET radios only with these radios. UNDERSTANDING YOUR...
... 16-pin connector port (in the Uconnect™ User Manual located on some vehicles). 4 NOTE: This section is for five seconds (when the ignition is available only if equipped as an option with uconnect™. For playing an iPod , use the UCI REL/RET radios only with these radios. UNDERSTANDING YOUR...
Owner's Manual
Page 211
... and is ready for use by the specific iPod device) ing the cable. Leaving the iPod connected Once in the glove compartment on some vehicles). available from the 16-pin connector port, prior to connectconnector (if supported by pressing radio switches, as described below. 210 UNDERSTANDING YOUR INSTRUMENT PANEL Connecting The...
... and is ready for use by the specific iPod device) ing the cable. Leaving the iPod connected Once in the glove compartment on some vehicles). available from the 16-pin connector port, prior to connectconnector (if supported by pressing radio switches, as described below. 210 UNDERSTANDING YOUR INSTRUMENT PANEL Connecting The...
Owner's Manual
Page 213
... During Play mode, pressing any of the buttons described you to the next screen of menus and tracks on the radio. During • RND button (available on sales code RES radio only): fast scroll, you can also press the > buttons to see showing on the iPod . below, takes you have List...
... During Play mode, pressing any of the buttons described you to the next screen of menus and tracks on the radio. During • RND button (available on sales code RES radio only): fast scroll, you can also press the > buttons to see showing on the iPod . below, takes you have List...

Owner's Manual
Page 214
... of the list, just turn the wheel backwards (counter-clockwise) to get to the track faster. • In List mode, the radio PRESET buttons are available on this system. • MUSIC TYPE button: The MUSIC TYPE button is another shortcut button to the genre listing on the second line. • To...
... of the list, just turn the wheel backwards (counter-clockwise) to get to the track faster. • In List mode, the radio PRESET buttons are available on this system. • MUSIC TYPE button: The MUSIC TYPE button is another shortcut button to the genre listing on the second line. • To...

Owner's Manual
Page 215
..., sports, news, entertainment, and programming for children, directly from its satellites and broadcasting studios. Failure to coast. Sirius will supply a welcome kit that is not available in Hawaii and has limited coverage in Alaska. The subscription service provider is Sirius Satellite Radio. 214 UNDERSTANDING YOUR INSTRUMENT PANEL CAUTION! • Leaving the...
..., sports, news, entertainment, and programming for children, directly from its satellites and broadcasting studios. Failure to coast. Sirius will supply a welcome kit that is not available in Hawaii and has limited coverage in Alaska. The subscription service provider is Sirius Satellite Radio. 214 UNDERSTANDING YOUR INSTRUMENT PANEL CAUTION! • Leaving the...
Owner's Manual
Page 216
... , press the SETUP button and scroll roof around the rooftop antenna location. calling: Next, touch the SUBSCRIPTION tab on the radio to the following information available when faceplate. Press the TUNE/SCROLL control knob and the decreased performance. Selecting Uconnect™ Multimedia (Satellite) Mode Press the SAT button until Sirius ID...
... , press the SETUP button and scroll roof around the rooftop antenna location. calling: Next, touch the SUBSCRIPTION tab on the radio to the following information available when faceplate. Press the TUNE/SCROLL control knob and the decreased performance. Selecting Uconnect™ Multimedia (Satellite) Mode Press the SAT button until Sirius ID...

Owner's Manual
Page 218
... Song Title all of the arrows. MUSIC TYPE Button Pressing this button once will cycle the display information between Artist, Song Title, and Composer (if available). UNDERSTANDING YOUR INSTRUMENT PANEL 217 INFO Button Pressing the INFO button will turn on the Music Type mode for five seconds.
... Song Title all of the arrows. MUSIC TYPE Button Pressing this button once will cycle the display information between Artist, Song Title, and Composer (if available). UNDERSTANDING YOUR INSTRUMENT PANEL 217 INFO Button Pressing the INFO button will turn on the Music Type mode for five seconds.
Owner's Manual
Page 220
... of the rocker switch will increase the volume, and pressing the bottom of the rocker switch will make the radio switch between the various modes available (AM/FM/TAPE/ CD, etc.). The left-hand control is different depending on which mode you are located on the rear surface of the left...
... of the rocker switch will increase the volume, and pressing the bottom of the rocker switch will make the radio switch between the various modes available (AM/FM/TAPE/ CD, etc.). The left-hand control is different depending on which mode you are located on the rear surface of the left...
Owner's Manual
Page 221
... to the beginning of the previous track if it will go to the disc; Pressing the bottom of the switch once will select the next available CD in the player. 7. 220 UNDERSTANDING YOUR INSTRUMENT PANEL The button located in the center of the left side rocker switch has no function for...
... to the beginning of the previous track if it will go to the disc; Pressing the bottom of the switch once will select the next available CD in the player. 7. 220 UNDERSTANDING YOUR INSTRUMENT PANEL The button located in the center of the left side rocker switch has no function for...
Owner's Manual
Page 242
... catalytic converter and, once the engine has started, ignite and damage the converter and vehicle. This type of an externally powered electric engine block heater (available from a booster battery or the battery in an attempt to push or tow your authorized dealer) is recommended. Then, turn the ignition switch to the...
... catalytic converter and, once the engine has started, ignite and damage the converter and vehicle. This type of an externally powered electric engine block heater (available from a booster battery or the battery in an attempt to push or tow your authorized dealer) is recommended. Then, turn the ignition switch to the...
Owner's Manual
Page 247
... is dangerous to move the shift lever left (-) or right (+) when the shift lever is in the DRIVE position, allowing you to limit the highest available gear. Electronic Range Select (ERS) Operation NEUTRAL This range is used only when the vehicle is at a complete stop . The Electronic Range Select (ERS) shift...
... is dangerous to move the shift lever left (-) or right (+) when the shift lever is in the DRIVE position, allowing you to limit the highest available gear. Electronic Range Select (ERS) Operation NEUTRAL This range is used only when the vehicle is at a complete stop . The Electronic Range Select (ERS) shift...
Owner's Manual
Page 252
... is no longer detected, the transmission will continue to operally after 1 to 3 miles (1.6 to shift into Overdrive when cold. Turn the engine off, and be available in the automatic transmission on your authorized dealer as possible. normal operation in a slightly different feeling or response during acceleration, gine. STARTING AND OPERATING 251...
... is no longer detected, the transmission will continue to operally after 1 to 3 miles (1.6 to shift into Overdrive when cold. Turn the engine off, and be available in the automatic transmission on your authorized dealer as possible. normal operation in a slightly different feeling or response during acceleration, gine. STARTING AND OPERATING 251...

