Owner Manual
Page 19
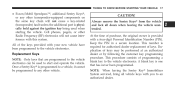
... dealer. 2 This procedure consists of keys may be programmed to the vehicle electronics can be used when starting the vehicle. Keep the PIN in a secure location. CAUTION! Always remove the Sentry Keys from the vehicle and lock all vehicle keys with your new vehicle have been programmed to the vehicle...
... dealer. 2 This procedure consists of keys may be programmed to the vehicle electronics can be used when starting the vehicle. Keep the PIN in a secure location. CAUTION! Always remove the Sentry Keys from the vehicle and lock all vehicle keys with your new vehicle have been programmed to the vehicle...
Owner Manual
Page 29
... key is an invitation to lock or unlock the doors and liftgate. Do not leave unattended children in the ignition and either front door is located on the driver's door panel. Power Door Locks A power door lock switch is open. Lock Driver Power Door Lock Switch 1 -
... key is an invitation to lock or unlock the doors and liftgate. Do not leave unattended children in the ignition and either front door is located on the driver's door panel. Power Door Locks A power door lock switch is open. Lock Driver Power Door Lock Switch 1 -
Owner Manual
Page 33
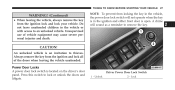
If Equipped Insert the tip of the ignition key into the lock and rotate to the LOCK or UNLOCK position. 2 Child-Protection Door Lock Function Child-Protection Door Lock Location THINGS TO KNOW BEFORE STARTING YOUR VEHICLE 31 Child-Protection Door Lock System (Rear Doors) -
If Equipped Insert the tip of the ignition key into the lock and rotate to the LOCK or UNLOCK position. 2 Child-Protection Door Lock Function Child-Protection Door Lock Location THINGS TO KNOW BEFORE STARTING YOUR VEHICLE 31 Child-Protection Door Lock System (Rear Doors) -
Owner Manual
Page 34
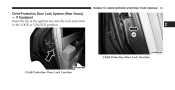
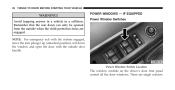
Avoid trapping anyone in a vehicle in a collision. POWER WINDOWS - There are engaged. 32 THINGS TO KNOW BEFORE STARTING YOUR VEHICLE WARNING! NOTE: For emergency exit with the system engaged, move the lock plunger up (unlocked position), roll down the window and open the door with the outside when the child protection locks are single window IF EQUIPPED Power Window Switches Power Window Switch Location The window controls on the driver's door trim panel control all the door windows. Remember that the rear doors can only be opened from the outside door handle.
Avoid trapping anyone in a vehicle in a collision. POWER WINDOWS - There are engaged. 32 THINGS TO KNOW BEFORE STARTING YOUR VEHICLE WARNING! NOTE: For emergency exit with the system engaged, move the lock plunger up (unlocked position), roll down the window and open the door with the outside when the child protection locks are single window IF EQUIPPED Power Window Switches Power Window Switch Location The window controls on the driver's door trim panel control all the door windows. Remember that the rear doors can only be opened from the outside door handle.
Owner Manual
Page 36
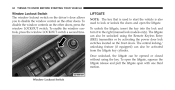
... unlocked, the liftgate can also be opened or closed without using the Remote Keyless Entry (RKE) transmitter or by activating the power door lock switches located on the other doors. 34 THINGS TO KNOW BEFORE STARTING YOUR VEHICLE Window Lockout Switch The window lockout switch on the driver's door allows you...
... unlocked, the liftgate can also be opened or closed without using the Remote Keyless Entry (RKE) transmitter or by activating the power door lock switches located on the other doors. 34 THINGS TO KNOW BEFORE STARTING YOUR VEHICLE Window Lockout Switch The window lockout switch on the driver's door allows you...
Owner Manual
Page 37
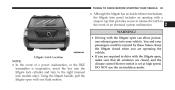
You and your vehicle. Liftgate Latch Location NOTE: • In the event of an electrical system malfunction. 2 WARNING! • Driving with one fluid motion. Keep the liftgate closed when you are operating ...
You and your vehicle. Liftgate Latch Location NOTE: • In the event of an electrical system malfunction. 2 WARNING! • Driving with one fluid motion. Keep the liftgate closed when you are operating ...
Owner Manual
Page 51
... and Knee Bolsters 1 - Driver and Passenger Airbag 2 - THINGS TO KNOW BEFORE STARTING YOUR VEHICLE 49 This vehicle may allow less forceful deployment. Their covers are located above the side windows. Knee Boltser NOTE: The front airbags are certified to the Federal regulations that allow the airbag to a window. Side Curtain Airbag...
... and Knee Bolsters 1 - Driver and Passenger Airbag 2 - THINGS TO KNOW BEFORE STARTING YOUR VEHICLE 49 This vehicle may allow less forceful deployment. Their covers are located above the side windows. Knee Boltser NOTE: The front airbags are certified to the Federal regulations that allow the airbag to a window. Side Curtain Airbag...
Owner Manual
Page 52
...: Do not use a clothing bar mounted to allow airbag deployment. You may not be injured because the airbags are inflating. • If your vehicle is located should remain free from any accessory items installed which will alter the roof, including adding a sunroof to your vehicle is equipped with side curtain airbags... are no longer functional. Do not add roof racks that require permanent attachments (bolts or screws) for the airbag cushions are designed to block the location of the side curtain airbags.
...: Do not use a clothing bar mounted to allow airbag deployment. You may not be injured because the airbags are inflating. • If your vehicle is located should remain free from any accessory items installed which will alter the roof, including adding a sunroof to your vehicle is equipped with side curtain airbags... are no longer functional. Do not add roof racks that require permanent attachments (bolts or screws) for the airbag cushions are designed to block the location of the side curtain airbags.
Owner Manual
Page 56
... won't have the airbags to protect you drive, have the airbag system checked right away. • The Driver and Front Passenger Airbag/Inflator Units are located in the sides of the way, as a self-check when the ignition is about 50 to 70 milliseconds. A large quantity of the airbag. If the...
... won't have the airbags to protect you drive, have the airbag system checked right away. • The Driver and Front Passenger Airbag/Inflator Units are located in the sides of the way, as a self-check when the ignition is about 50 to 70 milliseconds. A large quantity of the airbag. If the...
Owner Manual
Page 59
... is designed to be injured because the airbags are not there to tell anyone who works on your protection in a collision. Do not mount or locate any aftermarket equipment on or behind the knee impact bolster. • It is dangerous to try to eight second interval. • The light flickers or...
... is designed to be injured because the airbags are not there to tell anyone who works on your protection in a collision. Do not mount or locate any aftermarket equipment on or behind the knee impact bolster. • It is dangerous to try to eight second interval. • The light flickers or...
Owner Manual
Page 72
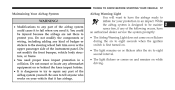
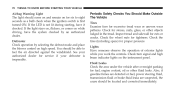
... leaks. Check the tires (including spare) for tightness. Lights Have someone observe the operation of exterior lights while you work the controls. You should be located and corrected immediately. See your authorized dealer for excessive tread wear or uneven wear patterns. Periodic Safety Checks You Should Make Outside The Vehicle Tires...
... leaks. Check the tires (including spare) for tightness. Lights Have someone observe the operation of exterior lights while you work the controls. You should be located and corrected immediately. See your authorized dealer for excessive tread wear or uneven wear patterns. Periodic Safety Checks You Should Make Outside The Vehicle Tires...
Owner Manual
Page 79
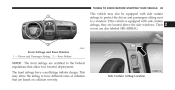
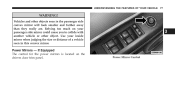
Relying too much on the drivers door trim panel. 3 Power Mirror Control If Equipped The control for the power mirrors is located on your inside mirror when judging the size or distance of a vehicle seen in the passenger side convex mirror will look smaller and farther away than they really are. UNDERSTANDING THE FEATURES OF YOUR VEHICLE 77 WARNING! Use your passenger side mirror could cause you to collide with another vehicle or other objects seen in this convex mirror. Vehicles and other object. Power Mirrors -
Relying too much on the drivers door trim panel. 3 Power Mirror Control If Equipped The control for the power mirrors is located on your inside mirror when judging the size or distance of a vehicle seen in the passenger side convex mirror will look smaller and farther away than they really are. UNDERSTANDING THE FEATURES OF YOUR VEHICLE 77 WARNING! Use your passenger side mirror could cause you to collide with another vehicle or other objects seen in this convex mirror. Vehicles and other object. Power Mirrors -
Owner Manual
Page 81
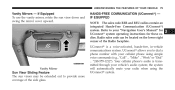
... system; the system will automatically mute your cellular phone using the UConnect system. 3 Vanity Mirror Sun Visor Sliding Feature The sun visors may be located on the lower right corner of the side glass. Your cellular phone's audio is a voice-activated, hands-free, in-vehicle communications system. UNDERSTANDING THE FEATURES...
... system; the system will automatically mute your cellular phone using the UConnect system. 3 Vanity Mirror Sun Visor Sliding Feature The sun visors may be located on the lower right corner of the side glass. Your cellular phone's audio is a voice-activated, hands-free, in-vehicle communications system. UNDERSTANDING THE FEATURES...
Owner Manual
Page 83
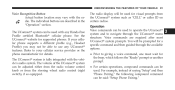
...'s audio system. The individual buttons are required after most UConnect system prompts. UNDERSTANDING THE FEATURES OF YOUR VEHICLE 81 Voice Recognition Button Actual button location may not be able to your cellular service provider or the phone manufacturer for the beep, which follows the ЉReadyЉ prompt or another...
...'s audio system. The individual buttons are required after most UConnect system prompts. UNDERSTANDING THE FEATURES OF YOUR VEHICLE 81 Voice Recognition Button Actual button location may not be able to your cellular service provider or the phone manufacturer for the beep, which follows the ЉReadyЉ prompt or another...
Owner Manual
Page 107
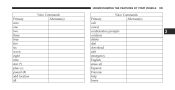
UNDERSTANDING THE FEATURES OF YOUR VEHICLE 105 Primary zero one two three four five six seven eight nine star (*) plus (+) pound (#) add location all Voice Commands Alternate(s) Voice Commands Primary Alternate(s) call cancel confirmation prompts continue delete dial download edit emergency English erase all Espanol Francais help home 3
UNDERSTANDING THE FEATURES OF YOUR VEHICLE 105 Primary zero one two three four five six seven eight nine star (*) plus (+) pound (#) add location all Voice Commands Alternate(s) Voice Commands Primary Alternate(s) call cancel confirmation prompts continue delete dial download edit emergency English erase all Espanol Francais help home 3
Owner Manual
Page 116
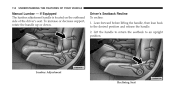
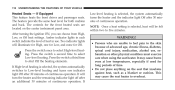
Lumbar Adjustment Reclining Seat To increase or decrease support, rotate the handle up or down. 114 UNDERSTANDING THE FEATURES OF YOUR VEHICLE Manual Lumbar - Lean forward before lifting the handle, then lean back to an upright position. Driver's Seatback Recline To recline: 1. Lift the handle to return the seatback to the desired position and release the handle. 2. If Equipped The lumbar adjustment handle is located on the outboard side of the driver's seat.
Lumbar Adjustment Reclining Seat To increase or decrease support, rotate the handle up or down. 114 UNDERSTANDING THE FEATURES OF YOUR VEHICLE Manual Lumbar - Lean forward before lifting the handle, then lean back to an upright position. Driver's Seatback Recline To recline: 1. Lift the handle to return the seatback to the desired position and release the handle. 2. If Equipped The lumbar adjustment handle is located on the outboard side of the driver's seat.
Owner Manual
Page 118
... illness, diabetes, spinal cord injury, medication, alcohol use . It may cause the seat heater to shut Off the heating elements. WARNING! • Persons who are located on the seat that insulates against heat, such as a blanket or cushion. Two indicator lights will illuminate for High, one indicator light Off after 30...
... illness, diabetes, spinal cord injury, medication, alcohol use . It may cause the seat heater to shut Off the heating elements. WARNING! • Persons who are located on the seat that insulates against heat, such as a blanket or cushion. Two indicator lights will illuminate for High, one indicator light Off after 30...
Owner Manual
Page 121
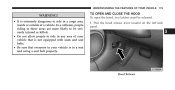
Pull the hood release lever located on the left kick panel. 3 Hood Release UNDERSTANDING THE FEATURES OF YOUR VEHICLE 119 WARNING! • It is extremely dangerous to ride in a cargo area, ...
Pull the hood release lever located on the left kick panel. 3 Hood Release UNDERSTANDING THE FEATURES OF YOUR VEHICLE 119 WARNING! • It is extremely dangerous to ride in a cargo area, ...
Owner Manual
Page 122
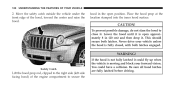
..., with both latches. CAUTION! To prevent possible damage, do not slam the hood to close it could have a collision. Place the hood prop at the location stamped into the inner hood surface. Safety Catch Lift the hood prop rod, clipped to secure the This should secure both latches engaged. 120 UNDERSTANDING...
..., with both latches. CAUTION! To prevent possible damage, do not slam the hood to close it could have a collision. Place the hood prop at the location stamped into the inner hood surface. Safety Catch Lift the hood prop rod, clipped to secure the This should secure both latches engaged. 120 UNDERSTANDING...
Owner Manual
Page 123
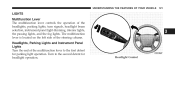
Turn to the first detent for headlight operation. 3 Headlight Control UNDERSTANDING THE FEATURES OF YOUR VEHICLE 121 LIGHTS Multifunction Lever The multifunction lever controls the operation of the steering column. Headlights, Parking Lights and Instrument Panel Lights Turn the end of the multifunction lever to the second detent for parking light operation. The multifunction lever is located on the left side of the headlights, parking lights, turn signals, headlight beam selection, instrument panel light dimming, interior lights, the passing lights, and the fog lights.
Turn to the first detent for headlight operation. 3 Headlight Control UNDERSTANDING THE FEATURES OF YOUR VEHICLE 121 LIGHTS Multifunction Lever The multifunction lever controls the operation of the steering column. Headlights, Parking Lights and Instrument Panel Lights Turn the end of the multifunction lever to the second detent for parking light operation. The multifunction lever is located on the left side of the headlights, parking lights, turn signals, headlight beam selection, instrument panel light dimming, interior lights, the passing lights, and the fog lights.


