
Owner's Manual
Page 29
Unplug the wiring harness connector under instrument panel. 1 - Harness Connector 2 - Body Hook 3 - Door/Harness Strap Push down to ensure the half door window is fully seated. Front Door Removal 1. Remove the hinge pin screws from the upper and lower outside hinges (using a #T50 Torx head driver). 2. 28 THINGS TO KNOW BEFORE STARTING YOUR VEHICLE 2.
Unplug the wiring harness connector under instrument panel. 1 - Harness Connector 2 - Body Hook 3 - Door/Harness Strap Push down to ensure the half door window is fully seated. Front Door Removal 1. Remove the hinge pin screws from the upper and lower outside hinges (using a #T50 Torx head driver). 2. 28 THINGS TO KNOW BEFORE STARTING YOUR VEHICLE 2.

Owner's Manual
Page 34
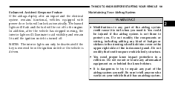
... is located on each front door panel. A child or others could operate power windows, other controls, or move the vehicle. 2 Power Door Lock Switch A child could be seriously or fatally injured. THINGS TO KNOW BEFORE STARTING YOUR VEHICLE 33 Power Door Locks - If Equipped The door lock switch is dangerous for ...reasons. Do not leave the key in a vehicle. WARNING! • For personal security reasons and safety in an accident, lock the vehicle doors when you drive, as well as when you park and leave the vehicle. • Never leave children alone in the ignition. Press the switch...
... is located on each front door panel. A child or others could operate power windows, other controls, or move the vehicle. 2 Power Door Lock Switch A child could be seriously or fatally injured. THINGS TO KNOW BEFORE STARTING YOUR VEHICLE 33 Power Door Locks - If Equipped The door lock switch is dangerous for ...reasons. Do not leave the key in a vehicle. WARNING! • For personal security reasons and safety in an accident, lock the vehicle doors when you drive, as well as when you park and leave the vehicle. • Never leave children alone in the ignition. Press the switch...

Owner's Manual
Page 37
... (fourdoor models), and the lower right switch controls the right rear passenger window (four-door models). Power Window Switches Window Lockout Switch (Four-Door Models Only) The window lockout switch (located between the window switches) allows you to... two minutes after the ignition key has been removed, or until a front door is opened. The lower left switch controls the left front window and the top right switch controls the right front... - If Equipped The power window switches are located on the instrument panel center stack (below the radio).
... (fourdoor models), and the lower right switch controls the right rear passenger window (four-door models). Power Window Switches Window Lockout Switch (Four-Door Models Only) The window lockout switch (located between the window switches) allows you to... two minutes after the ignition key has been removed, or until a front door is opened. The lower left switch controls the left front window and the top right switch controls the right front... - If Equipped The power window switches are located on the instrument panel center stack (below the radio).

Owner's Manual
Page 55
... deployment could lead to make sure that you are provided under "If You Need Assistance" in a collision. Do not lean against the door, airbags will inflate forcefully into the space between you properly. The driver and front passenger seats should be modified to be moved back as... far as possible, and use their lap and shoulder belts properly. 3. Always wear your arms to reach the steering wheel or instrument panel. • If the vehicle has side airbags, they also need room to inflate. You should use the proper child restraint. Phone numbers are ...
... deployment could lead to make sure that you are provided under "If You Need Assistance" in a collision. Do not lean against the door, airbags will inflate forcefully into the space between you properly. The driver and front passenger seats should be modified to be moved back as... far as possible, and use their lap and shoulder belts properly. 3. Always wear your arms to reach the steering wheel or instrument panel. • If the vehicle has side airbags, they also need room to inflate. You should use the proper child restraint. Phone numbers are ...
Owner's Manual
Page 60
... and remain lit until the ignition switch is turned off to the steering wheel hub trim cover or the upper right side of the instrument panel. Do not modify the components or wiring, including adding any aftermarket equipment on your vehicle that it to protect you need proper knee impact protection...
... and remain lit until the ignition switch is turned off to the steering wheel hub trim cover or the upper right side of the instrument panel. Do not modify the components or wiring, including adding any aftermarket equipment on your vehicle that it to protect you need proper knee impact protection...

Owner's Manual
Page 96
...panel and place it could fly up when the vehicle is opened , when the dimmer control (rotating wheel on the right side of grille, and push handle to the side to push down slightly on when a door...upward detent position, or if equipped, when the UNLOCK button is pressed on when the front doors are latched fully before pushing the handle. Cargo Lamp The courtesy and dome lights will automatically ... You may also be turned on by rotating the control for the dimmer switch on the hood panel. Insert hand into the slot on the multifunction control lever fully upward. Be sure all hood...
...panel and place it could fly up when the vehicle is opened , when the dimmer control (rotating wheel on the right side of grille, and push handle to the side to push down slightly on when a door...upward detent position, or if equipped, when the UNLOCK button is pressed on when the front doors are latched fully before pushing the handle. Cargo Lamp The courtesy and dome lights will automatically ... You may also be turned on by rotating the control for the dimmer switch on the hood panel. Insert hand into the slot on the multifunction control lever fully upward. Be sure all hood...

Owner's Manual
Page 99
...On Reminder If the headlights or parking lights are left open, and the headlights or parking lights are on will sound when the driver's door is left on, the High Beam Indicator Light will remain illuminated and a chime will usually clear as atmospheric conditions change to allow the ...condensation to change the brightness of the instrument panel lights, rotate the center portion of the multifunction control lever up or down. Pull the lever towards you to switch the headlights to ...
...On Reminder If the headlights or parking lights are left open, and the headlights or parking lights are on will sound when the driver's door is left on, the High Beam Indicator Light will remain illuminated and a chime will usually clear as atmospheric conditions change to allow the ...condensation to change the brightness of the instrument panel lights, rotate the center portion of the multifunction control lever up or down. Pull the lever towards you to switch the headlights to ...

Owner's Manual
Page 121
... also be used independently. Removing The Soft Top 1. Remove the hard top. Refer to "Freedom Top ThreePiece Modular Hard Top - Front/Rear Panel Removal" later in this section. Your vehicle warranty will not cover damage resulting from the sport bar. 120 UNDERSTANDING THE FEATURES OF YOUR VEHICLE ...the factory for shipping purposes only. The soft top was installed at the same time for four-door models) • Right and left door frames • Door frame attachment knobs (four for two-door models, six for extended periods of the tops from the vehicle. If the soft top is ...
... also be used independently. Removing The Soft Top 1. Remove the hard top. Refer to "Freedom Top ThreePiece Modular Hard Top - Front/Rear Panel Removal" later in this section. Your vehicle warranty will not cover damage resulting from the sport bar. 120 UNDERSTANDING THE FEATURES OF YOUR VEHICLE ...the factory for shipping purposes only. The soft top was installed at the same time for four-door models) • Right and left door frames • Door frame attachment knobs (four for two-door models, six for extended periods of the tops from the vehicle. If the soft top is ...

Owner's Manual
Page 123
...window 2. Remove the hard top. 122 UNDERSTANDING THE FEATURES OF YOUR VEHICLE 5. Refer to "Freedom Top ThreePiece Modular Hard Top - Front/Rear Panel Removal" later in a safe place. Reinstall the hard top. Recover and re-zip the sports bar cover. Installing the Soft Top NOTE: ... items prior to "Freedom Top ThreePiece Modular Hard Top - Front/Rear Panel Installation" later in this section. Refer to hard top removal: • Right and left door frames • Door frame attachment knobs (four for two-door models, six for first time set up only. Remove the brackets using...
...window 2. Remove the hard top. 122 UNDERSTANDING THE FEATURES OF YOUR VEHICLE 5. Refer to "Freedom Top ThreePiece Modular Hard Top - Front/Rear Panel Removal" later in a safe place. Reinstall the hard top. Recover and re-zip the sports bar cover. Installing the Soft Top NOTE: ... items prior to "Freedom Top ThreePiece Modular Hard Top - Front/Rear Panel Installation" later in this section. Refer to hard top removal: • Right and left door frames • Door frame attachment knobs (four for two-door models, six for first time set up only. Remove the brackets using...

Owner's Manual
Page 130
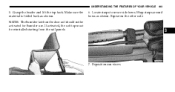
...steps for removal in this section. 2. Refer to "Front Panel(s) Removal" in reverse order. Remove the six Torx head screws that secure the hard top at the B-pillar (near top of the rear window glass. Remove both doors. 3. Open swing gate all the way to the vehicle ... bodyside) using a #40 Torx head driver (4-Door Only). 4. Lift rear window glass. 3 Rear Hard Top Removal 1. Remove the two Torx head screws that secure the hard top to ensure clearance of door) using a #40 Torx head driver. 5. Open both front panels. UNDERSTANDING THE FEATURES OF YOUR VEHICLE 129 3.
...steps for removal in this section. 2. Refer to "Front Panel(s) Removal" in reverse order. Remove the six Torx head screws that secure the hard top at the B-pillar (near top of the rear window glass. Remove both doors. 3. Open swing gate all the way to the vehicle ... bodyside) using a #40 Torx head driver (4-Door Only). 4. Lift rear window glass. 3 Rear Hard Top Removal 1. Remove the two Torx head screws that secure the hard top to ensure clearance of door) using a #40 Torx head driver. 5. Open both front panels. UNDERSTANDING THE FEATURES OF YOUR VEHICLE 129 3.

Owner's Manual
Page 161
Open the doors and insert the roof retainers into the body side channel. 21. Apply downward pressure on the top corner of the rear soft top bow (3-bow), then complete attaching the sail panel retainers into the channels above the door, starting at the front and working rearward. 19. Close the header latches and return the sun visors to their secured position. Grasp the swing gate bar and position it into the swing gate brackets. 20. 160 UNDERSTANDING THE FEATURES OF YOUR VEHICLE 18.
Open the doors and insert the roof retainers into the body side channel. 21. Apply downward pressure on the top corner of the rear soft top bow (3-bow), then complete attaching the sail panel retainers into the channels above the door, starting at the front and working rearward. 19. Close the header latches and return the sun visors to their secured position. Grasp the swing gate bar and position it into the swing gate brackets. 20. 160 UNDERSTANDING THE FEATURES OF YOUR VEHICLE 18.
Owner's Manual
Page 164
Make sure the material is folded back as shown. NOTE: The Sunrider latch on the other side. 3 7. If activated, the soft top must be activated for Sunrider use. Grasp the header and lift the top back. Wrap straps around bows as shown. Repeat on the door rail should not be reinstalled starting from the sail panels. 6. UNDERSTANDING THE FEATURES OF YOUR VEHICLE 163 5. Locate straps to secure side bows. Reposition sun visors.
Make sure the material is folded back as shown. NOTE: The Sunrider latch on the other side. 3 7. If activated, the soft top must be activated for Sunrider use. Grasp the header and lift the top back. Wrap straps around bows as shown. Repeat on the door rail should not be reinstalled starting from the sail panels. 6. UNDERSTANDING THE FEATURES OF YOUR VEHICLE 163 5. Locate straps to secure side bows. Reposition sun visors.

Owner's Manual
Page 208
... chime and an indicator light will stay on for more than 1 mi (2 km). 9. Oil Pressure Warning Light Shows low engine oil pressure. If the driver's door is operated. Push the multifunction control lever away from the OFF to indicate function check at vehicle startup. If the light stays on while driving... open, and the headlights or park lights are on , the High Beam Indicator Light will remain illuminated and a chime will sound. 10. UNDERSTANDING YOUR INSTRUMENT PANEL 207 7.
... chime and an indicator light will stay on for more than 1 mi (2 km). 9. Oil Pressure Warning Light Shows low engine oil pressure. If the driver's door is operated. Push the multifunction control lever away from the OFF to indicate function check at vehicle startup. If the light stays on while driving... open, and the headlights or park lights are on , the High Beam Indicator Light will remain illuminated and a chime will sound. 10. UNDERSTANDING YOUR INSTRUMENT PANEL 207 7.

Owner's Manual
Page 213
... may be sure to indicate the next scheduled oil change indicator system. Vehicle Warning Messages When the appropriate conditions exist, messages such as "door" (indicates that the vehicle has been driven. The engine oil change indicator system is open or ajar), "gASCAP" (which means the... switch to the ON/RUN position. To turn the ignition switch to the ON position (Do not start the engine). 212 UNDERSTANDING YOUR INSTRUMENT PANEL U.S. The "CHANgE OIL" message will continue to display each time you turn off ), and "noFUSE" (indicates that your personal driving style...
... may be sure to indicate the next scheduled oil change indicator system. Vehicle Warning Messages When the appropriate conditions exist, messages such as "door" (indicates that the vehicle has been driven. The engine oil change indicator system is open or ajar), "gASCAP" (which means the... switch to the ON/RUN position. To turn the ignition switch to the ON position (Do not start the engine). 212 UNDERSTANDING YOUR INSTRUMENT PANEL U.S. The "CHANgE OIL" message will continue to display each time you turn off ), and "noFUSE" (indicates that your personal driving style...

Owner's Manual
Page 222
... major feature of FM radio. They mainly affect the wave amplitude, and thus remain a part of the AM reception. Opening a vehicle front door will remain active for up electrical disturbances during transmission. NOTE: The radio, steering wheel radio controls (if equipped), and six-disc CD/DVD ... feature. 4 FM Reception Because FM transmission is varied to 10 minutes after the ignition switch has been turned OFF. UNDERSTANDING YOUR INSTRUMENT PANEL 221 Two Types of Signals There are two basic types of radio signals: AM or Amplitude Modulation, in which the frequency of the wave...
... major feature of FM radio. They mainly affect the wave amplitude, and thus remain a part of the AM reception. Opening a vehicle front door will remain active for up electrical disturbances during transmission. NOTE: The radio, steering wheel radio controls (if equipped), and six-disc CD/DVD ... feature. 4 FM Reception Because FM transmission is varied to 10 minutes after the ignition switch has been turned OFF. UNDERSTANDING YOUR INSTRUMENT PANEL 221 Two Types of Signals There are two basic types of radio signals: AM or Amplitude Modulation, in which the frequency of the wave...

Owner's Manual
Page 409
...; If you carry special cargo such as chemicals, fertilizers, de-icer salt, etc., assure that the drain holes in the lower edges of the doors, rocker panels and tailgate must be kept clear and open. • If you drive on scratches or chips as soon as possible. Your authorized dealer has touch...
...; If you carry special cargo such as chemicals, fertilizers, de-icer salt, etc., assure that the drain holes in the lower edges of the doors, rocker panels and tailgate must be kept clear and open. • If you drive on scratches or chips as soon as possible. Your authorized dealer has touch...

Owner's Manual
Page 465
... TOP THREE-PIECE MODULAR HARD TOP Front Panel(s) RemovalFront Panel(s) InstallationFront Panel(s) Installation Only (With Rear Hard Top Removed)Rear Hard Top RemovalRear Hard Top InstallationDOOR FRAME Door Frame Removal (Two-Door Models)Door Frame Installation (Two-Door Models)Door Frame Removal (Four-Door Models)Door Frame Installation (Four-Door Models)SOFT TOP (TWO-DOOR MODELS) Folding Down The Soft Top Putting...
... TOP THREE-PIECE MODULAR HARD TOP Front Panel(s) RemovalFront Panel(s) InstallationFront Panel(s) Installation Only (With Rear Hard Top Removed)Rear Hard Top RemovalRear Hard Top InstallationDOOR FRAME Door Frame Removal (Two-Door Models)Door Frame Installation (Two-Door Models)Door Frame Removal (Four-Door Models)Door Frame Installation (Four-Door Models)SOFT TOP (TWO-DOOR MODELS) Folding Down The Soft Top Putting...


