
Owner's Manual
Page 52
... less forceful deployment. The front passenger airbag is mounted in the instrument panel, above the glove compartment. The letters SRS are based on the airbag covers. NOTE: The front airbags are certified to the Federal regulations that are embossed on collision severity. 2 1 - Driver Airbag 2 - Passenger Airbag 3 - Knee Bolster THINGS TO KNOW...
... less forceful deployment. The front passenger airbag is mounted in the instrument panel, above the glove compartment. The letters SRS are based on the airbag covers. NOTE: The front airbags are certified to the Federal regulations that are embossed on collision severity. 2 1 - Driver Airbag 2 - Passenger Airbag 3 - Knee Bolster THINGS TO KNOW...

Owner's Manual
Page 53
.... The inflating side airbag could be obvious in the interior trim; but they are located inside the driver and front passenger seats, and their covers are no longer functional. You may not be injured because the airbags are also labeled SRS. You may cause serious injury during inflation. •...; Do not store or place items under the front seats. These protective covers for the airbag cushions are designed to open only when the airbags are inflating. • If your vehicle is equipped with side airbags, do...
.... The inflating side airbag could be obvious in the interior trim; but they are located inside the driver and front passenger seats, and their covers are no longer functional. You may not be injured because the airbags are also labeled SRS. You may cause serious injury during inflation. •...; Do not store or place items under the front seats. These protective covers for the airbag cushions are designed to open only when the airbags are inflating. • If your vehicle is equipped with side airbags, do...

Owner's Manual
Page 57
... the light does not come on, stays on after initial start the vehicle, or if it signals the inflator units. The steering wheel hub trim cover and the upper right side of the instrument panel separate and fold out of the way as you in the sides of the instrument panel...
... the light does not come on, stays on after initial start the vehicle, or if it signals the inflator units. The steering wheel hub trim cover and the upper right side of the instrument panel separate and fold out of the way as you in the sides of the instrument panel...
Owner's Manual
Page 60
... or behind the knee bolsters. • It is dangerous to try to repair any kind of badges or stickers to the steering wheel hub trim cover or the upper right side of the airbag system yourself. In addition, after an impact and the electrical system remains functional, vehicles equipped with power...
... or behind the knee bolsters. • It is dangerous to try to repair any kind of badges or stickers to the steering wheel hub trim cover or the upper right side of the airbag system yourself. In addition, after an impact and the electrical system remains functional, vehicles equipped with power...

Owner's Manual
Page 73
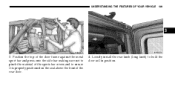
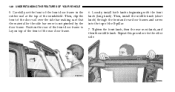
... STARTING YOUR VEHICLE a hook for attachment to the tether strap anchorage, and a means for adjusting the tension of the anchorage bars, pushing aside the seat cover material. Finally, tighten all three straps as you are designed to keep the lap portion tight around the child restraint so that you can lead...
... STARTING YOUR VEHICLE a hook for attachment to the tether strap anchorage, and a means for adjusting the tension of the anchorage bars, pushing aside the seat cover material. Finally, tighten all three straps as you are designed to keep the lap portion tight around the child restraint so that you can lead...

Owner's Manual
Page 105
... can't maintain a constant speed. Release the lever when the desired speed is ON, push down if multiple speed control switch functions are winding, icy, snow-covered, or slippery. Do not use Speed Control in engine RPM before the speed control disengages is tapped, speed decreases. If this occurs, the system can...
... can't maintain a constant speed. Release the lever when the desired speed is ON, push down if multiple speed control switch functions are winding, icy, snow-covered, or slippery. Do not use Speed Control in engine RPM before the speed control disengages is tapped, speed decreases. If this occurs, the system can...

Owner's Manual
Page 117
.../or prevent engine starting. As a safety precaution, the outlet in the heating position. The left side outlet is on plastic cap so that can be covered when not in and pops out automatically when ready for use with the ignition switch ON. Power Outlets This outlet will also operate a conventional cigar...
.../or prevent engine starting. As a safety precaution, the outlet in the heating position. The left side outlet is on plastic cap so that can be covered when not in and pops out automatically when ready for use with the ignition switch ON. Power Outlets This outlet will also operate a conventional cigar...

Owner's Manual
Page 119
Rear Cupholders Center Console STORAGE Console Storage Compartment To lock or unlock, insert ignition key and turn. To open, press the latch and lift cover. 118 UNDERSTANDING THE FEATURES OF YOUR VEHICLE Rear Cupholders The rear cupholders are located on the back of the center console.
Rear Cupholders Center Console STORAGE Console Storage Compartment To lock or unlock, insert ignition key and turn. To open, press the latch and lift cover. 118 UNDERSTANDING THE FEATURES OF YOUR VEHICLE Rear Cupholders The rear cupholders are located on the back of the center console.

Owner's Manual
Page 120
Flip up ) to the top surface of the tray. 2. In order to the slotted hole in tray. 3. Open rear compartment cover. UNDERSTANDING THE FEATURES OF YOUR VEHICLE 119 Rear Storage Compartment The rear storage compartment cover is parallel to remove the rear storage compartment cover, use the following procedure: NOTE: The rear storage compartment latch should not be used as cargo tie-down. 1. Pull up on loop and twist 90 degrees, so it is perpendicular (straight up pull loop so it is held by a springloaded latch. Rear Storage Cover 3
Flip up ) to the top surface of the tray. 2. In order to the slotted hole in tray. 3. Open rear compartment cover. UNDERSTANDING THE FEATURES OF YOUR VEHICLE 119 Rear Storage Compartment The rear storage compartment cover is parallel to remove the rear storage compartment cover, use the following procedure: NOTE: The rear storage compartment latch should not be used as cargo tie-down. 1. Pull up on loop and twist 90 degrees, so it is perpendicular (straight up pull loop so it is held by a springloaded latch. Rear Storage Cover 3

Owner's Manual
Page 121
... tear on the vehicle at the factory for shipping purposes only. Removal is mandatory to be removed from the vehicle. Your vehicle warranty will not cover damage resulting from both tops remaining on the soft top. If the soft top is removed, the pivot brackets must remove one of time. Removing...
... tear on the vehicle at the factory for shipping purposes only. Removal is mandatory to be removed from the vehicle. Your vehicle warranty will not cover damage resulting from both tops remaining on the soft top. If the soft top is removed, the pivot brackets must remove one of time. Removing...

Owner's Manual
Page 123
... future soft top procedures, refer to "Soft Top" in this section. 1. Unzip the zipper on the sport bar cover to "Freedom Top ThreePiece Modular Hard Top - Front/Rear Panel Installation" later in a safe place. Reinstall the hard top. Remove the brackets using a #T30 Torx ...
... future soft top procedures, refer to "Soft Top" in this section. 1. Unzip the zipper on the sport bar cover to "Freedom Top ThreePiece Modular Hard Top - Front/Rear Panel Installation" later in a safe place. Reinstall the hard top. Remove the brackets using a #T30 Torx ...

Owner's Manual
Page 124
... removed, follow these steps to step #5. If the pivot brackets have been removed, unzip the sport bar covers and attach the pivot brackets to "Door Frame" in this section. 4. Re-cover and re-zip sport bar covers. b. Lay the soft top into the rear of the bows facing upward. 3 UNDERSTANDING THE FEATURES OF...
... removed, follow these steps to step #5. If the pivot brackets have been removed, unzip the sport bar covers and attach the pivot brackets to "Door Frame" in this section. 4. Re-cover and re-zip sport bar covers. b. Lay the soft top into the rear of the bows facing upward. 3 UNDERSTANDING THE FEATURES OF...

Owner's Manual
Page 126
NOTE: A visual instruction sheet is not tangled in the soft top bows before you lift the top. 7. Also, it was intended as a protective cover for bottom of the vehicle, and thus cannot properly carry any additional loads such as a structural member of rear window) and set aside. Do not ... additional loads other than environmental (rain, snow, etc.). 3 CAUTION! Refer to the windshield frame and bodyside, or fully removed. Unsnap and remove the black boot cover. It was not designed as roof racks, spare tires, building, hunting, or camping supplies, and/or luggage, etc. This...
NOTE: A visual instruction sheet is not tangled in the soft top bows before you lift the top. 7. Also, it was intended as a protective cover for bottom of the vehicle, and thus cannot properly carry any additional loads such as a structural member of rear window) and set aside. Do not ... additional loads other than environmental (rain, snow, etc.). 3 CAUTION! Refer to the windshield frame and bodyside, or fully removed. Unsnap and remove the black boot cover. It was not designed as roof racks, spare tires, building, hunting, or camping supplies, and/or luggage, etc. This...

Owner's Manual
Page 135
Set the door frame pin into the rubber seal at the top of the windshield. 4. Starting with the front of the body side, behind the door opening. 3. After the door frame pin has been set into the body side hole, carefully set the front of the door frame into the hole on top of the door frame, clip it over the metal side bar and then clip the rear, making sure that the material for the side bar covers is not pinched by the door frame. Unfold door frame and unscrew thumbscrews. 2. 134 UNDERSTANDING THE FEATURES OF YOUR VEHICLE Door Frame Installation (Two-Door Models) 1.
Set the door frame pin into the rubber seal at the top of the windshield. 4. Starting with the front of the body side, behind the door opening. 3. After the door frame pin has been set into the body side hole, carefully set the front of the door frame into the hole on top of the door frame, clip it over the metal side bar and then clip the rear, making sure that the material for the side bar covers is not pinched by the door frame. Unfold door frame and unscrew thumbscrews. 2. 134 UNDERSTANDING THE FEATURES OF YOUR VEHICLE Door Frame Installation (Two-Door Models) 1.
Owner's Manual
Page 140
Position the top of the door frame against the metal sport bar and press onto the side bar making sure not to pinch the material of the rear door. 4. Loosely install the rear knob (long knob) to ensure it is properly positioned on the seal above the front of the sports bar covers and to hold the door rail in position. UNDERSTANDING THE FEATURES OF YOUR VEHICLE 139 3 3.
Position the top of the door frame against the metal sport bar and press onto the side bar making sure not to pinch the material of the rear door. 4. Loosely install the rear knob (long knob) to ensure it is properly positioned on the seal above the front of the sports bar covers and to hold the door rail in position. UNDERSTANDING THE FEATURES OF YOUR VEHICLE 139 3 3.
Owner's Manual
Page 141
.... Then, clip the front of the windshield. Loosely install both knobs beginning with the front knob (long knob). Repeat this procedure for the side bar cover is not pinched by the door frame. 140 UNDERSTANDING THE FEATURES OF YOUR VEHICLE 5. Position the rear of the front door frame to lay on...
.... Then, clip the front of the windshield. Loosely install both knobs beginning with the front knob (long knob). Repeat this procedure for the side bar cover is not pinched by the door frame. 140 UNDERSTANDING THE FEATURES OF YOUR VEHICLE 5. Position the rear of the front door frame to lay on...

Owner's Manual
Page 148
... and body side channel. Pull the zipper up, across the top and down on the rear window to disengage from the zipper on the top cover. Once unzipped, remove side window retainers from the rear lower corner, completely unzip the window. 3 9. Zipper pulls will stay on the opposite side. Undo the...
... and body side channel. Pull the zipper up, across the top and down on the rear window to disengage from the zipper on the top cover. Once unzipped, remove side window retainers from the rear lower corner, completely unzip the window. 3 9. Zipper pulls will stay on the opposite side. Undo the...

Owner's Manual
Page 175
Stow the windows carefully to the left lower corner. Beginning from the door channel and body side channel. Zipper pulls will stay on the top cover. Pull the zipper up, across the top and down on the rear window to disengage from the zipper on the rear window. Undo the Velcro ...
Stow the windows carefully to the left lower corner. Beginning from the door channel and body side channel. Zipper pulls will stay on the top cover. Pull the zipper up, across the top and down on the rear window to disengage from the zipper on the rear window. Undo the Velcro ...

Owner's Manual
Page 194
Open sport bar Velcro covering. 4. UNDERSTANDING THE FEATURES OF YOUR VEHICLE 193 Lowering The Windshield And Removing Side Bars 1. Remove the two top hex bolts (13 mm), and the one ... side bar, and one side hex bolt (13 mm) visible through the trim (Do not remove plastic corner trim, sun visor bolts, or sport bar covering). 3. Remove the one hex bolt (13 mm) visible through the plastic trim on bottom side of side bar, one hex bolt (13 mm) on top...
Open sport bar Velcro covering. 4. UNDERSTANDING THE FEATURES OF YOUR VEHICLE 193 Lowering The Windshield And Removing Side Bars 1. Remove the two top hex bolts (13 mm), and the one ... side bar, and one side hex bolt (13 mm) visible through the trim (Do not remove plastic corner trim, sun visor bolts, or sport bar covering). 3. Remove the one hex bolt (13 mm) visible through the plastic trim on bottom side of side bar, one hex bolt (13 mm) on top...

Owner's Manual
Page 195
NOTE: Store all of the storage bin cover. Remove side bar assembly, and reattach sport bar Velcro covering. 6. Remove the side bars from the side bars, as described or they may result. See your vehicle. To safely store the side bars in their ...
NOTE: Store all of the storage bin cover. Remove side bar assembly, and reattach sport bar Velcro covering. 6. Remove the side bars from the side bars, as described or they may result. See your vehicle. To safely store the side bars in their ...

