Owner Manual
Page 27
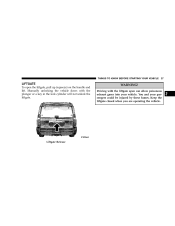
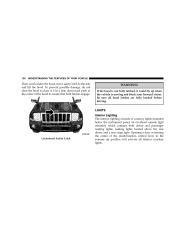
THINGS TO KNOW BEFORE STARTING YOUR VEHICLE 27 LIFTGATE To open can allow poisonous exhaust gases into your passengers could be injured by these fumes. You and your vehicle. Manually unlocking the vehicle doors with the liftgate open the liftgate, pull up (squeeze) on the handle and lift. Driving with the plunger or a key in the lock cylinder will not unlock the liftgate. WARNING! Keep the liftgate closed when you are operating the vehicle. 2 Liftgate Release
THINGS TO KNOW BEFORE STARTING YOUR VEHICLE 27 LIFTGATE To open can allow poisonous exhaust gases into your passengers could be injured by these fumes. You and your vehicle. Manually unlocking the vehicle doors with the liftgate open the liftgate, pull up (squeeze) on the handle and lift. Driving with the plunger or a key in the lock cylinder will not unlock the liftgate. WARNING! Keep the liftgate closed when you are operating the vehicle. 2 Liftgate Release

Owner Manual
Page 30
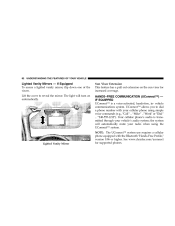
... up during the auto-closure it when you want the window to stop . Opening either the up automatically. To close the window part way, lift the window switch to the first detent and release when you want the window to stop . Remove the obstacle and use the window switch again...obstacle during the auto-up on the switch briefly. If this feature. Auto Up Feature with Anti-Pinch Protection (Driver's and Front Passenger Door Only) Lift the window switch to close the window manually. To stop . To cancel the "Auto Down" movement, operate the switch in either front door will ...
... up during the auto-closure it when you want the window to stop . Opening either the up automatically. To close the window part way, lift the window switch to the first detent and release when you want the window to stop . Remove the obstacle and use the window switch again...obstacle during the auto-up on the switch briefly. If this feature. Auto Up Feature with Anti-Pinch Protection (Driver's and Front Passenger Door Only) Lift the window switch to close the window manually. To stop . To cancel the "Auto Down" movement, operate the switch in either front door will ...
Owner Manual
Page 82
...IF EQUIPPED UConnect™ is transmitted through your cellular phone using the UConnect™ system. UConnect™ allows you to reveal the mirror. Lift the cover to dial a phone number with the Bluetooth ЉHands-Free Profile,Љ version 0.96 or higher. Your cellular phone's ...free, in- See www.chrysler.com/uconnect for increased coverage. Lighted Vanity Mirror The light will automatically mute your radio when using simple voice commands (e.g., ЉCall" ѧ "Mike" ѧ"WorkЉ or ЉDial" ѧ "248-555-1212Љ). the system will...
...IF EQUIPPED UConnect™ is transmitted through your cellular phone using the UConnect™ system. UConnect™ allows you to reveal the mirror. Lift the cover to dial a phone number with the Bluetooth ЉHands-Free Profile,Љ version 0.96 or higher. Your cellular phone's ...free, in- See www.chrysler.com/uconnect for increased coverage. Lighted Vanity Mirror The light will automatically mute your radio when using simple voice commands (e.g., ЉCall" ѧ "Mike" ѧ"WorkЉ or ЉDial" ѧ "248-555-1212Љ). the system will...

Owner Manual
Page 105
... phone set up on the bar located on the front of the seat near the floor. Adjust any seat only while the vehicle is dangerous. Lift up SEATS WARNING! The sudden movement of them Confirmation prompts Confirmations prompts Delete a name Delete Language Select language List names List all List paired phones...
... phone set up on the bar located on the front of the seat near the floor. Adjust any seat only while the vehicle is dangerous. Lift up SEATS WARNING! The sudden movement of them Confirmation prompts Confirmations prompts Delete a name Delete Language Select language List names List all List paired phones...
Owner Manual
Page 106
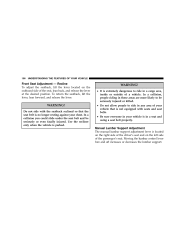
... with seats and seat belts. • Be sure everyone in your chest. Recline To adjust the seatback, lift the lever located on the left side of the passenger's seat. To return the seatback, lift the lever, lean forward, and release the lever. Manual Lumbar Support Adjustment The manual lumbar support adjustment lever...
... with seats and seat belts. • Be sure everyone in your chest. Recline To adjust the seatback, lift the lever located on the left side of the passenger's seat. To return the seatback, lift the lever, lean forward, and release the lever. Manual Lumbar Support Adjustment The manual lumbar support adjustment lever...
Owner Manual
Page 120
... up position will activate all hood latches are fully latched before driving. To prevent possible damage, do not slam the hood to the left, and lift the hood. If the hood is moving and block your forward vision.
... up position will activate all hood latches are fully latched before driving. To prevent possible damage, do not slam the hood to the left, and lift the hood. If the hood is moving and block your forward vision.
Owner Manual
Page 134
...striking objects or other vehicles. ERM (Electronic Rollover Mitigation) This system anticipates the potential for wheel lift by prevailing road conditions. When ERM determines that wheel lift will only intervene during severe or evasive driving maneuvers. BAS (Brake Assist System) cannot prevent the ...natural laws of the steering wheel angle and vehicles speed are sufficient to potentially cause wheel lift, it increase the traction afforded by monitoring the driver's steering wheel input and the speed of others. BAS cannot prevent accidents...
...striking objects or other vehicles. ERM (Electronic Rollover Mitigation) This system anticipates the potential for wheel lift by prevailing road conditions. When ERM determines that wheel lift will only intervene during severe or evasive driving maneuvers. BAS (Brake Assist System) cannot prevent the ...natural laws of the steering wheel angle and vehicles speed are sufficient to potentially cause wheel lift, it increase the traction afforded by monitoring the driver's steering wheel input and the speed of others. BAS cannot prevent accidents...
Owner Manual
Page 135
... and driving conditions, influence the chance that involve leaving the roadway or striking objects or other vehicles. ERM cannot prevent all wheel lift or rollovers, especially those that wheel lift or rollover may also be exploited in counteracting the over /under steering of the vehicle by the driver and compares it to...
... and driving conditions, influence the chance that involve leaving the roadway or striking objects or other vehicles. ERM cannot prevent all wheel lift or rollovers, especially those that wheel lift or rollover may also be exploited in counteracting the over /under steering of the vehicle by the driver and compares it to...
Owner Manual
Page 167
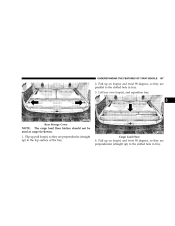
Cargo Load Floor 4. UNDERSTANDING THE FEATURES OF YOUR VEHICLE 167 2. Pull up on loop(s) and twist 90 degrees, so they are perpendicular (straight up) to the top surface of the tray. Pull up ) to the slotted hole in tray. 3. Flip up pull loop(s) so they are perpendicular (straight up on loop(s) and twist 90 degrees, so they are parallel to the slotted hole in tray. Lift tray over loop(s), and reposition tray. 3 Rear Storage Cover NOTE: The cargo load floor latches should not be used as cargo tie-downs. 1.
Cargo Load Floor 4. UNDERSTANDING THE FEATURES OF YOUR VEHICLE 167 2. Pull up on loop(s) and twist 90 degrees, so they are perpendicular (straight up) to the top surface of the tray. Pull up ) to the slotted hole in tray. 3. Flip up pull loop(s) so they are perpendicular (straight up on loop(s) and twist 90 degrees, so they are parallel to the slotted hole in tray. Lift tray over loop(s), and reposition tray. 3 Rear Storage Cover NOTE: The cargo load floor latches should not be used as cargo tie-downs. 1.
Owner Manual
Page 224
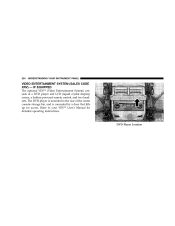
DVD Player Location Refer to your VES™ User's Manual for access. IF EQUIPPED The optional VES™ (Video Entertainment System) consists of the center console storage bin, and is mounted in the rear of a DVD player and LCD (liquid crystal display) screen, a battery-powered remote control, and two headsets. 224 UNDERSTANDING YOUR INSTRUMENT PANEL VIDEO ENTERTAINMENT SYSTEM (SALES CODE XRV) - The DVD player is concealed by a door that lifts up for detailed operating instructions.
DVD Player Location Refer to your VES™ User's Manual for access. IF EQUIPPED The optional VES™ (Video Entertainment System) consists of the center console storage bin, and is mounted in the rear of a DVD player and LCD (liquid crystal display) screen, a battery-powered remote control, and two headsets. 224 UNDERSTANDING YOUR INSTRUMENT PANEL VIDEO ENTERTAINMENT SYSTEM (SALES CODE XRV) - The DVD player is concealed by a door that lifts up for detailed operating instructions.
Owner Manual
Page 324
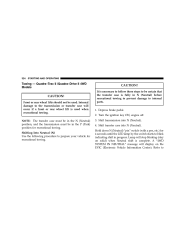
... engine off. 3. Shift transfer case into N (Neutral). 4. Internal damage to the transmission or transfer case will occur if a front or rear wheel lift is fully in progress. 324 STARTING AND OPERATING Towing - Hold down N (Neutral) "pin" switch (with a pen, etc.) for recreational towing. Shift...blink indicating shift in N (Neutral) before recreational towing to prevent damage to be used when recreational towing. Front or rear wheel lifts should not be certain that the transfer case is used . Shifting Into Neutral (N) Use the following procedure to CAUTION! A "4WD...
... engine off. 3. Shift transfer case into N (Neutral). 4. Internal damage to the transmission or transfer case will occur if a front or rear wheel lift is fully in progress. 324 STARTING AND OPERATING Towing - Hold down N (Neutral) "pin" switch (with a pen, etc.) for recreational towing. Shift...blink indicating shift in N (Neutral) before recreational towing to prevent damage to be used when recreational towing. Front or rear wheel lifts should not be certain that the transfer case is used . Shifting Into Neutral (N) Use the following procedure to CAUTION! A "4WD...
Owner Manual
Page 332
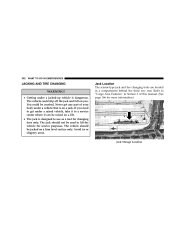
.... If you . Jack Location The scissor-type jack and tire changing tools are located in Section 3 of your body under a vehicle that is on a lift. • The jack is dangerous. Refer to "Cargo Area Features" in a compartment behind the third row seat. The vehicle could be raised on a ... part of this manual. (See page 166 for more information.) Jack Storage Location Avoid ice or slippery areas. The jack should be used to lift the vehicle for service purposes. 332 WHAT TO DO IN EMERGENCIES JACKING AND TIRE CHANGING WARNING! • Getting under a jacked-up vehicle is ...
.... If you . Jack Location The scissor-type jack and tire changing tools are located in Section 3 of your body under a vehicle that is on a lift. • The jack is dangerous. Refer to "Cargo Area Features" in a compartment behind the third row seat. The vehicle could be raised on a ... part of this manual. (See page 166 for more information.) Jack Storage Location Avoid ice or slippery areas. The jack should be used to lift the vehicle for service purposes. 332 WHAT TO DO IN EMERGENCIES JACKING AND TIRE CHANGING WARNING! • Getting under a jacked-up vehicle is ...
Owner Manual
Page 336
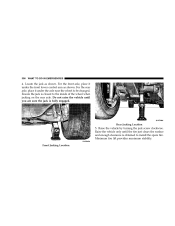
... shown. Do not raise the vehicle until the tire just clears the surface and enough clearance is obtained to install the spare tire. Minimum tire lift provides maximum stability. For the rear axle, place it under the axle near the wheel to the inside of the wheel when jacking on the...
... shown. Do not raise the vehicle until the tire just clears the surface and enough clearance is obtained to install the spare tire. Minimum tire lift provides maximum stability. For the rear axle, place it under the axle near the wheel to the inside of the wheel when jacking on the...
