
Owner's Manual
Page 5
INTRODUCTION 5 Although your vehicle has a sport bar and side bars for some extra protection, it has low sides and a folding windshield. In a roll over crash, an unbelted person is no structural ...
INTRODUCTION 5 Although your vehicle has a sport bar and side bars for some extra protection, it has low sides and a folding windshield. In a roll over crash, an unbelted person is no structural ...

Owner's Manual
Page 53
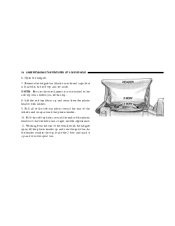
... seat with seats and seat belts. • Be sure everyone in a cargo area, inside or outside of the other end. Place the opposite loop around sport bar, and put one end of the strap through loop of a vehicle. UNDERSTANDING THE FEATURES OF YOUR VEHICLE 53 4. Pull to ride in your vehicle...
... seat with seats and seat belts. • Be sure everyone in a cargo area, inside or outside of the other end. Place the opposite loop around sport bar, and put one end of the strap through loop of a vehicle. UNDERSTANDING THE FEATURES OF YOUR VEHICLE 53 4. Pull to ride in your vehicle...

Owner's Manual
Page 68
Remove the brackets using a #T40 Torx head driver. Recover and re-zip the sports bar cover. If the door frames have been removed, unzip the sport bar cover and attach the pivot brackets and screws with a #T40 Torx head driver. Refer to "Hard Top Installation" in this section. 3. 68 UNDERSTANDING... the soft top has been removed, follow these steps to "Soft Top" in this section. a. Re-cover and re-zip sport bar cover. b. If the soft top is on the sport bar cover to "Hard Top Removal" in a safe place. 1. Reinstall the hard top. If the pivot brackets have been removed...
Remove the brackets using a #T40 Torx head driver. Recover and re-zip the sports bar cover. If the door frames have been removed, unzip the sport bar cover and attach the pivot brackets and screws with a #T40 Torx head driver. Refer to "Hard Top Installation" in this section. 3. 68 UNDERSTANDING... the soft top has been removed, follow these steps to "Soft Top" in this section. a. Re-cover and re-zip sport bar cover. b. If the soft top is on the sport bar cover to "Hard Top Removal" in a safe place. 1. Reinstall the hard top. If the pivot brackets have been removed...
Owner's Manual
Page 70
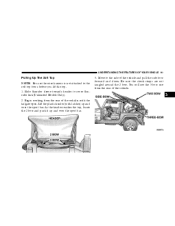
... the soft top fabric around the plastic header. 10. As the header reaches the top, locate the 2 bow and push it up and over the sport bar. Pull all of the soft top fabric toward the rear of the vehicle and wrap around the ends of the vehicle with the tailgate... open, lift the plastic header up and over the sport bar. Lift the soft top fabric up and away from the rear of the plastic header so that is not attached to the soft top...
... the soft top fabric around the plastic header. 10. As the header reaches the top, locate the 2 bow and push it up and over the sport bar. Pull all of the soft top fabric toward the rear of the vehicle and wrap around the ends of the vehicle with the tailgate... open, lift the plastic header up and over the sport bar. Lift the soft top fabric up and away from the rear of the plastic header so that is not attached to the soft top...

Owner's Manual
Page 73
... around 2 bow attaching it up and around the 2 bow. 17. Grasp the fabric rearward of the vehicle and gently pull the sail panels over the sport bar. Look up at this time. Move to it's original position. 3 NOTE: Do not tuck the sail panel retainers at the 2 bow. Make sure that...
... around 2 bow attaching it up and around the 2 bow. 17. Grasp the fabric rearward of the vehicle and gently pull the sail panels over the sport bar. Look up at this time. Move to it's original position. 3 NOTE: Do not tuck the sail panel retainers at the 2 bow. Make sure that...
Owner's Manual
Page 91
... vehicle and pull the side bow forward and down. As the header reaches the top, locate the 2 bow and push it up and over the sport bar. 3. You will see the 3 bow rise from the rear of the vehicle. 3 Be sure the check straps are not tangled around the 2 bow. Begin... working from the rear of the vehicle, with latches) up and over the sport bar. Move to the soft top bows before you lift the top. 1. Slide Sunrider sleeve towards header to cover Sunrider link (Unlimited Models Only). 2. Lift...
... vehicle and pull the side bow forward and down. As the header reaches the top, locate the 2 bow and push it up and over the sport bar. 3. You will see the 3 bow rise from the rear of the vehicle. 3 Be sure the check straps are not tangled around the 2 bow. Begin... working from the rear of the vehicle, with latches) up and over the sport bar. Move to the soft top bows before you lift the top. 1. Slide Sunrider sleeve towards header to cover Sunrider link (Unlimited Models Only). 2. Lift...

Owner's Manual
Page 93
Move to the rear of the vehicle and gently pull the sail panels over the sport bar. 3 NOTE: Do not tuck the drip rails into the door frame at this time. Guide side bows down over the 3 bow. Make sure door rail Sunrider pins engage into bracket on side bows (Unlimited Models Only). 7. Let them from the door frame. 8. Grasp the drip rail retainer and untuck them hang down into bracket on door rails. UNDERSTANDING THE FEATURES OF YOUR VEHICLE 93 6.
Move to the rear of the vehicle and gently pull the sail panels over the sport bar. 3 NOTE: Do not tuck the drip rails into the door frame at this time. Guide side bows down over the 3 bow. Make sure door rail Sunrider pins engage into bracket on side bows (Unlimited Models Only). 7. Let them from the door frame. 8. Grasp the drip rail retainer and untuck them hang down into bracket on door rails. UNDERSTANDING THE FEATURES OF YOUR VEHICLE 93 6.
Owner's Manual
Page 100
...sun visors to the side. 4. Locate strap to secure the header to header and tighten. 1. To Lower 4. Release header latches from header and sport bar. 2. Slide plastic sleeve rearward over Sunrider™ link. Unclip and move the sun visors to the side. 3. Attach and reposition sunvisors. Wrap... strap around sport bar and hook to the sport bar. Grasp the front header and pull to plastic retainer on header. Secure latches to the front of the vehicle. 5. ...
...sun visors to the side. 4. Locate strap to secure the header to header and tighten. 1. To Lower 4. Release header latches from header and sport bar. 2. Slide plastic sleeve rearward over Sunrider™ link. Unclip and move the sun visors to the side. 3. Attach and reposition sunvisors. Wrap... strap around sport bar and hook to the sport bar. Grasp the front header and pull to plastic retainer on header. Secure latches to the front of the vehicle. 5. ...

Owner's Manual
Page 105
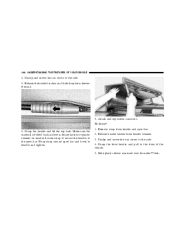
... and rear Torx head screws for safekeeping. 4. Do not remove the head impact foam from the side bars, as damage to the vehicle. Unzip the sport bar padding to the windshield frame. NOTE: Store all of the side bars. UNDERSTANDING THE FEATURES OF YOUR VEHICLE 105 3. CAUTION! Shift the side bar... side bar. 3 Do not loosen or remove the adjusting bolts on the side of the mounting bolts in place. Remove the side bars and rezip sport bar padding in their original threaded holes and tighten for each side bar to expose the side bar bolts. Remove the two Torx head screws...
... and rear Torx head screws for safekeeping. 4. Do not remove the head impact foam from the side bars, as damage to the vehicle. Unzip the sport bar padding to the windshield frame. NOTE: Store all of the side bars. UNDERSTANDING THE FEATURES OF YOUR VEHICLE 105 3. CAUTION! Shift the side bar... side bar. 3 Do not loosen or remove the adjusting bolts on the side of the mounting bolts in place. Remove the side bars and rezip sport bar padding in their original threaded holes and tighten for each side bar to expose the side bar bolts. Remove the two Torx head screws...
Owner's Manual
Page 126
... play position. 126 UNDERSTANDING YOUR INSTRUMENT PANEL • Oldies • Other M • Phone In • Pop M • Religion • Rock M • Science • Social • Sport • Travel • Varied • Weather By pressing the SEEK button when the PTY icon is activated while in the FM mode.
... play position. 126 UNDERSTANDING YOUR INSTRUMENT PANEL • Oldies • Other M • Phone In • Pop M • Religion • Rock M • Science • Social • Sport • Travel • Varied • Weather By pressing the SEEK button when the PTY icon is activated while in the FM mode.
Owner's Manual
Page 145
Time Press the TIME button to 100 channels of music, sports, news, entertainment, and programming for 3 seconds. System Activation To activate your system: 1. This service offers up to change the display from its satellites and broadcasting ...
Time Press the TIME button to 100 channels of music, sports, news, entertainment, and programming for 3 seconds. System Activation To activate your system: 1. This service offers up to change the display from its satellites and broadcasting ...

Owner's Manual
Page 181
...-Lock Brake System is a better view of the road, allowing you to anticipate problems. They are designed to possible detrimental effects of gravity than lowslung sports cars are not designed for low-speed pulling power or to operate this type, failure to improve handling and control on slippery or difficult terrain...
...-Lock Brake System is a better view of the road, allowing you to anticipate problems. They are designed to possible detrimental effects of gravity than lowslung sports cars are not designed for low-speed pulling power or to operate this type, failure to improve handling and control on slippery or difficult terrain...


