Owner's Manual
Page 15
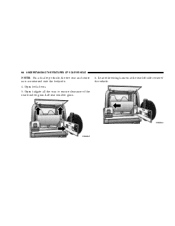
... used to start the vehicle is turned on both hard-top and soft-top models are closed without using the key. To open the tailgate, lift the latch release and swing open any door. To lock a door when leaving your vehicle, press to lock or unlock the doors, tailgate, console storage...
... used to start the vehicle is turned on both hard-top and soft-top models are closed without using the key. To open the tailgate, lift the latch release and swing open any door. To lock a door when leaving your vehicle, press to lock or unlock the doors, tailgate, console storage...
Owner's Manual
Page 36
... back of the rear seat prior to attaching and adjusting the strap. Pull up on the tether strap so that it tight if necessary. Then lift the tether anchorage cover directly behind the seat where you push the child restraint rearward and downward into the seat, removing slack in the straps...
... back of the rear seat prior to attaching and adjusting the strap. Pull up on the tether strap so that it tight if necessary. Then lift the tether anchorage cover directly behind the seat where you push the child restraint rearward and downward into the seat, removing slack in the straps...
Owner's Manual
Page 50
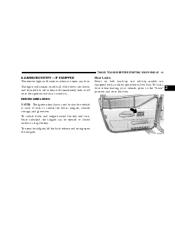
..., lean back, and release lever at desired position. Adjusting a seat while the vehicle is moving is parked. To return seatback, lift the lever, lean forward and release the lever. The sudden movement of a vehicle seen in the right side convex mirror will look smaller and f arther ...
..., lean back, and release lever at desired position. Adjusting a seat while the vehicle is moving is parked. To return seatback, lift the lever, lean forward and release the lever. The sudden movement of a vehicle seen in the right side convex mirror will look smaller and f arther ...
Owner's Manual
Page 52
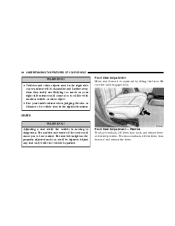
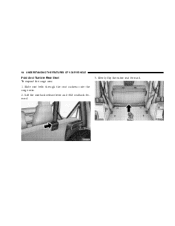
Slowly flip the entire seat forward. Slide seat belts through the seat cushions into the cargo area. 2. Lift the seatback release lever and fold seatback forward. 3. 52 UNDERSTANDING THE FEATURES OF YOUR VEHICLE Fold And Tumble Rear Seat To expand the cargo area: 1.
Slowly flip the entire seat forward. Slide seat belts through the seat cushions into the cargo area. 2. Lift the seatback release lever and fold seatback forward. 3. 52 UNDERSTANDING THE FEATURES OF YOUR VEHICLE Fold And Tumble Rear Seat To expand the cargo area: 1.
Owner's Manual
Page 55
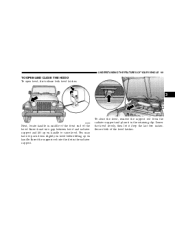
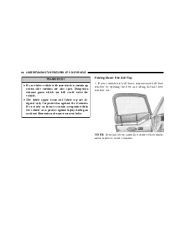
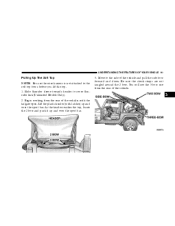
... into the slot in middle of the front end of the hood latches. Insert the support rod into gap between hood and radiator support and lift up on handle to raise hood. To close the hood, remove the support rod from the radiator support and place it drop the last few... inches. You may have to push down slightly on hood before lifting up on handle. UNDERSTANDING THE FEATURES OF YOUR VEHICLE 55 TO OPEN AND CLOSE THE HOOD To open hood, first release both of the hood...
... into the slot in middle of the front end of the hood latches. Insert the support rod into gap between hood and radiator support and lift up on handle to raise hood. To close the hood, remove the support rod from the radiator support and place it drop the last few... inches. You may have to push down slightly on hood before lifting up on handle. UNDERSTANDING THE FEATURES OF YOUR VEHICLE 55 TO OPEN AND CLOSE THE HOOD To open hood, first release both of the hood...
Owner's Manual
Page 66
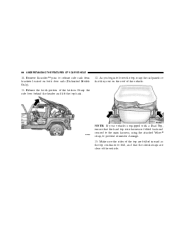
... store it can be used independently. The soft top and the hard top are to be easily removed from the vehicle. Refer to the body. Lift the Add-A-Trunk™ out and place the knobs in the molded-in this section. 3. Storage space is not desired, it in your soft top...
... store it can be used independently. The soft top and the hard top are to be easily removed from the vehicle. Refer to the body. Lift the Add-A-Trunk™ out and place the knobs in the molded-in this section. 3. Storage space is not desired, it in your soft top...
Owner's Manual
Page 70
... away from the rear of the plastic header so that is not attached to the soft top bows before you lift the top. 8. Working from the plastic header with the tailgate open, lift the plastic header up and over the sport bar. 70 UNDERSTANDING THE FEATURES OF YOUR VEHICLE 6. Pull the soft...
... away from the rear of the plastic header so that is not attached to the soft top bows before you lift the top. 8. Working from the plastic header with the tailgate open, lift the plastic header up and over the sport bar. 70 UNDERSTANDING THE FEATURES OF YOUR VEHICLE 6. Pull the soft...
Owner's Manual
Page 80
Locate the wiring harness at the rear left side corner of the rear window glass. Open both doors. 5. Lift rear window glass. 6. Open tailgate all the way to ensure clearance of the vehicle. 80 UNDERSTANDING THE FEATURES OF YOUR VEHICLE NOTE: On a dual top vehicle, the two rear and center nuts are retained onto the bodyside. 4.
Locate the wiring harness at the rear left side corner of the rear window glass. Open both doors. 5. Lift rear window glass. 6. Open tailgate all the way to ensure clearance of the vehicle. 80 UNDERSTANDING THE FEATURES OF YOUR VEHICLE NOTE: On a dual top vehicle, the two rear and center nuts are retained onto the bodyside. 4.
Owner's Manual
Page 82
... due to any additional loading to the top area will void any loads on the windshield frame so that there is a uniform gap between the lift glass and hard top. Set the hard top on the roof, and any additional loads such as a structural member of the hard top. 1. Inspect the...
... due to any additional loading to the top area will void any loads on the windshield frame so that there is a uniform gap between the lift glass and hard top. Set the hard top on the roof, and any additional loads such as a structural member of the hard top. 1. Inspect the...
Owner's Manual
Page 84
... top are also open. Remember, always wear seat belts. If your vehicle has half doors, remove each half door window by opening the door and lifting the half door window out. Do not rely on them to contain occupants within the vehicle or to avoid scratches. 84 UNDERSTANDING THE FEATURES OF...
... top are also open. Remember, always wear seat belts. If your vehicle has half doors, remove each half door window by opening the door and lifting the half door window out. Do not rely on them to contain occupants within the vehicle or to avoid scratches. 84 UNDERSTANDING THE FEATURES OF...
Owner's Manual
Page 88
... rails from brackets located on the roof of the latches. Release the hook portion of the vehicle. Grasp the side bow behind the header and lift the top back. 12. 88 UNDERSTANDING THE FEATURES OF YOUR VEHICLE 10. Make sure the sides of the top are clear of the vehicle. Remove...
... rails from brackets located on the roof of the latches. Release the hook portion of the vehicle. Grasp the side bow behind the header and lift the top back. 12. 88 UNDERSTANDING THE FEATURES OF YOUR VEHICLE 10. Make sure the sides of the top are clear of the vehicle. Remove...
Owner's Manual
Page 91
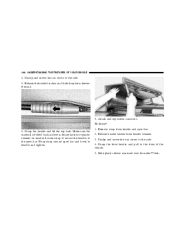
Lift the plastic header (with the tailgate open. As the header reaches the top, locate the 2 bow and push it up and over the sport bar. 3. ... the wire harness is not attached to cover Sunrider link (Unlimited Models Only). 2. Slide Sunrider sleeve towards header to the soft top bows before you lift the top. 1.
Lift the plastic header (with the tailgate open. As the header reaches the top, locate the 2 bow and push it up and over the sport bar. 3. ... the wire harness is not attached to cover Sunrider link (Unlimited Models Only). 2. Slide Sunrider sleeve towards header to the soft top bows before you lift the top. 1.
Owner's Manual
Page 100
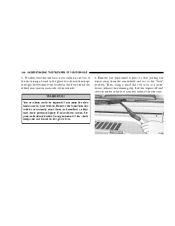
... retainer on header. Secure latches to the sport bar. Unclip and move the sun visors to the front of the vehicle. 5. Grasp the header and lift the top back. Wrap strap around sport bar and hook to the side. 4. Grasp the front header and pull to the side. 3. Attach and reposition...
... retainer on header. Secure latches to the sport bar. Unclip and move the sun visors to the front of the vehicle. 5. Grasp the header and lift the top back. Wrap strap around sport bar and hook to the side. 4. Grasp the front header and pull to the side. 3. Attach and reposition...
Owner's Manual
Page 106
... loops located in the glove box. 106 UNDERSTANDING THE FEATURES OF YOUR VEHICLE 5. Remove the bars from the windshield and out to the "lock" position. Lift the wipers off and store in your vehicle, use four of the vehicle. 6.
... loops located in the glove box. 106 UNDERSTANDING THE FEATURES OF YOUR VEHICLE 5. Remove the bars from the windshield and out to the "lock" position. Lift the wipers off and store in your vehicle, use four of the vehicle. 6.
Owner's Manual
Page 155
... fluid level at regular intervals. To activate the rear washer, depress the switch to prevent damaging the heating elements. To turn the rear wiper off, lift the bottom of the rear window to prevent damage to the first detent. Rear Window Wiper/Washer To utilize the rear wiper, press the switch...
... fluid level at regular intervals. To activate the rear washer, depress the switch to prevent damaging the heating elements. To turn the rear wiper off, lift the bottom of the rear window to prevent damage to the first detent. Rear Window Wiper/Washer To utilize the rear wiper, press the switch...
Owner's Manual
Page 178
.... Dry the brakes by gentle, intermittent pedal action while driving at higher speeds during warm-up . On fabric top models, do not drive with the lift glass up , which could cause rear wheels to sway. • Do not pile luggage or cargo higher than the top of water can cause loss...
.... Dry the brakes by gentle, intermittent pedal action while driving at higher speeds during warm-up . On fabric top models, do not drive with the lift glass up , which could cause rear wheels to sway. • Do not pile luggage or cargo higher than the top of water can cause loss...
Owner's Manual
Page 205
... recreational towing. RECREATIONAL TOWING (BEHIND MOTORHOME, ETC.) Shifting Into Neutral (N) Use the following procedure to the transfer case will occur if a front or rear wheel lift is necessary to follow these steps to be added to "Recommended Fluids, Lubricants, and Genuine Parts" in N (Neutral) before recreational towing to prevent damage to...
... recreational towing. RECREATIONAL TOWING (BEHIND MOTORHOME, ETC.) Shifting Into Neutral (N) Use the following procedure to the transfer case will occur if a front or rear wheel lift is necessary to follow these steps to be added to "Recommended Fluids, Lubricants, and Genuine Parts" in N (Neutral) before recreational towing to prevent damage to...
Owner's Manual
Page 212
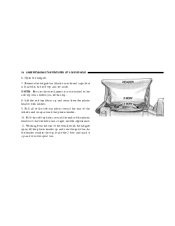
Turn the thumb screw counterclockwise to use your vehicle jack on a firm level surface only. The jack should be used to lift the vehicle for "Tire Changing Procedures." Always store the jack, lug wrench, jack handle driver, jack extension, and spare, flat or damaged tire securely in ...
Turn the thumb screw counterclockwise to use your vehicle jack on a firm level surface only. The jack should be used to lift the vehicle for "Tire Changing Procedures." Always store the jack, lug wrench, jack handle driver, jack extension, and spare, flat or damaged tire securely in ...
