
Owner's Manual
Page 5
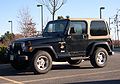
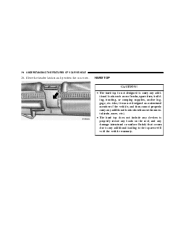
... risk of being thrown out of an open-body vehicle than out of a closed vehicle in an accident which may be equipped with a soft top or optional hard top to die than a person wearing a seal belt. Always buckle up. Operating this vehicle at excessive speeds or while intoxicated may result in loss ..., going off the road, or overturning, any of which can result in the event of an accident and do not have fully enclosed hard doors. Many of these tops do not offer structural protection in injury or death. 1 In a roll over crash, an unbelted person is significantly more each year, and...
... risk of being thrown out of an open-body vehicle than out of a closed vehicle in an accident which may be equipped with a soft top or optional hard top to die than a person wearing a seal belt. Always buckle up. Operating this vehicle at excessive speeds or while intoxicated may result in loss ..., going off the road, or overturning, any of which can result in the event of an accident and do not have fully enclosed hard doors. Many of these tops do not offer structural protection in injury or death. 1 In a roll over crash, an unbelted person is significantly more each year, and...
Owner's Manual
Page 15
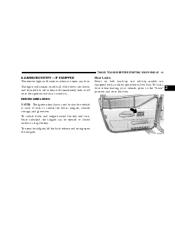
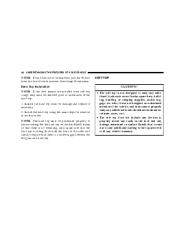
... you open the tailgate. To lock a door when leaving your vehicle, press to start the vehicle is turned on. The lights will remain on both hard-top and soft-top models are closed without using the key.
... you open the tailgate. To lock a door when leaving your vehicle, press to start the vehicle is turned on. The lights will remain on both hard-top and soft-top models are closed without using the key.
Owner's Manual
Page 44
... ...63 Cup Holders ...64 Storage ...65 ▫ Glove Compartment ...65 ▫ Console Storage Compartment - If Equipped ...65 ▫ Add-A-Trunk™ - If Equipped ...65 Dual Top - If Equipped ...66 ▫ Removing The Soft Top ...66 ▫ Installing The Soft Top ...68 Hard Top ...78 ▫ Hard Top Removal ...79 ▫ Hard Top Installation ...82
... ...63 Cup Holders ...64 Storage ...65 ▫ Glove Compartment ...65 ▫ Console Storage Compartment - If Equipped ...65 ▫ Add-A-Trunk™ - If Equipped ...65 Dual Top - If Equipped ...66 ▫ Removing The Soft Top ...66 ▫ Installing The Soft Top ...68 Hard Top ...78 ▫ Hard Top Removal ...79 ▫ Hard Top Installation ...82
Owner's Manual
Page 66
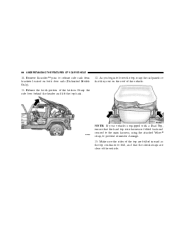
... YOUR VEHICLE When the Add-A-Trunk™ is equipped with a Dual Top, you must remove one of the tops from the rear compartment. The soft top and the hard top are to prevent any possible wear and tear on the soft top, should both tops remain on the vehicle at the factory for the wheel lock, and... lock key tool. Lift the Add-A-Trunk™ out and place the knobs in the molded-in a safe place. Failure to "Hard Top Removal" in your soft top warranty. DUAL TOP - IF EQUIPPED If your vehicle is not desired, it in storage area. Remove the...
... YOUR VEHICLE When the Add-A-Trunk™ is equipped with a Dual Top, you must remove one of the tops from the rear compartment. The soft top and the hard top are to prevent any possible wear and tear on the soft top, should both tops remain on the vehicle at the factory for the wheel lock, and... lock key tool. Lift the Add-A-Trunk™ out and place the knobs in the molded-in a safe place. Failure to "Hard Top Removal" in your soft top warranty. DUAL TOP - IF EQUIPPED If your vehicle is not desired, it in storage area. Remove the...

Owner's Manual
Page 68
...: The following items prior to step #4. Unzip the zipper on the vehicle, proceed to hard top removal: • right and left door frames • door frame attachment knobs (4) • right and left quarter windows • rear tailgate window. 2. ...pivot bracket. a. Store pivot brackets and screws in this section). 6. Remove the hard top. 68 UNDERSTANDING THE FEATURES OF YOUR VEHICLE 5. Re-cover and re-zip sport bar cover. If the soft top has been removed, follow these steps to "Hard Top Installation" in this section. 4. b. Remove the brackets using a #T40 Torx head...
...: The following items prior to step #4. Unzip the zipper on the vehicle, proceed to hard top removal: • right and left door frames • door frame attachment knobs (4) • right and left quarter windows • rear tailgate window. 2. ...pivot bracket. a. Store pivot brackets and screws in this section). 6. Remove the hard top. 68 UNDERSTANDING THE FEATURES OF YOUR VEHICLE 5. Re-cover and re-zip sport bar cover. If the soft top has been removed, follow these steps to "Hard Top Installation" in this section. 4. b. Remove the brackets using a #T40 Torx head...
Owner's Manual
Page 78
...as a structural member of the vehicle, and thus cannot properly carry any additional loads other than environmental (rain, snow, etc.). • The hard top does not include any devices to properly secure any loads on the roof, and any damage (structural or surface finish) that occurs due to ...the top area will void the vehicle warranty. HARD TOP CAUTION! • The hard top is not designed to carry any additional loading to any additional loads such as roof racks, spare tires, building...
...as a structural member of the vehicle, and thus cannot properly carry any additional loads other than environmental (rain, snow, etc.). • The hard top does not include any devices to properly secure any loads on the roof, and any damage (structural or surface finish) that occurs due to ...the top area will void the vehicle warranty. HARD TOP CAUTION! • The hard top is not designed to carry any additional loading to any additional loads such as roof racks, spare tires, building...

Owner's Manual
Page 79
...3 CAUTION! UNDERSTANDING THE FEATURES OF YOUR VEHICLE 79 CAUTION! Unbolt the six Torx head screws which secure the hard top to prevent this from occurring. Unlatch the two hard top latches located at the top of the doors, make sure that the nut does not fall into the seat belt retractor. Fold down the... sun visors and move your vehicle until the top has been either fully attached to the side. 2. Do ...
...3 CAUTION! UNDERSTANDING THE FEATURES OF YOUR VEHICLE 79 CAUTION! Unbolt the six Torx head screws which secure the hard top to prevent this from occurring. Unlatch the two hard top latches located at the top of the doors, make sure that the nut does not fall into the seat belt retractor. Fold down the... sun visors and move your vehicle until the top has been either fully attached to the side. 2. Do ...

Owner's Manual
Page 81
.... NOTE: If the red latch on the connector is installed to disconnect. 9. This will unlock connector tab, allowing the tab to be disconnected from the hard top. 3 CAUTION! Fold the harness back and secure it to the main harness using the attached Velcro strap, to be pressed down and enabling the harness... right until you can only see the latch on one end (right) of the connector and pulling to prevent foreign materials from rattling. Remove the hard top from the hard top by pressing the tab at the side of the connector. Disconnect the wire harness from the vehicle. 10.
.... NOTE: If the red latch on the connector is installed to disconnect. 9. This will unlock connector tab, allowing the tab to be disconnected from the hard top. 3 CAUTION! Fold the harness back and secure it to the main harness using the attached Velcro strap, to be pressed down and enabling the harness... right until you can only see the latch on one end (right) of the connector and pulling to prevent foreign materials from rattling. Remove the hard top from the hard top by pressing the tab at the side of the connector. Disconnect the wire harness from the vehicle. 10.
Owner's Manual
Page 82
...not designed to carry any additional loads such as a structural member of the hard top. 1. NOTE: The hard top must be positioned properly to ensure sealing. Set the hard top on the roof, and any vehicle warranty. Hard Top Installation NOTE: If the door frames are to be removed, pull the ... will void any damage (structural or surface finish) that there is no overhang. SOFT TOP CAUTION! • The soft top is a uniform gap between the lift glass and hard top. Install the hard top using the same steps for damage and replace if necessary. 2. 82 UNDERSTANDING THE FEATURES ...
...not designed to carry any additional loads such as a structural member of the hard top. 1. NOTE: The hard top must be positioned properly to ensure sealing. Set the hard top on the roof, and any vehicle warranty. Hard Top Installation NOTE: If the door frames are to be removed, pull the ... will void any damage (structural or surface finish) that there is no overhang. SOFT TOP CAUTION! • The soft top is a uniform gap between the lift glass and hard top. Install the hard top using the same steps for damage and replace if necessary. 2. 82 UNDERSTANDING THE FEATURES ...
Owner's Manual
Page 88
...to release side rails from brackets located on the roof of the vehicle. As you begin to lower the top, wrap the sail panels so that the hard top wire harness is equipped with a Dual Top, ensure that they rest on both door rails (Unlimited Models Only). 11. Grasp the side bow behind ...the header and lift the top back. 12. Release the hook portion of the top are folded inward as the top continues to prevent connector...
...to release side rails from brackets located on the roof of the vehicle. As you begin to lower the top, wrap the sail panels so that the hard top wire harness is equipped with a Dual Top, ensure that they rest on both door rails (Unlimited Models Only). 11. Grasp the side bow behind ...the header and lift the top back. 12. Release the hook portion of the top are folded inward as the top continues to prevent connector...

Owner's Manual
Page 104
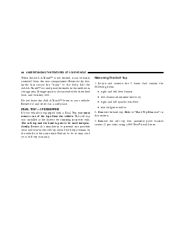
Make sure that you remove the doors, store them outside the vehicle. Lower the fabric top or remove the hard top following the instructions in some accidents. • If you carefully follow these warnings to follow these instructions may cause personal injury. Failure to help protect ...
Make sure that you remove the doors, store them outside the vehicle. Lower the fabric top or remove the hard top following the instructions in some accidents. • If you carefully follow these warnings to follow these instructions may cause personal injury. Failure to help protect ...
Owner's Manual
Page 113
UNDERSTANDING YOUR INSTRUMENT PANEL 113 Cassette Tape And Player Maintenance ...148 CD/DVD Disc Maintenance ...149 Radio Operation And Cellular Phones ...149 Climate Controls ...149 ▫ Heater Only - If Equipped ...150 ▫ Air Conditioning - If Equipped ...151 ▫ Operating Tips ...154 Rear Window Features - Hard Top Only ...154 ▫ Rear Window Defogger ...154 ▫ Rear Window Wiper/Washer ...155 4
UNDERSTANDING YOUR INSTRUMENT PANEL 113 Cassette Tape And Player Maintenance ...148 CD/DVD Disc Maintenance ...149 Radio Operation And Cellular Phones ...149 Climate Controls ...149 ▫ Heater Only - If Equipped ...150 ▫ Air Conditioning - If Equipped ...151 ▫ Operating Tips ...154 Rear Window Features - Hard Top Only ...154 ▫ Rear Window Defogger ...154 ▫ Rear Window Wiper/Washer ...155 4
Owner's Manual
Page 154
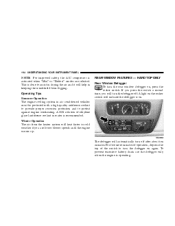
... Operation The air from fogging. The defogger will automatically turn the defogger off after about ten minutes. For five more minutes of operation, depress the top of ethylene glycol antifreeze coolant in keeping the windshield from the heater system will help in water is operating. This is done to assist in... until the engine warms up. If you press the switch a second time, you use the defogger only when the engine is recommended. REAR WINDOW FEATURES - HARD TOP ONLY Rear Window Defogger To turn the defogger on the rocker switch will turn off .
... Operation The air from fogging. The defogger will automatically turn the defogger off after about ten minutes. For five more minutes of operation, depress the top of ethylene glycol antifreeze coolant in keeping the windshield from the heater system will help in water is operating. This is done to assist in... until the engine warms up. If you press the switch a second time, you use the defogger only when the engine is recommended. REAR WINDOW FEATURES - HARD TOP ONLY Rear Window Defogger To turn the defogger on the rocker switch will turn off .
Owner's Manual
Page 182
If the brakes are required to normal air pressure before driving on pavement or other hard surfaces. Never back down a hill in R (Reverse) gear. You must return the tires to control vehicle speed, apply them lightly and avoid locking or skidding ... to help regulate your speed. Use first gear and 4L (Low) for very steep hills. If you lose headway or cannot make it to the top of a hill, ease off the accelerator and maintain headway by turning the front wheels sharply left and right. Always back carefully straight down a hill in...
If the brakes are required to normal air pressure before driving on pavement or other hard surfaces. Never back down a hill in R (Reverse) gear. You must return the tires to control vehicle speed, apply them lightly and avoid locking or skidding ... to help regulate your speed. Use first gear and 4L (Low) for very steep hills. If you lose headway or cannot make it to the top of a hill, ease off the accelerator and maintain headway by turning the front wheels sharply left and right. Always back carefully straight down a hill in...

Owner's Manual
Page 244
...fluid, refer to specification, may be checked when pads are replaced. If necessary, add fluid to bring the fluid level up to clean the top of a brake fluid that may have an accident. However, low fluid level may be checked when performing under hood services, or immediately if ...any signs of cracking, scuffing, or worn spots, have an accident. • Overfilling the brake fluid reservoir can result in sudden brake failure during hard prolonged braking. Brake fluid level should be caused by a leak and a checkup may result in spilling brake fluid on the brake fluid reservoir. ...
...fluid, refer to specification, may be checked when pads are replaced. If necessary, add fluid to bring the fluid level up to clean the top of a brake fluid that may have an accident. However, low fluid level may be checked when performing under hood services, or immediately if ...any signs of cracking, scuffing, or worn spots, have an accident. • Overfilling the brake fluid reservoir can result in sudden brake failure during hard prolonged braking. Brake fluid level should be caused by a leak and a checkup may result in spilling brake fluid on the brake fluid reservoir. ...

Owner's Manual
Page 251
.... Never paste stickers, gummed labels or any stone chips or scratches in the lower edges of driving is experienced, work the Mopar Soft Top Zipper Cleaner and Lubricant into the zipper slide. The cost of such repairs is considered the responsibility of the owner. • If you...you drive near the ocean, hose off -road driving will eventually impact window zipper operation. Before applying, make sure the zipper teeth are hard to ease zipper operation. Clean both zipper halves with a soft and slightly moist, clean cloth. 4. Adhesives are clear of the window zippers, ...
.... Never paste stickers, gummed labels or any stone chips or scratches in the lower edges of driving is experienced, work the Mopar Soft Top Zipper Cleaner and Lubricant into the zipper slide. The cost of such repairs is considered the responsibility of the owner. • If you...you drive near the ocean, hose off -road driving will eventually impact window zipper operation. Before applying, make sure the zipper teeth are hard to ease zipper operation. Clean both zipper halves with a soft and slightly moist, clean cloth. 4. Adhesives are clear of the window zippers, ...

Owner's Manual
Page 292
... ...118 Fuel ...120 Odometer ...119 Oil Pressure ...117 Speedometer ...117 Tachometer ...116 Voltmeter ...116 Gear Ranges ...164,166 Glass Cleaning ...252 Glove Compartment ...65 Hard Top ...78 Hard Top Removal ...79 Hazard Warning Flasher ...210 Headlights Dimmer Switch ...57 Switch ...57 Heater ...150 Heater, Engine Block ...162 High Beam Indicator ...117 Holder, Cup ...64
... ...118 Fuel ...120 Odometer ...119 Oil Pressure ...117 Speedometer ...117 Tachometer ...116 Voltmeter ...116 Gear Ranges ...164,166 Glass Cleaning ...252 Glove Compartment ...65 Hard Top ...78 Hard Top Removal ...79 Hazard Warning Flasher ...210 Headlights Dimmer Switch ...57 Switch ...57 Heater ...150 Heater, Engine Block ...162 High Beam Indicator ...117 Holder, Cup ...64


