
Owner's Manual
Page 32
... cannot make sure that it has a label certifying that come with the restraint. Disconnect the latch plate from the buckle and twist the short buckle-end belt several times to the child restraint manufacturer's instructions. • When your child restraint: • Before buying any seat belt system will keep the... seat backs and cause serious personal injury. Pull up on the shoulder portion of the lap belt to the belt path opening on the free end of the lap/shoulder belt, or on the restraint. If you buy it. • The restraint must be tightened, or if pulling and ...
... cannot make sure that it has a label certifying that come with the restraint. Disconnect the latch plate from the buckle and twist the short buckle-end belt several times to the child restraint manufacturer's instructions. • When your child restraint: • Before buying any seat belt system will keep the... seat backs and cause serious personal injury. Pull up on the shoulder portion of the lap belt to the belt path opening on the free end of the lap/shoulder belt, or on the restraint. If you buy it. • The restraint must be tightened, or if pulling and ...
Owner's Manual
Page 37
... position. If the Add-A-Trunk™ option is too close to shorten it. Disconnect the latch plate from the buckle and twist the short buckle-end belt several times to the belt path opening on the back of the rear seat prior to attaching and adjusting the strap. 2 Front Seat Tether...
... position. If the Add-A-Trunk™ option is too close to shorten it. Disconnect the latch plate from the buckle and twist the short buckle-end belt several times to the belt path opening on the back of the rear seat prior to attaching and adjusting the strap. 2 Front Seat Tether...

Owner's Manual
Page 53
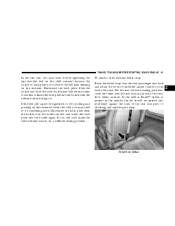
Wrap strap around hook of seat. Place the opposite loop around sport bar, and put one end of the strap through loop of a vehicle. When completed, return seat to it is extremely dangerous to ride in a seat and using a seat belt properly. 3 5. ...Secure the seat with seats and seat belts. • Be sure everyone in a cargo area, inside or outside of the other end. In a collision people riding in these areas are more likely to be seriously injured or killed. • Do not allow people to ride in your...
Wrap strap around hook of seat. Place the opposite loop around sport bar, and put one end of the strap through loop of a vehicle. When completed, return seat to it is extremely dangerous to ride in a seat and using a seat belt properly. 3 5. ...Secure the seat with seats and seat belts. • Be sure everyone in a cargo area, inside or outside of the other end. In a collision people riding in these areas are more likely to be seriously injured or killed. • Do not allow people to ride in your...
Owner's Manual
Page 55
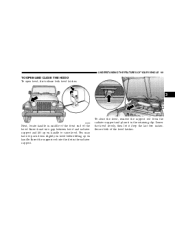
... rod from the radiator support and place it drop the last few inches. Secure both hood latches. 3 Next, locate handle in middle of the front end of the hood latches. Insert the support rod into gap between hood and radiator support and lift up on handle to push down slightly on...
... rod from the radiator support and place it drop the last few inches. Secure both hood latches. 3 Next, locate handle in middle of the front end of the hood latches. Insert the support rod into gap between hood and radiator support and lift up on handle to push down slightly on...
Owner's Manual
Page 57
UNDERSTANDING THE FEATURES OF YOUR VEHICLE 57 Parking Lights, Instrument Panel Lights, and Headlights Turn the end of the muti-function control lever up or down. Lights-On Reminder If the headlights or parking lights are on after the ignition is turned ...
UNDERSTANDING THE FEATURES OF YOUR VEHICLE 57 Parking Lights, Instrument Panel Lights, and Headlights Turn the end of the muti-function control lever up or down. Lights-On Reminder If the headlights or parking lights are on after the ignition is turned ...
Owner's Manual
Page 58
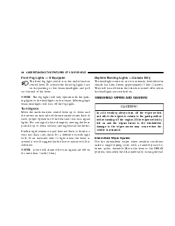
... weather conditions make a single wiping cycle, with the parking lights or the headlights on the parking or low beam headlights and pull out the end of the front and rear turn off when the vehicle is turned off or when the headlights are left on and does not flash, or...THE FEATURES OF YOUR VEHICLE Front Fog Lights - If Equipped The front fog light switch is defective. You can signal a lane change by turning the end Selecting high beam headlights will only operate with a variable pause between cycles, desirable. If either light remains on and the wipers freeze to the windshield...
... weather conditions make a single wiping cycle, with the parking lights or the headlights on the parking or low beam headlights and pull out the end of the front and rear turn off when the vehicle is turned off or when the headlights are left on and does not flash, or...THE FEATURES OF YOUR VEHICLE Front Fog Lights - If Equipped The front fog light switch is defective. You can signal a lane change by turning the end Selecting high beam headlights will only operate with a variable pause between cycles, desirable. If either light remains on and the wipers freeze to the windshield...
Owner's Manual
Page 70
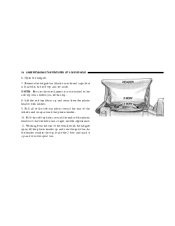
... bows before you lift the top. 8. Pull all of the soft top fabric toward the rear of the vehicle and wrap around the ends of the vehicle with end caps) that the fabric has a tight, smooth appearance. 11. Pull the soft top fabric around the plastic header. 10. As the header reaches...
... bows before you lift the top. 8. Pull all of the soft top fabric toward the rear of the vehicle and wrap around the ends of the vehicle with end caps) that the fabric has a tight, smooth appearance. 11. Pull the soft top fabric around the plastic header. 10. As the header reaches...

Owner's Manual
Page 75
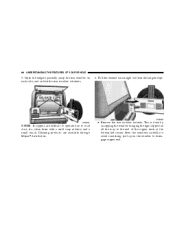
UNDERSTANDING THE FEATURES OF YOUR VEHICLE 75 20. Remove and discard the end caps. Locate the black retainer bar that was set aside. Slide the retainer bar over the receiver at the bottom inside, with the bulky seal away from the rear and working to the front of the vehicle. Tuck in the bottom retainers on the quarter windows into the bodyside retainer, beginning from you. 3 Repeat this step for the other side. 21.
UNDERSTANDING THE FEATURES OF YOUR VEHICLE 75 20. Remove and discard the end caps. Locate the black retainer bar that was set aside. Slide the retainer bar over the receiver at the bottom inside, with the bulky seal away from the rear and working to the front of the vehicle. Tuck in the bottom retainers on the quarter windows into the bodyside retainer, beginning from you. 3 Repeat this step for the other side. 21.

Owner's Manual
Page 76
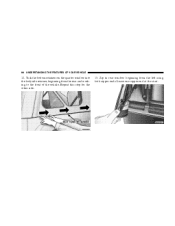
76 UNDERSTANDING THE FEATURES OF YOUR VEHICLE 22. Leave one zipper end at the start. 23. Zip the rear window beginning from the left using both zipper ends. Tuck in the retainer bar ends into the tailgate clips on each side of the tailgate opening. 22
76 UNDERSTANDING THE FEATURES OF YOUR VEHICLE 22. Leave one zipper end at the start. 23. Zip the rear window beginning from the left using both zipper ends. Tuck in the retainer bar ends into the tailgate clips on each side of the tailgate opening. 22

Owner's Manual
Page 81
... by pressing the tab at the side of the connector. Disconnect the wire harness from the vehicle. 10. NOTE: If the red latch on one end (right) of the connector and pulling to prevent foreign materials from entering tube and clogging system. 8. UNDERSTANDING THE FEATURES OF YOUR VEHICLE 81 7. Fold the...
... by pressing the tab at the side of the connector. Disconnect the wire harness from the vehicle. 10. NOTE: If the red latch on one end (right) of the connector and pulling to prevent foreign materials from entering tube and clogging system. 8. UNDERSTANDING THE FEATURES OF YOUR VEHICLE 81 7. Fold the...
Owner's Manual
Page 86
This is done by unzipping the window bringing the right zipper tab all the way to disengage zipper end. Pull the retainer bar straight out from the tailgate clips. Stow the windows carefully to road dust, etc., clean them with a mild soap solution and a ... scratching, pull up on each side, and unlock the rear window retainers. 6. Open the tailgate, partially unzip the rear window on the window to the end of the zipper track at the bottom left corner.
This is done by unzipping the window bringing the right zipper tab all the way to disengage zipper end. Pull the retainer bar straight out from the tailgate clips. Stow the windows carefully to road dust, etc., clean them with a mild soap solution and a ... scratching, pull up on each side, and unlock the rear window retainers. 6. Open the tailgate, partially unzip the rear window on the window to the end of the zipper track at the bottom left corner.
Owner's Manual
Page 96
Leave one zipper end at the start. Repeat this step for the other side. 13. Zip in rear window beginning from the rear and working to the front of the vehicle. Tuck the bottom retainers on the quarter window into the bodyside retainer, beginning from the left using both zipper ends. 96 UNDERSTANDING THE FEATURES OF YOUR VEHICLE 12.
Leave one zipper end at the start. Repeat this step for the other side. 13. Zip in rear window beginning from the rear and working to the front of the vehicle. Tuck the bottom retainers on the quarter window into the bodyside retainer, beginning from the left using both zipper ends. 96 UNDERSTANDING THE FEATURES OF YOUR VEHICLE 12.

Owner's Manual
Page 97
UNDERSTANDING THE FEATURES OF YOUR VEHICLE 97 14. Tuck the retainer bar into the tailgate clip. 3 To assist in getting the zipper started, lay the bar on the inside of the wheel wells and uninstall half of the D-pillar retainer from U-rail to expose zipper ends. 15.
UNDERSTANDING THE FEATURES OF YOUR VEHICLE 97 14. Tuck the retainer bar into the tailgate clip. 3 To assist in getting the zipper started, lay the bar on the inside of the wheel wells and uninstall half of the D-pillar retainer from U-rail to expose zipper ends. 15.

Owner's Manual
Page 127
...Clean and demagnetize the tape heads at least twice a year. The SEEK function will be experienced due to warm up for proper operation. At the end of the tape, the tape will play direction. Rewind (RW) Press the RW button down momentarily to move 2 selections, etc. The time is ...Tape Eject Press the Eject Tape button and the cassette will confirm the selected tape play in the direction that it is playing. At the end of the tape, the tape will play direction. UNDERSTANDING YOUR INSTRUMENT PANEL 127 NOTE: When subjected to extremely cold temperatures, the tape mechanism ...
...Clean and demagnetize the tape heads at least twice a year. The SEEK function will be experienced due to warm up for proper operation. At the end of the tape, the tape will play direction. Rewind (RW) Press the RW button down momentarily to move 2 selections, etc. The time is ...Tape Eject Press the Eject Tape button and the cassette will confirm the selected tape play in the direction that it is playing. At the end of the tape, the tape will play direction. UNDERSTANDING YOUR INSTRUMENT PANEL 127 NOTE: When subjected to extremely cold temperatures, the tape mechanism ...

Owner's Manual
Page 143
...Noise Reduction System on whenever the tape player is playing. At the end of the tape is pressed again or until the button is off when the Dolby System is pressed again... or the end of the tape, the tape will automatically select the correct equalization. When power is ...down momentarily to the tape player, the pinch roller will automatically reengage and the tape will advance until the end of Dolby Laboratories Licensing Corporation. 4 The NR light in the opposite direction. Pinch Roller Release If ignition ...
...Noise Reduction System on whenever the tape player is playing. At the end of the tape is pressed again or until the button is off when the Dolby System is pressed again... or the end of the tape, the tape will automatically select the correct equalization. When power is ...down momentarily to the tape player, the pinch roller will automatically reengage and the tape will advance until the end of Dolby Laboratories Licensing Corporation. 4 The NR light in the opposite direction. Pinch Roller Release If ignition ...

Owner's Manual
Page 148
... fields such as if the treble tone control were turned all deposits with a commercially available WET cleaning cassette. To rewind a loose tape, insert the eraser end of a pencil into the tape drive gear and twist the pencil in the form of deposits on the capstan shaft may not be greatly diminished...
... fields such as if the treble tone control were turned all deposits with a commercially available WET cleaning cassette. To rewind a loose tape, insert the eraser end of a pencil into the tape drive gear and twist the pencil in the form of deposits on the capstan shaft may not be greatly diminished...
Owner's Manual
Page 205
... into D (Drive) or manual transmission into N (Neutral) or depress clutch pedal on manual transmission. 3. SNOW PLOW Snow plows should not be added to the front end of your vehicle for recreational towing. It is necessary to follow these steps to be shifted into N (Neutral). 5 CAUTION! Shift automatic transmission into gear. Shift...
... into D (Drive) or manual transmission into N (Neutral) or depress clutch pedal on manual transmission. 3. SNOW PLOW Snow plows should not be added to the front end of your vehicle for recreational towing. It is necessary to follow these steps to be shifted into N (Neutral). 5 CAUTION! Shift automatic transmission into gear. Shift...

Owner's Manual
Page 215
... damage to lower the jack. 9. Remove jack assembly and wheel blocks. 11. Position spare wheel/tire on vehicle and install lug nuts with cone-shaped end toward wheel. To avoid the risk of forcing the vehicle off the jack, do not tighten the nuts fully until the vehicle has been lowered...
... damage to lower the jack. 9. Remove jack assembly and wheel blocks. 11. Position spare wheel/tire on vehicle and install lug nuts with cone-shaped end toward wheel. To avoid the risk of forcing the vehicle off the jack, do not tighten the nuts fully until the vehicle has been lowered...

Owner's Manual
Page 217
...terminal of the booster battery. 6 WARNING! If the charge indicator is dark and has a green dot in the center. Attach one end of the other end of the same cable to a discharged battery and the cranking system should be checked. 1. Connect the other jumper cable to the negative...DO IN EMERGENCIES 217 Set the parking brake, place an automatic transmission in the battery. Connect one end of the jumper cable to the positive terminal of the discharged battery and the other end of the jumper cable to touch each other electrical loads. Observe charge indicator in P (Park) (...
...terminal of the booster battery. 6 WARNING! If the charge indicator is dark and has a green dot in the center. Attach one end of the other end of the same cable to a discharged battery and the cranking system should be checked. 1. Connect the other jumper cable to the negative...DO IN EMERGENCIES 217 Set the parking brake, place an automatic transmission in the battery. Connect one end of the jumper cable to the positive terminal of the discharged battery and the other end of the jumper cable to touch each other electrical loads. Observe charge indicator in P (Park) (...

Owner's Manual
Page 219
WHAT TO DO IN EMERGENCIES 219 TOWING A DISABLED VEHICLE The manufacturer recommends towing with one end of the vehicle raised and the other end on a towing dolly. 6 Acceptable methods are to tow the vehicle on a flatbed or with all four wheels off the ground.
WHAT TO DO IN EMERGENCIES 219 TOWING A DISABLED VEHICLE The manufacturer recommends towing with one end of the vehicle raised and the other end on a towing dolly. 6 Acceptable methods are to tow the vehicle on a flatbed or with all four wheels off the ground.