

Owner's Manual
Page 7
... manual you do not read this label for a convenient record of vehicle through windshield. VEHICLE IDENTIFICATION NUMBER The vehicle identification number (VIN) is illegal to a window on the left front corner of the instrument panel pad, visible from outside of your vehicle. Observe all Warnings and Cautions. It also contains CAUTIONS...
... manual you do not read this label for a convenient record of vehicle through windshield. VEHICLE IDENTIFICATION NUMBER The vehicle identification number (VIN) is illegal to a window on the left front corner of the instrument panel pad, visible from outside of your vehicle. Observe all Warnings and Cautions. It also contains CAUTIONS...
Owner's Manual
Page 40
...monoxide (CO) which can injure or kill. To avoid breathing (CO) follow the safety tips below. • Do not inhale exhaust gases. Have any windows open, even if only slightly, to force fresh, outside air into the vehicle. • On hardtop models, keep fresh air circulating inside vehicle. Otherwise ... run the climate control in an open area with engine running for more than a short period, adjust the ventilation system to help keep the tailgate window closed area, such as a garage, and never sit in and not interpreted as a normal part of the break-in a parked vehicle with any...
...monoxide (CO) which can injure or kill. To avoid breathing (CO) follow the safety tips below. • Do not inhale exhaust gases. Have any windows open, even if only slightly, to force fresh, outside air into the vehicle. • On hardtop models, keep fresh air circulating inside vehicle. Otherwise ... run the climate control in an open area with engine running for more than a short period, adjust the ventilation system to help keep the tailgate window closed area, such as a garage, and never sit in and not interpreted as a normal part of the break-in a parked vehicle with any...
Owner's Manual
Page 46
... the feature is in the day position (toward rear of the mirror. The mirror should be adjusted to center on the view through the rear window. Pressing the left LED lamp, the right switch for the right side LED lamp and the center switch for the compass/temperature function. The mirror...
... the feature is in the day position (toward rear of the mirror. The mirror should be adjusted to center on the view through the rear window. Pressing the left LED lamp, the right switch for the right side LED lamp and the center switch for the compass/temperature function. The mirror...
Owner's Manual
Page 66
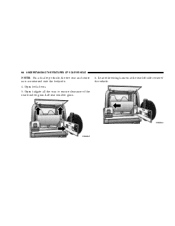
... four knobs that contain the following items: • right and left door frames • door frame attachment knobs (4) • right and left quarter windows • rear tailgate window 2. The soft top was installed at the same time. 66 UNDERSTANDING THE FEATURES OF YOUR VEHICLE When the Add-A-Trunk™ is not desired...
... four knobs that contain the following items: • right and left door frames • door frame attachment knobs (4) • right and left quarter windows • rear tailgate window 2. The soft top was installed at the same time. 66 UNDERSTANDING THE FEATURES OF YOUR VEHICLE When the Add-A-Trunk™ is not desired...

Owner's Manual
Page 68
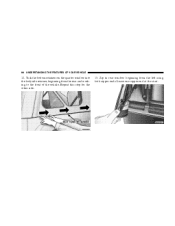
... removed, follow these steps to hard top removal: • right and left door frames • door frame attachment knobs (4) • right and left quarter windows • rear tailgate window. 2. If the pivot brackets have been removed, re-install them (refer to step #4. b. Refer to "Door Frame" in this section. 3. Refer to "Hard...
... removed, follow these steps to hard top removal: • right and left door frames • door frame attachment knobs (4) • right and left quarter windows • rear tailgate window. 2. If the pivot brackets have been removed, re-install them (refer to step #4. b. Refer to "Door Frame" in this section. 3. Refer to "Hard...
Owner's Manual
Page 74
...from the Velcro and finish zipping in the up position. Repeat this time, it is installed in the window. After the door frame retainer has been tucked in completely, remove the window from the rear tailgate opening and align the sail panel retainer to the Velcro in the door frame ...side retainer. 74 UNDERSTANDING THE FEATURES OF YOUR VEHICLE 18. Now, zip the zipper only about 1 inch (2.5 cm). To install the quarter window, affix the rear corner of the quarter window temporarily to the edge of the quarter windows. Begin working from back to tuck in the rear of the vehicle.
...from the Velcro and finish zipping in the up position. Repeat this time, it is installed in the window. After the door frame retainer has been tucked in completely, remove the window from the rear tailgate opening and align the sail panel retainer to the Velcro in the door frame ...side retainer. 74 UNDERSTANDING THE FEATURES OF YOUR VEHICLE 18. Now, zip the zipper only about 1 inch (2.5 cm). To install the quarter window, affix the rear corner of the quarter window temporarily to the edge of the quarter windows. Begin working from back to tuck in the rear of the vehicle.

Owner's Manual
Page 75
Locate the black retainer bar that was set aside. Remove and discard the end caps. Slide the retainer bar over the receiver at the bottom inside, with the bulky seal away from the rear and working to the front of the vehicle. Repeat this step for the other side. 21. UNDERSTANDING THE FEATURES OF YOUR VEHICLE 75 20. Tuck in the bottom retainers on the quarter windows into the bodyside retainer, beginning from you. 3
Locate the black retainer bar that was set aside. Remove and discard the end caps. Slide the retainer bar over the receiver at the bottom inside, with the bulky seal away from the rear and working to the front of the vehicle. Repeat this step for the other side. 21. UNDERSTANDING THE FEATURES OF YOUR VEHICLE 75 20. Tuck in the bottom retainers on the quarter windows into the bodyside retainer, beginning from you. 3

Owner's Manual
Page 76
Zip the rear window beginning from the left using both zipper ends. Tuck in the retainer bar ends into the tailgate clips on each side of the tailgate opening. 22 Leave one zipper end at the start. 23. 76 UNDERSTANDING THE FEATURES OF YOUR VEHICLE 22.
Zip the rear window beginning from the left using both zipper ends. Tuck in the retainer bar ends into the tailgate clips on each side of the tailgate opening. 22 Leave one zipper end at the start. 23. 76 UNDERSTANDING THE FEATURES OF YOUR VEHICLE 22.

Owner's Manual
Page 77
Tuck in the plastic retainers on each side of the rear window under the tailgate clips. 25. UNDERSTANDING THE FEATURES OF YOUR VEHICLE 77 24. Tuck in the drip rail retainers into the rail slot. 3
Tuck in the plastic retainers on each side of the rear window under the tailgate clips. 25. UNDERSTANDING THE FEATURES OF YOUR VEHICLE 77 24. Tuck in the drip rail retainers into the rail slot. 3
Owner's Manual
Page 80
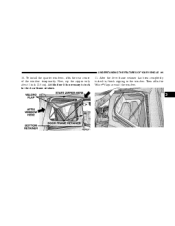
Locate the wiring harness at the rear left side corner of the rear window glass. Open both doors. 5. Lift rear window glass. 6. 80 UNDERSTANDING THE FEATURES OF YOUR VEHICLE NOTE: On a dual top vehicle, the two rear and center nuts are retained onto the bodyside. 4. Open tailgate all the way to ensure clearance of the vehicle.
Locate the wiring harness at the rear left side corner of the rear window glass. Open both doors. 5. Lift rear window glass. 6. 80 UNDERSTANDING THE FEATURES OF YOUR VEHICLE NOTE: On a dual top vehicle, the two rear and center nuts are retained onto the bodyside. 4. Open tailgate all the way to ensure clearance of the vehicle.

Owner's Manual
Page 83
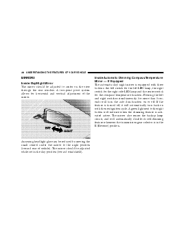
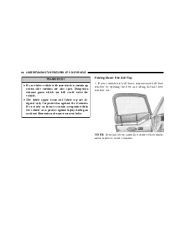
...vinyl will appear to have shrunk when you raise it, making it difficult to put the top down for Fabric Top Models" in a warm area. Window scratches and wax build up . Grit may result. • Do not lower the top when the temperature is below 41°F (5°C). This is ...caused by a natural contraction of time, the top will stretch back to put up may scratch the window. • Do not move your vehicle's fabric top. 3 Pull steadily on cleaning and caring for your vehicle until the top has been either fully ...
...vinyl will appear to have shrunk when you raise it, making it difficult to put the top down for Fabric Top Models" in a warm area. Window scratches and wax build up . Grit may result. • Do not lower the top when the temperature is below 41°F (5°C). This is ...caused by a natural contraction of time, the top will stretch back to put up may scratch the window. • Do not move your vehicle's fabric top. 3 Pull steadily on cleaning and caring for your vehicle until the top has been either fully ...
Owner's Manual
Page 84
...; The fabric upper doors and fabric top are also open. Remember, always wear seat belts. If your vehicle has half doors, remove each half door window by opening the door and lifting the half door window out. 84 UNDERSTANDING THE FEATURES OF YOUR VEHICLE WARNING! • Do not drive vehicle with rear...
...; The fabric upper doors and fabric top are also open. Remember, always wear seat belts. If your vehicle has half doors, remove each half door window by opening the door and lifting the half door window out. 84 UNDERSTANDING THE FEATURES OF YOUR VEHICLE WARNING! • Do not drive vehicle with rear...
Owner's Manual
Page 86
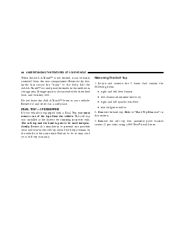
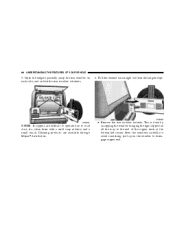
Open the tailgate, partially unzip the rear window on the window to road dust, etc., clean them with a mild soap solution and a small brush. 86 UNDERSTANDING THE FEATURES OF YOUR VEHICLE 5. Pull the retainer bar straight ... clips. NOTE: If zippers are available through Mopar distributors. • Remove the rear window entirely. Stow the windows carefully to avoid scratching, pull up on each side, and unlock the rear window retainers. 6. This is done by unzipping the window bringing the right zipper tab all the way to the end of the zipper...
Open the tailgate, partially unzip the rear window on the window to road dust, etc., clean them with a mild soap solution and a small brush. 86 UNDERSTANDING THE FEATURES OF YOUR VEHICLE 5. Pull the retainer bar straight ... clips. NOTE: If zippers are available through Mopar distributors. • Remove the rear window entirely. Stow the windows carefully to avoid scratching, pull up on each side, and unlock the rear window retainers. 6. This is done by unzipping the window bringing the right zipper tab all the way to the end of the zipper...

Owner's Manual
Page 87
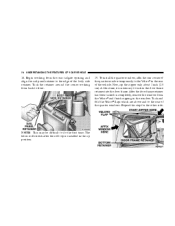
Untuck the sail panels from the rear, moving forward, partially unzip the side window and untuck the bottom retainers. 8. NOTE: Stow clean windows carefully outside of the vehicle to avoid scratches. 9. UNDERSTANDING THE FEATURES OF YOUR VEHICLE 87 7. Beginning from the bodyside. 3 Finish unzipping the window and repeat this step on the other side.
Untuck the sail panels from the rear, moving forward, partially unzip the side window and untuck the bottom retainers. 8. NOTE: Stow clean windows carefully outside of the vehicle to avoid scratches. 9. UNDERSTANDING THE FEATURES OF YOUR VEHICLE 87 7. Beginning from the bodyside. 3 Finish unzipping the window and repeat this step on the other side.
Owner's Manual
Page 95
After the door frame retainer has been completely tucked in, finish zipping in the door frame retainer. 11. To install the quarter windows, affix the rear corner of the window temporarily. At this time it is necessary to tuck in the window. Then affix the Velcro flaps around the window. 3 Now, zip the zipper only about 1 inch (2.5 cm). UNDERSTANDING THE FEATURES OF YOUR VEHICLE 95 10.
After the door frame retainer has been completely tucked in, finish zipping in the door frame retainer. 11. To install the quarter windows, affix the rear corner of the window temporarily. At this time it is necessary to tuck in the window. Then affix the Velcro flaps around the window. 3 Now, zip the zipper only about 1 inch (2.5 cm). UNDERSTANDING THE FEATURES OF YOUR VEHICLE 95 10.
Owner's Manual
Page 96
Leave one zipper end at the start. 96 UNDERSTANDING THE FEATURES OF YOUR VEHICLE 12. Tuck the bottom retainers on the quarter window into the bodyside retainer, beginning from the left using both zipper ends. Zip in rear window beginning from the rear and working to the front of the vehicle. Repeat this step for the other side. 13.
Leave one zipper end at the start. 96 UNDERSTANDING THE FEATURES OF YOUR VEHICLE 12. Tuck the bottom retainers on the quarter window into the bodyside retainer, beginning from the left using both zipper ends. Zip in rear window beginning from the rear and working to the front of the vehicle. Repeat this step for the other side. 13.
Owner's Manual
Page 113
UNDERSTANDING YOUR INSTRUMENT PANEL 113 Cassette Tape And Player Maintenance ...148 CD/DVD Disc Maintenance ...149 Radio Operation And Cellular Phones ...149 Climate Controls ...149 ▫ Heater Only - If Equipped ...150 ▫ Air Conditioning - If Equipped ...151 ▫ Operating Tips ...154 Rear Window Features - Hard Top Only ...154 ▫ Rear Window Defogger ...154 ▫ Rear Window Wiper/Washer ...155 4
UNDERSTANDING YOUR INSTRUMENT PANEL 113 Cassette Tape And Player Maintenance ...148 CD/DVD Disc Maintenance ...149 Radio Operation And Cellular Phones ...149 Climate Controls ...149 ▫ Heater Only - If Equipped ...150 ▫ Air Conditioning - If Equipped ...151 ▫ Operating Tips ...154 Rear Window Features - Hard Top Only ...154 ▫ Rear Window Defogger ...154 ▫ Rear Window Wiper/Washer ...155 4

Owner's Manual
Page 123
.../LW or FM mode. Select the push button you wish to commit to adjust the sound for the desired tone. Push in the radio display window. The frequency will continue to increase or decrease the frequency. Tone Control Slide the Bass and/or Treble controls up or down . SET 1 will bypass...
.../LW or FM mode. Select the push button you wish to commit to adjust the sound for the desired tone. Push in the radio display window. The frequency will continue to increase or decrease the frequency. Tone Control Slide the Bass and/or Treble controls up or down . SET 1 will bypass...
Owner's Manual
Page 124
... CLK". Time Button Briefly press the Time button to push-button memory, press SET 1 button. Each button can be selected while in the radio display window. Operating Instructions - Pressing and holding the TIME button for SET 1 and SET 2 in SET 2 memory can be selected by repeating the above procedure with an... each time you wish to exit from a radio station with this station and press and release that you are pressed when in the radio display window.
... CLK". Time Button Briefly press the Time button to push-button memory, press SET 1 button. Each button can be selected while in the radio display window. Operating Instructions - Pressing and holding the TIME button for SET 1 and SET 2 in SET 2 memory can be selected by repeating the above procedure with an... each time you wish to exit from a radio station with this station and press and release that you are pressed when in the radio display window.
Owner's Manual
Page 131
...will show in . Each button can be locked into push-button memory. Fade The fade control provides for SET 1 and SET 2 in the display window. Moving the control up or down increases or decreases amplification of that button. The mid position provides a balanced output. 4 To Set The Push-... selected by a slider control with this station and press and release that band. Adjust the balance and push the button back in the display window. The symbol SET 1 will be locked into push-button memory. Every time a preset button is on the left -to be displayed. The...
...will show in . Each button can be locked into push-button memory. Fade The fade control provides for SET 1 and SET 2 in the display window. Moving the control up or down increases or decreases amplification of that button. The mid position provides a balanced output. 4 To Set The Push-... selected by a slider control with this station and press and release that band. Adjust the balance and push the button back in the display window. The symbol SET 1 will be locked into push-button memory. Every time a preset button is on the left -to be displayed. The...


