Owner's Manual
Page 235
WHAT TO DO IN EMERGENCIES CONTENTS Hazard Warning Flashers ...236 If Your Engine Overheats ...237 Changing A Flat Tire ...238 ▫ Jack And Lug Wrench Locations ...238 ▫ Spare Tire Location ...239 ▫ Tire Changing Procedure ...242 Jump Starting Procedure ...246 Emergency Tow Hooks - If Equipped ...248 Towing A Disabled Vehicle ...248 6
WHAT TO DO IN EMERGENCIES CONTENTS Hazard Warning Flashers ...236 If Your Engine Overheats ...237 Changing A Flat Tire ...238 ▫ Jack And Lug Wrench Locations ...238 ▫ Spare Tire Location ...239 ▫ Tire Changing Procedure ...242 Jump Starting Procedure ...246 Emergency Tow Hooks - If Equipped ...248 Towing A Disabled Vehicle ...248 6
Owner's Manual
Page 238
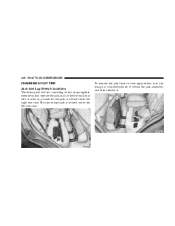
To remove the jack from its stowage position, turn the wing nut counterclockwise to loosen the jack assembly, and then remove it. The scissor-type jack is stored under the left rear seat. 238 WHAT TO DO IN EMERGENCIES CHANGING A FLAT TIRE Jack And Lug Wrench Locations The three piece tool set, consisting of two snap-together extensions that operate the jack and a wheel wrench that also is used as a crank for the jack, is located under the right rear seat.
To remove the jack from its stowage position, turn the wing nut counterclockwise to loosen the jack assembly, and then remove it. The scissor-type jack is stored under the left rear seat. 238 WHAT TO DO IN EMERGENCIES CHANGING A FLAT TIRE Jack And Lug Wrench Locations The three piece tool set, consisting of two snap-together extensions that operate the jack and a wheel wrench that also is used as a crank for the jack, is located under the right rear seat.
Owner's Manual
Page 239
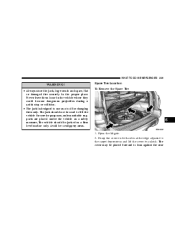
...designed to use as a tool for service purposes, unless suitable supports are placed under the vehicle as a safety measure, The vehicle should be jacked on both sides at the edge adjacent to the carpet depressions and lift the cover to unlatch. Never leave them loose in the proper place. ...Spare Tire Location To Remove the Spare Tire 6 1. The jack should not be placed forward to lift the vehicle for changing tires only. The cover may be used to lean against the rear Open the...
...designed to use as a tool for service purposes, unless suitable supports are placed under the vehicle as a safety measure, The vehicle should be jacked on both sides at the edge adjacent to the carpet depressions and lift the cover to unlatch. Never leave them loose in the proper place. ...Spare Tire Location To Remove the Spare Tire 6 1. The jack should not be placed forward to lift the vehicle for changing tires only. The cover may be used to lean against the rear Open the...
Owner's Manual
Page 242
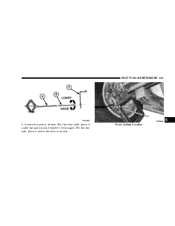
...; Block the front and rear of the diagonally opposite tire. Loosen the lug nuts one-half turn counterclockwise. 3. Assemble the jack and jacking tools as shown. Connect jack handle driver (A) to extension (B), then to provide ample work space. For example, if the right front tire is being hit...surface well off the road to the lug wrench (C). Remove the spare tire from under the cargo floor, jack and jack tools from under the left rear wheel. 1. Avoid jacking up the vehicle with occupants inside. 242 WHAT TO DO IN EMERGENCIES Tire Changing Procedure Preparation WARNING! Put the...
...; Block the front and rear of the diagonally opposite tire. Loosen the lug nuts one-half turn counterclockwise. 3. Assemble the jack and jacking tools as shown. Connect jack handle driver (A) to extension (B), then to provide ample work space. For example, if the right front tire is being hit...surface well off the road to the lug wrench (C). Remove the spare tire from under the cargo floor, jack and jack tools from under the left rear wheel. 1. Avoid jacking up the vehicle with occupants inside. 242 WHAT TO DO IN EMERGENCIES Tire Changing Procedure Preparation WARNING! Put the...
Owner's Manual
Page 243
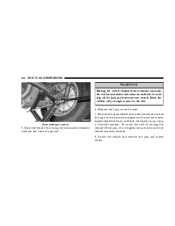
Front Jacking Location Locate the jack as shown. WHAT TO DO IN EMERGENCIES 243 6 4. For the front axle, place it under the axle near the wheel to be changed. For the rear axle, place it under the axle as shown.
Front Jacking Location Locate the jack as shown. WHAT TO DO IN EMERGENCIES 243 6 4. For the front axle, place it under the axle near the wheel to be changed. For the rear axle, place it under the axle as shown.
Owner's Manual
Page 244
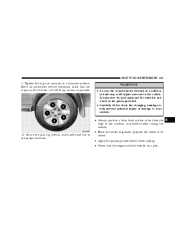
... Lightly tighten the nuts until the tire clears the ground. To avoid the risk of forcing the vehicle off the jack and hurt someone near it. Raise the vehicle by turning the jack handle clockwise until they are equally snug, using a crisscross pattern. Remove the lug nuts and wheel. 7. Raise ...the vehicle only enough to remove the tire. 6. Lower the vehicle and remove the jack and wheel blocks. It could slip off the jack, do not tighten the nuts fully until the vehicle has been lowered. 8. Raising the vehicle higher than necessary can make the...
... Lightly tighten the nuts until the tire clears the ground. To avoid the risk of forcing the vehicle off the jack and hurt someone near it. Raise the vehicle by turning the jack handle clockwise until they are equally snug, using a crisscross pattern. Remove the lug nuts and wheel. 7. Raise ...the vehicle only enough to remove the tire. 6. Lower the vehicle and remove the jack and wheel blocks. It could slip off the jack, do not tighten the nuts fully until the vehicle has been lowered. 8. Raising the vehicle higher than necessary can make the...
Owner's Manual
Page 245
... the vehicle. Have an authorized service technician check that the torque is 85-115 ft.lbs. (115-156 N·m) as soon as possible before jacking. • Never start the engine with the vehicle on a firm, level surface as far from the edge of the roadway as possible. WARNING!... locations. • Block the wheel diagonally opposite the wheel to your vehicle: • Always park on a jack. WHAT TO DO IN EMERGENCIES 245 9. Secure the jack, lug wrench, jack handle and tire in the places provided. • Carefully follow these tire changing warnings to help prevent personal injury...
... the vehicle. Have an authorized service technician check that the torque is 85-115 ft.lbs. (115-156 N·m) as soon as possible before jacking. • Never start the engine with the vehicle on a firm, level surface as far from the edge of the roadway as possible. WARNING!... locations. • Block the wheel diagonally opposite the wheel to your vehicle: • Always park on a jack. WHAT TO DO IN EMERGENCIES 245 9. Secure the jack, lug wrench, jack handle and tire in the places provided. • Carefully follow these tire changing warnings to help prevent personal injury...

Owner's Manual
Page 246
... TO DO IN EMERGENCIES • Do not let anyone sit in the vehicle when it is on a jack. • Do not get under the vehicle when it is on a jack. • Only use the jack in the vehicle with the discharged battery. Set the parking brake, place the transmission in another vehicle, park...
... TO DO IN EMERGENCIES • Do not let anyone sit in the vehicle when it is on a jack. • Do not get under the vehicle when it is on a jack. • Only use the jack in the vehicle with the discharged battery. Set the parking brake, place the transmission in another vehicle, park...
Owner's Manual
Page 332
332 INDEX Coolant Temperature Gauge ...131 Engine Oil Pressure Gauge ...130 Freeing Vehicle When Stuck ...186 Hazard Warning Flasher ...236 Jacking ...242 Jump Starting ...246 Tow Hooks ...248 Emission Control System Maintenance ...254,296 Engine Air Cleaner ...264 Block Heater ...178 Break-In Recommendations ...51 Compartment ......
332 INDEX Coolant Temperature Gauge ...131 Engine Oil Pressure Gauge ...130 Freeing Vehicle When Stuck ...186 Hazard Warning Flasher ...236 Jacking ...242 Jump Starting ...246 Tow Hooks ...248 Emission Control System Maintenance ...254,296 Engine Air Cleaner ...264 Block Heater ...178 Break-In Recommendations ...51 Compartment ......
Owner's Manual
Page 335
... ...127 Instrument Panel and Controls ...126 Interior Appearance Care ...284 Interior Fuses ...286 Interior Lighting ...75 Interior Lights ...75,78 Intermittent Wipers ...81 Introduction ...4 Jack Location ...Jack Operation ...Jacking Instructions Jump Starting ...238 242 242 246 ...14 13 12 12 20 Keys ...11 Lane Change and Turn Signals ...129 Lap Belts ...33 Lap...
... ...127 Instrument Panel and Controls ...126 Interior Appearance Care ...284 Interior Fuses ...286 Interior Lighting ...75 Interior Lights ...75,78 Intermittent Wipers ...81 Introduction ...4 Jack Location ...Jack Operation ...Jacking Instructions Jump Starting ...238 242 242 246 ...14 13 12 12 20 Keys ...11 Lane Change and Turn Signals ...129 Lap Belts ...33 Lap...

Owner's Manual
Page 338
... Center ...288 Door Locks ...18 Mirrors ...61 Outlet ...115 Seats ...65 Steering ...266 Sunroof ...112 Windows ...24 Pregnant Women and Seat Belts ...34 Preparation for Jacking ...242
... Center ...288 Door Locks ...18 Mirrors ...61 Outlet ...115 Seats ...65 Steering ...266 Sunroof ...112 Windows ...24 Pregnant Women and Seat Belts ...34 Preparation for Jacking ...242
Owner's Manual
Page 342
...,211 Air Pressure ...212 Alignment and Balance ...217 Chains ...220 Changing ...238,242 Compact Spare ...241 General Information ...211 High Speed ...213 Inflation Pressures ...212 Jacking ...242 Load Capacity ...207,208 Pressure Monitor System ...92,217 Radial ...214 Replacement ...215 Rotation ...218,220 Safety ...53,203 Sizes ...204 Spare Tire ...239...
...,211 Air Pressure ...212 Alignment and Balance ...217 Chains ...220 Changing ...238,242 Compact Spare ...241 General Information ...211 High Speed ...213 Inflation Pressures ...212 Jacking ...242 Load Capacity ...207,208 Pressure Monitor System ...92,217 Radial ...214 Replacement ...215 Rotation ...218,220 Safety ...53,203 Sizes ...204 Spare Tire ...239...

