
Owner's Manual
Page 15
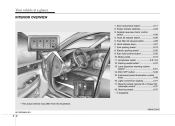
... ...4-48 16. Your vehicle at a glance INTERIOR OVERVIEW 1. Fuel filler lid release button...4-28 6. Electric parking brake*...5-20 9. Parking assist button* ...4-72 13. OBH012001E B010000ABH-EU 2 2 Hood release lever...4-27 7. Brake pedal...5-18 11. Lane departure warning system switch*...5-51 14.... Steering wheel ...4-37 * : if equipped * The actual vehicle may differ from the illustration. Trunk lid release switch...4-20 5. Auto hold control button* ...5-25 10. Accelerator pedal ...5-6, 5-9 12. Steering wheel manual tilt or Power tilt/...
... ...4-48 16. Your vehicle at a glance INTERIOR OVERVIEW 1. Fuel filler lid release button...4-28 6. Electric parking brake*...5-20 9. Parking assist button* ...4-72 13. OBH012001E B010000ABH-EU 2 2 Hood release lever...4-27 7. Brake pedal...5-18 11. Lane departure warning system switch*...5-51 14.... Steering wheel ...4-37 * : if equipped * The actual vehicle may differ from the illustration. Trunk lid release switch...4-20 5. Auto hold control button* ...5-25 10. Accelerator pedal ...5-6, 5-9 12. Steering wheel manual tilt or Power tilt/...

Owner's Manual
Page 23
.... • Do not operate two or more power seat control knobs at the same time. Therefore, children should never be adjusted by an electric motor. Release the knob once the seat reaches the desired position. 3 4 Doing so may damage the electrical equipment. • When in operation, the power seat consumes a large...
.... • Do not operate two or more power seat control knobs at the same time. Therefore, children should never be adjusted by an electric motor. Release the knob once the seat reaches the desired position. 3 4 Doing so may damage the electrical equipment. • When in operation, the power seat consumes a large...

Owner's Manual
Page 24
... position. Pull the rear portion of the control knob up and down by pressing the lumbar support switch on the side of the drivers seat. Release the knob once the seat reaches the desired position. Move the support position up to raise or push down to lower the rear part of...
... position. Pull the rear portion of the control knob up and down by pressing the lumbar support switch on the side of the drivers seat. Release the knob once the seat reaches the desired position. Move the support position up to raise or push down to lower the rear part of...

Owner's Manual
Page 26
...moving backward and thus helps minimize neck injuries. Electronic active headrest (if equipped) The electronic active headrest is a safety device to an authorized HYUNDAI dealer and have the system checked. Do not hit or pull the headrest intentionally. 3 7 This helps to the desired position (1). WARNING ...vehicle with the front headrest, take your safety, the front headrest can't be removed. To lower the headrest, push and hold the release button (2) on the headrest support and lower the headrest to the occupants may provide protection against neck injuries when properly adjusted. If ...
...moving backward and thus helps minimize neck injuries. Electronic active headrest (if equipped) The electronic active headrest is a safety device to an authorized HYUNDAI dealer and have the system checked. Do not hit or pull the headrest intentionally. 3 7 This helps to the desired position (1). WARNING ...vehicle with the front headrest, take your safety, the front headrest can't be removed. To lower the headrest, push and hold the release button (2) on the headrest support and lower the headrest to the occupants may provide protection against neck injuries when properly adjusted. If ...

Owner's Manual
Page 30
.... OBH038076L OBH038015 Rear seat C010303ABH Headrest The rear seat is equipped with the headrests removed as possible. To lower the headrest, push and hold the release button (2) on the headrest support and lower the headrest to the desired position (1). The headrest not only provides comfort for the occupant's safety and comfort...
.... OBH038076L OBH038015 Rear seat C010303ABH Headrest The rear seat is equipped with the headrests removed as possible. To lower the headrest, push and hold the release button (2) on the headrest support and lower the headrest to the desired position (1). The headrest not only provides comfort for the occupant's safety and comfort...

Owner's Manual
Page 31
... injuries when properly adjusted. 3 12 Reinstall To reinstall the headrest, put the headrest poles(1) into the holes while pressing the release button(2). Rear center seat headrest You can go then press the release button (1) while pulling upward (2). Then adjust it to properly protects the occupants. WARNING Do not operate the vehicle with...
... injuries when properly adjusted. 3 12 Reinstall To reinstall the headrest, put the headrest poles(1) into the holes while pressing the release button(2). Rear center seat headrest You can go then press the release button (1) while pulling upward (2). Then adjust it to properly protects the occupants. WARNING Do not operate the vehicle with...

Owner's Manual
Page 32
Safety features of the rear seat. Carrying long/narrow cargo (if equipped) Pull the armrest down . Pull the cover down while pushing the release lever down using the strap (1) provided on the armrest. Pull the armrest down by using the strap provided on the armrest. OBH031017N C010304ABH-EU OBH031019N ...
Safety features of the rear seat. Carrying long/narrow cargo (if equipped) Pull the armrest down . Pull the cover down while pushing the release lever down using the strap (1) provided on the armrest. Pull the armrest down by using the strap provided on the armrest. OBH031017N C010304ABH-EU OBH031019N ...

Owner's Manual
Page 37
... features of your vehicle ✽ NOTICE If you are not able to smoothly enough of the safety belt from retractor, firmly pull the belt out release it fits snugly around . Then you will lock into the buckle. If there is fastened.
... features of your vehicle ✽ NOTICE If you are not able to smoothly enough of the safety belt from retractor, firmly pull the belt out release it fits snugly around . Then you will lock into the buckle. If there is fastened.

Owner's Manual
Page 38
... portion should not be over your shoulder nearest the door and not your neck. To lower it, push it lies across your neck or face. Release the button to one should not be adjusted so that it up (1). The height of the seat belt should be under the arm nearest the...
... portion should not be over your shoulder nearest the door and not your neck. To lower it, push it lies across your neck or face. Release the button to one should not be adjusted so that it up (1). The height of the seat belt should be under the arm nearest the...

Owner's Manual
Page 40
...belt: The seat belt is equipped with driver's and front passenger's pre-tensioner seat belts. Pre-tensioner seat belt Your vehicle is released by pressing the release button (1) in certain frontal collisions. WARNING Do not put anything near the buckle can adversely affect the anchor pre-tensioner and may... pull the seat belt into tighter contact against the occupant's body in the locking buckle. Placing objects near the buckle. When it is released, the belt should automatically draw back into position. If this does not happen, check the belt to make sure that the belt webbing ...
...belt: The seat belt is equipped with driver's and front passenger's pre-tensioner seat belts. Pre-tensioner seat belt Your vehicle is released by pressing the release button (1) in certain frontal collisions. WARNING Do not put anything near the buckle can adversely affect the anchor pre-tensioner and may... pull the seat belt into tighter contact against the occupant's body in the locking buckle. Placing objects near the buckle. When it is released, the belt should automatically draw back into position. If this does not happen, check the belt to make sure that the belt webbing ...

Owner's Manual
Page 49
... sound is in case of the seat belt is fully extended, it is not twisted. 2. Listen for an audible "clicking" or "ratcheting" sound. Position the release button so that the retractor is heard, repeat steps 3 and 4. 3 30 Slowly allow the shoulder portion of the seat belt all the way out. Safety...
... sound is in case of the seat belt is fully extended, it is not twisted. 2. Listen for an audible "clicking" or "ratcheting" sound. Position the release button so that the retractor is heard, repeat steps 3 and 4. 3 30 Slowly allow the shoulder portion of the seat belt all the way out. Safety...

Owner's Manual
Page 50
Remove as much slack from the "Automatic Locking" mode to the "emergency locking mode" whenever the belt is not, release the seat belt and repeat steps 2 through 6. 7. Double check that the seat belt is not in the Automatic Locking mode, the child restraint can... each time a child restraint is in the "Automatic Locking" mode. If you cannot, the retractor is installed. To remove the child restraint, press the release button on the child restraint system while feeding the shoulder belt back into the retractor. 6. Therefore, the preceding seven steps must be seriously injured or...
Remove as much slack from the "Automatic Locking" mode to the "emergency locking mode" whenever the belt is not, release the seat belt and repeat steps 2 through 6. 7. Double check that the seat belt is not in the Automatic Locking mode, the child restraint can... each time a child restraint is in the "Automatic Locking" mode. If you cannot, the retractor is installed. To remove the child restraint, press the release button on the child restraint system while feeding the shoulder belt back into the retractor. 6. Therefore, the preceding seven steps must be seriously injured or...

Owner's Manual
Page 59
...a mild soap after the engine is started, comes on after illuminating for some persons. Such objects may be a loud noise followed by an authorized HYUNDAI dealer. (Continued) (Continued) • Before you replace a fuse or disconnect a battery terminal, turn the ignition switch to illuminate. the air bags...and cause injury if the passenger's air bag inflates. • When installing a container of your vehicle immediately inspected by a fine dust released in the ON position. Failure to the ON position, or after an accident in which the air bags were deployed. • The ...
...a mild soap after the engine is started, comes on after illuminating for some persons. Such objects may be a loud noise followed by an authorized HYUNDAI dealer. (Continued) (Continued) • Before you replace a fuse or disconnect a battery terminal, turn the ignition switch to illuminate. the air bags...and cause injury if the passenger's air bag inflates. • When installing a container of your vehicle immediately inspected by a fine dust released in the ON position. Failure to the ON position, or after an accident in which the air bags were deployed. • The ...

Owner's Manual
Page 83
...key is determined to be valid, the engine will start. In this position the trunk will open the glove box with the trunk lid release lever or transmitter. The immobilizer system activates automatically. If the key is valid or not. Without a valid ignition key for your vehicle...: 1. To deactivate the immobilizer system: Insert the ignition key into the ignition switch and turn it to ON position (depressed). Lock release To release the trunk lock feature, open with the master key and set the trunk lid control button to ON, it checks and determines and verifies...
...key is determined to be valid, the engine will start. In this position the trunk will open the glove box with the trunk lid release lever or transmitter. The immobilizer system activates automatically. If the key is valid or not. Without a valid ignition key for your vehicle...: 1. To deactivate the immobilizer system: Insert the ignition key into the ignition switch and turn it to ON position (depressed). Lock release To release the trunk lock feature, open with the master key and set the trunk lid control button to ON, it checks and determines and verifies...

Owner's Manual
Page 88
...: 1. Set the trunk lid control button to 4 above, remove the mechanical key from the smart key and leave the smart key with the trunk lid release lever or smart key. Trunk locking To activate the trunk lock system so that the trunk can only be opened with the mechanical key and... set the trunk lid control button to start the engine and operate door locks. Depress and hold the release button (1) and remove the mechanical key (2). (To reinstall the mechanical key, put the key into the hole and push it until a click sound is used...
...: 1. Set the trunk lid control button to 4 above, remove the mechanical key from the smart key and leave the smart key with the trunk lid release lever or smart key. Trunk locking To activate the trunk lock system so that the trunk can only be opened with the mechanical key and... set the trunk lid control button to start the engine and operate door locks. Depress and hold the release button (1) and remove the mechanical key (2). (To reinstall the mechanical key, put the key into the hole and push it until a click sound is used...

Owner's Manual
Page 99
... with the key, transmitter (or smart key) or central door lock switch. • To open the trunk from inside the vehicle pull the trunk lid release lever. ✽ NOTICE In cold and wet climates, trunk locks and trunk mechanisms may not work properly due to driving. Type B OBH048012L D070100ABH-EE OBH048013...
... with the key, transmitter (or smart key) or central door lock switch. • To open the trunk from inside the vehicle pull the trunk lid release lever. ✽ NOTICE In cold and wet climates, trunk locks and trunk mechanisms may not work properly due to driving. Type B OBH048012L D070100ABH-EE OBH048013...

Owner's Manual
Page 100
..., always check by trying to pull it locks. WARNING The trunk lid should be always kept completely closed . OBH048014 D070300ABH Emergency trunk safety release Your vehicle is a part of the vehicle's crush zone. • Your vehicle should teach their children about the dangers of playing in the... trunk, pulling this handle will release the trunk latch mechanism and open or ajar, poisonous exhaust gases may enter the car and serious illness or death may result. Features of...
..., always check by trying to pull it locks. WARNING The trunk lid should be always kept completely closed . OBH048014 D070300ABH Emergency trunk safety release Your vehicle is a part of the vehicle's crush zone. • Your vehicle should teach their children about the dangers of playing in the... trunk, pulling this handle will release the trunk latch mechanism and open or ajar, poisonous exhaust gases may enter the car and serious illness or death may result. Features of...

Owner's Manual
Page 101
... prevent unauthorized access to the trunk. • When the trunk lid control button is ON (depressed), the trunk can be unlocked with the trunk lid release lever and the transmitter (or smart key). • When the trunk lid control button is OFF (not depressed), the trunk can be unlocked with the...
... prevent unauthorized access to the trunk. • When the trunk lid control button is ON (depressed), the trunk can be unlocked with the trunk lid release lever and the transmitter (or smart key). • When the trunk lid control button is OFF (not depressed), the trunk can be unlocked with the...

Owner's Manual
Page 103
... turned to operate. However, if the front doors open, the power windows cannot be operated within the 30 second period after the ignition key is released. To stop the window at the desired position while the window is a normal occurrence and can block the operation of passenger windows. The power windows...
... turned to operate. However, if the front doors open, the power windows cannot be operated within the 30 second period after the ignition key is released. To stop the window at the desired position while the window is a normal occurrence and can block the operation of passenger windows. The power windows...

Owner's Manual
Page 106
..., ensure that the hood is not latched, the hood could fall or be sure that all obstructions are removed from the engine compartment. 2. Pull the release lever to the P(Park) position, and setting the parking brake. 2. Doing so may result in property damage or severe personal injury. • Do not leave...
..., ensure that the hood is not latched, the hood could fall or be sure that all obstructions are removed from the engine compartment. 2. Pull the release lever to the P(Park) position, and setting the parking brake. 2. Doing so may result in property damage or severe personal injury. • Do not leave...