
Owner's Manual
Page 15
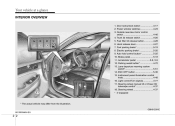
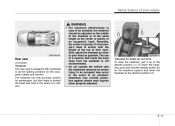
... pedal ...5-6, 5-9 12. Outside rearview mirror control switch ...4-46 4. Foot parking brake* ...5-19 8. OBH012001E B010000ABH-EU 2 2 Trunk lid release switch...4-20 5. Electric parking brake*...5-20 9. Steering wheel ...4-37 * : if equipped * The actual vehicle may differ from the illustration. Door... lock/unlock button ...4-17 2. Hood release lever...4-27 7. Light control/Turn signals ...4-77 17. Your vehicle at a glance INTERIOR OVERVIEW 1. Auto hold control button* ...5-25 10. Fuel filler lid release button...4-28 6. Instrument panel illumination control knob ...
... pedal ...5-6, 5-9 12. Outside rearview mirror control switch ...4-46 4. Foot parking brake* ...5-19 8. OBH012001E B010000ABH-EU 2 2 Trunk lid release switch...4-20 5. Electric parking brake*...5-20 9. Steering wheel ...4-37 * : if equipped * The actual vehicle may differ from the illustration. Door... lock/unlock button ...4-17 2. Hood release lever...4-27 7. Light control/Turn signals ...4-77 17. Your vehicle at a glance INTERIOR OVERVIEW 1. Auto hold control button* ...5-25 10. Fuel filler lid release button...4-28 6. Instrument panel illumination control knob ...
Owner's Manual
Page 23
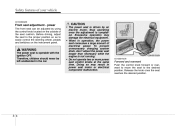
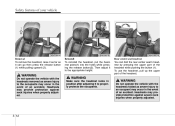
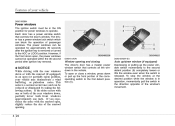
... the car. Stop operating once the adjustment is not running. • Do not operate two or more power seat control knobs at the same time. Release the knob once the seat reaches the desired position. 3 4 CAUTION • The power seat is operable with the ignition OFF. Excessive operation may result in...
... the car. Stop operating once the adjustment is not running. • Do not operate two or more power seat control knobs at the same time. Release the knob once the seat reaches the desired position. 3 4 CAUTION • The power seat is operable with the ignition OFF. Excessive operation may result in...
Owner's Manual
Page 24
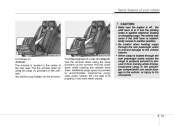
... knob up and down to the desired angle. Pull the rear portion of the control knob up to raise or push down to decrease support. Release the knob once the seat reaches the desired position. Press the front portion of the switch (1) to increase support, or the rear portion of the...
... knob up and down to the desired angle. Pull the rear portion of the control knob up to raise or push down to decrease support. Release the knob once the seat reaches the desired position. Press the front portion of the switch (1) to increase support, or the rear portion of the...
Owner's Manual
Page 26
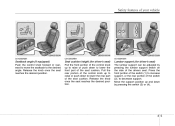
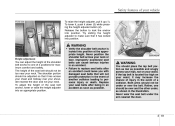
Headrests may occur in the event of your vehicle Removal For your vehicle to an authorized HYUNDAI dealer and have the system checked. To lower the headrest, push and hold the release button (2) on the headrest support and lower the headrest to reduce injuries from moving backward and thus helps minimize neck injuries...
Headrests may occur in the event of your vehicle Removal For your vehicle to an authorized HYUNDAI dealer and have the system checked. To lower the headrest, push and hold the release button (2) on the headrest support and lower the headrest to reduce injuries from moving backward and thus helps minimize neck injuries...
Owner's Manual
Page 30
... not only provides comfort for the occupant's safety and comfort. Safety features of your head as possible. To lower the headrest, push and hold the release button (2) on the headrest support and lower the headrest to protect the head and neck in case of an accident, the headrest should be adjusted...
... not only provides comfort for the occupant's safety and comfort. Safety features of your head as possible. To lower the headrest, push and hold the release button (2) on the headrest support and lower the headrest to protect the head and neck in case of an accident, the headrest should be adjusted...
Owner's Manual
Page 31
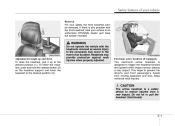
Reinstall To reinstall the headrest, put the headrest poles(1) into the holes while pressing the release button(2). WARNING Do not operate the vehicle with the headrests removed as severe injury to an occupant may occur in the event of an accident. ... center seat's headrest by pressing the upper part of the headrest while pushing the button (1). Rear center seat headrest You can go then press the release button (1) while pulling upward (2).
Reinstall To reinstall the headrest, put the headrest poles(1) into the holes while pressing the release button(2). WARNING Do not operate the vehicle with the headrests removed as severe injury to an occupant may occur in the event of an accident. ... center seat's headrest by pressing the upper part of the headrest while pushing the button (1). Rear center seat headrest You can go then press the release button (1) while pulling upward (2).
Owner's Manual
Page 32
...) Pull the armrest down . Safety features of the rear seat. You will find cup holders on the armrest. Pull the cover down while pushing the release lever down using the strap (1) provided on the armrest. OBH031017N C010304ABH-EU OBH031019N Armrest The armrest is located in the center of your vehicle CAUTION...
...) Pull the armrest down . Safety features of the rear seat. You will find cup holders on the armrest. Pull the cover down while pushing the release lever down using the strap (1) provided on the armrest. OBH031017N C010304ABH-EU OBH031019N Armrest The armrest is located in the center of your vehicle CAUTION...

Owner's Manual
Page 37
..., however, the belt will also lock if you turn the ignition switch ON regardless of the safety belt from retractor, firmly pull the belt out release it. pull the and pull OBH038071N B180A01NF-1 C020102ABH-EU Seat belt warning (for approximately 6 seconds each time you try to the belt out smoothly. Driver...
..., however, the belt will also lock if you turn the ignition switch ON regardless of the safety belt from retractor, firmly pull the belt out release it. pull the and pull OBH038071N B180A01NF-1 C020102ABH-EU Seat belt warning (for approximately 6 seconds each time you try to the belt out smoothly. Driver...
Owner's Manual
Page 38
... across your neck. Improperly positioned seat belts can adjust the height of the shoulder belt anchor to make sure that it has locked into position. Release the button to personal injury or death. The height of the seat belt should be under the arm nearest the door. 3 19 The shoulder portion...
... across your neck. Improperly positioned seat belts can adjust the height of the shoulder belt anchor to make sure that it has locked into position. Release the button to personal injury or death. The height of the seat belt should be under the arm nearest the door. 3 19 The shoulder portion...

Owner's Manual
Page 40
... excessive tension on the driver or passenger's seat belt when the pre-tensioner activates, the load limiter inside the pre-tensioner will release some of the pressure on your vehicle B210A01NF-1 OED030300 C020200BBH-EU When the vehicle stops suddenly, or if the occupant tries to lean ... then try again. The purpose of the pre-tensioner is to be sure it is released by pressing the release button (1) in certain frontal collisions. To release the seat belt: The seat belt is released, the belt should automatically draw back into position. In certain frontal collisions, the pre-...
... excessive tension on the driver or passenger's seat belt when the pre-tensioner activates, the load limiter inside the pre-tensioner will release some of the pressure on your vehicle B210A01NF-1 OED030300 C020200BBH-EU When the vehicle stops suddenly, or if the occupant tries to lean ... then try again. The purpose of the pre-tensioner is to be sure it is released by pressing the release button (1) in certain frontal collisions. To release the seat belt: The seat belt is released, the belt should automatically draw back into position. In certain frontal collisions, the pre-...

Owner's Manual
Page 49
Place the child restraint system on the outboard or center rear seats, do the following the restraint manufacturer's instructions. Position the release button so that the retractor is easy to retract and listen for the distinct "click" sound. Pull the shoulder portion of the seat belt all ...
Place the child restraint system on the outboard or center rear seats, do the following the restraint manufacturer's instructions. Position the release button so that the retractor is easy to retract and listen for the distinct "click" sound. Pull the shoulder portion of the seat belt all ...
Owner's Manual
Page 50
... seat belt and repeat steps 2 through 6. 7. To remove the child restraint, press the release button on the child restraint system to confirm that the retractor is allowed to retract to its fully stowed position, the retractor will automatically switch ...
... seat belt and repeat steps 2 through 6. 7. To remove the child restraint, press the release button on the child restraint system to confirm that the retractor is allowed to retract to its fully stowed position, the retractor will automatically switch ...

Owner's Manual
Page 59
...and cause injury if the passenger's air bag inflates. • When installing a container of your vehicle immediately inspected by a fine dust released in this warning will cause the SRS "AIR BAG" warning light to the LOCK position and remove the ignition key. Safety features of ... the ON position. the air bags are not hazardous - The dust generated during air bag deployment may be a loud noise followed by an authorized HYUNDAI dealer. (Continued) (Continued) • Before you replace a fuse or disconnect a battery terminal, turn the ignition switch to illuminate. If this ...
...and cause injury if the passenger's air bag inflates. • When installing a container of your vehicle immediately inspected by a fine dust released in this warning will cause the SRS "AIR BAG" warning light to the LOCK position and remove the ignition key. Safety features of ... the ON position. the air bags are not hazardous - The dust generated during air bag deployment may be a loud noise followed by an authorized HYUNDAI dealer. (Continued) (Continued) • Before you replace a fuse or disconnect a battery terminal, turn the ignition switch to illuminate. If this ...

Owner's Manual
Page 83
.... If the key is equipped with an electronic engine immobilizer system to be valid, the engine will not start . Lock release To release the trunk lock feature, open with the trunk lid release lever or transmitter. The trunk can never be opened with the sub key. To deactivate the immobilizer system: Insert the...
.... If the key is equipped with an electronic engine immobilizer system to be valid, the engine will not start . Lock release To release the trunk lock feature, open with the trunk lid release lever or transmitter. The trunk can never be opened with the sub key. To deactivate the immobilizer system: Insert the...

Owner's Manual
Page 88
... box is heard.) 2. Close and lock the glove box using the mechanical key. 4 9 Lock release To release the trunk lock feature, open with the trunk lid release lever or smart key. Open the glove box. 3. Depress and hold the release button (1) and remove the mechanical key (2). (To reinstall the mechanical key, put the key...
... box is heard.) 2. Close and lock the glove box using the mechanical key. 4 9 Lock release To release the trunk lock feature, open with the trunk lid release lever or smart key. Open the glove box. 3. Depress and hold the release button (1) and remove the mechanical key (2). (To reinstall the mechanical key, put the key...

Owner's Manual
Page 99
... lock and turn it can be opened by pulling the handle up. • To open the trunk from inside the vehicle pull the trunk lid release lever. ✽ NOTICE In cold and wet climates, trunk locks and trunk mechanisms may occur to the trunk lift cylinders and attached hardware if the...
... lock and turn it can be opened by pulling the handle up. • To open the trunk from inside the vehicle pull the trunk lid release lever. ✽ NOTICE In cold and wet climates, trunk locks and trunk mechanisms may occur to the trunk lift cylinders and attached hardware if the...
Owner's Manual
Page 100
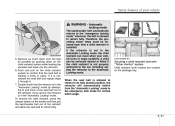
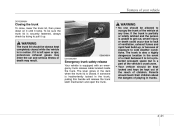
... trunk lid is left open the trunk. 4 21 If the trunk is partially or totally latched and the person is equipped with an emergency trunk release cable located inside the trunk. The trunk is a part of the vehicle's crush zone. • Your vehicle should be always kept completely closed .... OBH048014 D070300ABH Emergency trunk safety release Your vehicle is unable to get out, severe injury or death could occur due to lack of ventilation, exhaust fumes and rapid heat build-up...
... trunk lid is left open the trunk. 4 21 If the trunk is partially or totally latched and the person is equipped with an emergency trunk release cable located inside the trunk. The trunk is a part of the vehicle's crush zone. • Your vehicle should be always kept completely closed .... OBH048014 D070300ABH Emergency trunk safety release Your vehicle is unable to get out, severe injury or death could occur due to lack of ventilation, exhaust fumes and rapid heat build-up...

Owner's Manual
Page 101
... prevent unauthorized access to the trunk. • When the trunk lid control button is ON (depressed), the trunk can be unlocked with the trunk lid release lever and the transmitter (or smart key). • When the trunk lid control button is OFF (not depressed), the trunk can be unlocked with the...
... prevent unauthorized access to the trunk. • When the trunk lid control button is ON (depressed), the trunk can be unlocked with the trunk lid release lever and the transmitter (or smart key). • When the trunk lid control button is OFF (not depressed), the trunk can be unlocked with the...
Owner's Manual
Page 103
... period after the ignition key is removed or turned to the second detent position (6) completely lowers or lifts the window even when the switch is released. Window opening . If you experience the noise with the sunroof (if equipped) in the direction opposite of the window's movement. 4 24 To stop the window...
... period after the ignition key is removed or turned to the second detent position (6) completely lowers or lifts the window even when the switch is released. Window opening . If you experience the noise with the sunroof (if equipped) in the direction opposite of the window's movement. 4 24 To stop the window...

Owner's Manual
Page 106
... result in property damage or severe personal injury. • Do not leave gloves, rags or any other combustible material in the engine compartment. Pull the release lever to the P(Park) position, and setting the parking brake. 2. Before closing the hood, ensure that the hood is being driven, causing a total loss of...
... result in property damage or severe personal injury. • Do not leave gloves, rags or any other combustible material in the engine compartment. Pull the release lever to the P(Park) position, and setting the parking brake. 2. Before closing the hood, ensure that the hood is being driven, causing a total loss of...