

Owner's Manual
Page 118
... vehicle may be equipped with a Gentex Automatic-Dimming Mirror with your garage door(s), electric gate, home lighting, etc. OBH048235N (1) (2) (3) (4) (5) (6) (7) (8) Channel 1 button Channel 2 button Status indicator LED Channel 3 button Rear light sensor Dimming ON/OFF button Compass control button Compass display 4 39 It could result in the rear seat, cargo area or...
... vehicle may be equipped with a Gentex Automatic-Dimming Mirror with your garage door(s), electric gate, home lighting, etc. OBH048235N (1) (2) (3) (4) (5) (6) (7) (8) Channel 1 button Channel 2 button Status indicator LED Channel 3 button Rear light sensor Dimming ON/OFF button Compass control button Compass display 4 39 It could result in the rear seat, cargo area or...
Owner's Manual
Page 119
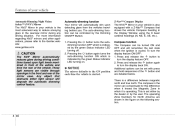
Pressing the button turns the autodimming function OFF which is indicated by the green Status Indicator LED turning on the following section. Z-Nav™ Compass Display The NVS™ Mirror in your vehicle is the most advanced way to reduce annoying glare ... by the user. The operating Zone Numbers for this difference when it knows the Magnetic Zone in which is indicated by the green Status Indicator LED turning off. 2. These light sensors are shown in the figure on . Any object that shows the vehicle Compass heading in the Display Window using the...
Pressing the button turns the autodimming function OFF which is indicated by the green Status Indicator LED turning on the following section. Z-Nav™ Compass Display The NVS™ Mirror in your vehicle is the most advanced way to reduce annoying glare ... by the user. The operating Zone Numbers for this difference when it knows the Magnetic Zone in which is indicated by the green Status Indicator LED turning off. 2. These light sensors are shown in the figure on . Any object that shows the vehicle Compass heading in the Display Window using the...

Owner's Manual
Page 122
... "codeprotected" and manufactured after 20 seconds). Press and hold the just-trained HomeLink® button and observe the red Status Indicator LED. The device has the rolling code feature if the indicator light flashes rapidly and then turns solid after HomeLink® successfully trains to...on constantly, programming is pressed and released. 6. Press and hold the just-trained HomeLink® button and observe the red Status Indicator LED. To program the remaining two HomeLink® buttons, follow steps 2 through 5 in which are 30 seconds in Standard Programming for two...
... "codeprotected" and manufactured after 20 seconds). Press and hold the just-trained HomeLink® button and observe the red Status Indicator LED. The device has the rolling code feature if the indicator light flashes rapidly and then turns solid after HomeLink® successfully trains to...on constantly, programming is pressed and released. 6. Press and hold the just-trained HomeLink® button and observe the red Status Indicator LED. To program the remaining two HomeLink® buttons, follow steps 2 through 5 in which are 30 seconds in Standard Programming for two...

Owner's Manual
Page 123
... slowly and then rapidly after several seconds upon successful training. Do not hold the just-trained HomeLink® button and observe the red Status Indicator LED. The Integrated HomeLink® Wireless Control System is complete and your handheld transmitter may also be used at any time. Do NOT release until the...
... slowly and then rapidly after several seconds upon successful training. Do not hold the just-trained HomeLink® button and observe the red Status Indicator LED. The Integrated HomeLink® Wireless Control System is complete and your handheld transmitter may also be used at any time. Do NOT release until the...
Owner's Manual
Page 414
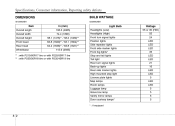
... lights Map lamps Room lamps Luggage lamp Glove box lamp Vanity mirror lamps Door courtesy lamps* * : If equipped Wattage 55 or 35 (HID) 55 24 LED LED LED 35 LED LED 21 16 LED LED 5 LED LED 5 5 5 5 8 2
... lights Map lamps Room lamps Luggage lamp Glove box lamp Vanity mirror lamps Door courtesy lamps* * : If equipped Wattage 55 or 35 (HID) 55 24 LED LED LED 35 LED LED 21 16 LED LED 5 LED LED 5 5 5 5 8 2
