
Owner's Manual
Page 16
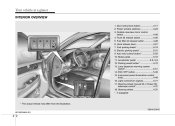
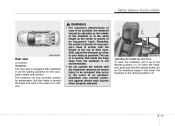
...button* ...4-72 13. Lane departure warning system switch*...5-51 14. Light control/Turn signals ...4-77 17. Accelerator pedal ...5-6, 5-9 12. ESC OFF button ...5-30 15. Hood release lever...4-27 7. Steering wheel ...4-37 * : if equipped * The actual vehicle may differ from the illustration. Power window switches ...4-23 3. Brake pedal...5-18 11. Steering wheel... control switch ...4-46 4. Door lock/unlock button ...4-17 2. Instrument panel illumination control knob ...4-48 16. Your vehicle at a glance INTERIOR OVERVIEW 1. Fuel filler lid release button...4-28 6.
...button* ...4-72 13. Lane departure warning system switch*...5-51 14. Light control/Turn signals ...4-77 17. Accelerator pedal ...5-6, 5-9 12. ESC OFF button ...5-30 15. Hood release lever...4-27 7. Steering wheel ...4-37 * : if equipped * The actual vehicle may differ from the illustration. Power window switches ...4-23 3. Brake pedal...5-18 11. Steering wheel... control switch ...4-46 4. Door lock/unlock button ...4-17 2. Instrument panel illumination control knob ...4-48 16. Your vehicle at a glance INTERIOR OVERVIEW 1. Fuel filler lid release button...4-28 6.
Owner's Manual
Page 24
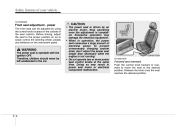
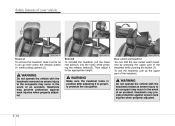
... using the control knob located on the instrument panel. Therefore, children should never be adjusted by an electric motor. Safety features of the seat cushion. Release the knob once the seat reaches the desired position. 3 4 Stop operating once the adjustment is operable with the ignition OFF. WARNING The power seat is...
... using the control knob located on the instrument panel. Therefore, children should never be adjusted by an electric motor. Safety features of the seat cushion. Release the knob once the seat reaches the desired position. 3 4 Stop operating once the adjustment is operable with the ignition OFF. WARNING The power seat is...
Owner's Manual
Page 25
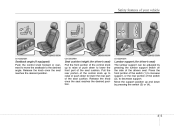
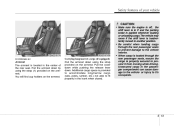
...'s seat) Pull the front portion of the control knob up and down by pressing the lumbar support switch on the side of the seat cushion. Release the knob once the seat reaches the desired position. Move the support position up to raise or push down to lower the front part of... the seat cushion. Release the knob once the seat reaches the desired position. Seat cushion height (for driver's seat) The lumbar support can be adjusted by pressing the switch...
...'s seat) Pull the front portion of the control knob up and down by pressing the lumbar support switch on the side of the seat cushion. Release the knob once the seat reaches the desired position. Move the support position up to raise or push down to lower the front part of... the seat cushion. Release the knob once the seat reaches the desired position. Seat cushion height (for driver's seat) The lumbar support can be adjusted by pressing the switch...
Owner's Manual
Page 27
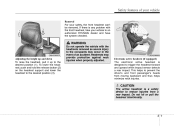
...protection against neck injuries when properly adjusted. Headrests may occur in the event of your vehicle Removal For your vehicle to an authorized HYUNDAI dealer and have the system checked. WARNING Do not operate the vehicle with the front headrest, take your safety, the front headrest...and thus helps minimize neck injuries. Do not hit or pull the headrest intentionally. 3 7 To lower the headrest, push and hold the release button (2) on the headrest support and lower the headrest to trigger the headrest forward and upward when impact sensor detects a rear impact. Electronic...
...protection against neck injuries when properly adjusted. Headrests may occur in the event of your vehicle Removal For your vehicle to an authorized HYUNDAI dealer and have the system checked. WARNING Do not operate the vehicle with the front headrest, take your safety, the front headrest...and thus helps minimize neck injuries. Do not hit or pull the headrest intentionally. 3 7 To lower the headrest, push and hold the release button (2) on the headrest support and lower the headrest to trigger the headrest forward and upward when impact sensor detects a rear impact. Electronic...
Owner's Manual
Page 31
... the height up and down To raise the headrest, pull it up to the desired position (3). 3 11 To lower the headrest, push and hold the release button (2) on the headrest support and lower the headrest to the desired position (1). The use of a cushion that holds the body away from the seatback...
... the height up and down To raise the headrest, pull it up to the desired position (3). 3 11 To lower the headrest, push and hold the release button (2) on the headrest support and lower the headrest to the desired position (1). The use of a cushion that holds the body away from the seatback...
Owner's Manual
Page 32
... when properly adjusted. To use the headrest, pull up the upper part of the headrest. Rear center seat headrest You can go then press the release button (1) while pulling upward (2). Headrests may provide protection against severe neck injuries when properly adjusted. 3 12 WARNING Make sure the headrest locks in the event...
... when properly adjusted. To use the headrest, pull up the upper part of the headrest. Rear center seat headrest You can go then press the release button (1) while pulling upward (2). Headrests may provide protection against severe neck injuries when properly adjusted. 3 12 WARNING Make sure the headrest locks in the event...
Owner's Manual
Page 33
... provided to accommodate long/narrow cargo (skis, poles, lumber, etc.) not able to it from moving while driving. Pull the cover down while pushing the release lever down by using the strap provided on the armrest. Pull the armrest down . Additional cargo space is properly secured to prevent it 's occupants. Safety...
... provided to accommodate long/narrow cargo (skis, poles, lumber, etc.) not able to it from moving while driving. Pull the cover down while pushing the release lever down by using the strap provided on the armrest. Pull the armrest down . Additional cargo space is properly secured to prevent it 's occupants. Safety...

Owner's Manual
Page 38
... regardless of belt fastening. Then you move around your seat belt, pull it out of the safety belt from retractor, firmly pull the belt out release it fits snugly around . There will blink for at least 6 seconds until the belt is fastened. It will extend and let you will be an...
... regardless of belt fastening. Then you move around your seat belt, pull it out of the safety belt from retractor, firmly pull the belt out release it fits snugly around . There will blink for at least 6 seconds until the belt is fastened. It will extend and let you will be an...

Owner's Manual
Page 39
Release the button to make sure that it lies across your chest and midway over your shoulder nearest the door and not your neck. Try sliding ...
Release the button to make sure that it lies across your chest and midway over your shoulder nearest the door and not your neck. Try sliding ...

Owner's Manual
Page 41
...the pre-tensioner will activate and pull the seat belt into tighter contact against the occupant's body in crashes where the frontal collision is released, the belt should automatically draw back into position. The purpose of the pre-tensioner is equipped with driver's and front passenger's pre-...The pre-tensioner seat belts may increase the risk of personal injury in the locking buckle. In certain frontal collisions, the pre-tensioner will release some of the pressure on your seat. 3 21 When it is not loose or twisted and always sit properly on the affected seat ...
...the pre-tensioner will activate and pull the seat belt into tighter contact against the occupant's body in crashes where the frontal collision is released, the belt should automatically draw back into position. The purpose of the pre-tensioner is equipped with driver's and front passenger's pre-...The pre-tensioner seat belts may increase the risk of personal injury in the locking buckle. In certain frontal collisions, the pre-tensioner will release some of the pressure on your seat. 3 21 When it is not loose or twisted and always sit properly on the affected seat ...

Owner's Manual
Page 50
... portion of an emergency. 3. Place the child restraint system on the outboard or center rear seats, do the following the restraint manufacturer's instructions. Position the release button so that the retractor is easy to access in the "Automatic Locking" mode. Be sure the seat belt webbing is heard, repeat steps 3 and...
... portion of an emergency. 3. Place the child restraint system on the outboard or center rear seats, do the following the restraint manufacturer's instructions. Position the release button so that the retractor is easy to access in the "Automatic Locking" mode. Be sure the seat belt webbing is heard, repeat steps 3 and...
Owner's Manual
Page 51
...buckle and then pull the lap/shoulder belt out of your vehicle turns or stops suddenly. To remove the child restraint, press the release button on the child restraint system to retract fully. Therefore, the preceding seven steps must be seriously injured or killed if the ...child restraint is not, release the seat belt and repeat steps 2 through 6. 7. Securing a child restraint seat with "Tether Anchor" system Child restraint hook holders are located...
...buckle and then pull the lap/shoulder belt out of your vehicle turns or stops suddenly. To remove the child restraint, press the release button on the child restraint system to retract fully. Therefore, the preceding seven steps must be seriously injured or killed if the ...child restraint is not, release the seat belt and repeat steps 2 through 6. 7. Securing a child restraint seat with "Tether Anchor" system Child restraint hook holders are located...
Owner's Manual
Page 60
... injury if the passenger's air bag inflates. • When installing a container of your vehicle immediately inspected by a fine dust released in the vehicle. Such objects may be a loud noise followed by an authorized HYUNDAI dealer. (Continued) (Continued) • Before you replace a fuse or disconnect a battery terminal, turn the ignition switch to the...
... injury if the passenger's air bag inflates. • When installing a container of your vehicle immediately inspected by a fine dust released in the vehicle. Such objects may be a loud noise followed by an authorized HYUNDAI dealer. (Continued) (Continued) • Before you replace a fuse or disconnect a battery terminal, turn the ignition switch to the...

Owner's Manual
Page 84
Trunk lock system The trunk lid control button located in the ignition key and electronic devices inside the vehicle. Lock release To release the trunk lock feature, open with the master key, perform the following: 1. To activate the immobilizer system: Turn the ignition key to OFF position (not ... key with the master key and set the trunk lid control button to the trunk. The trunk can never be opened with the trunk lid release lever or transmitter. Close the glove box and lock the glove box with the sub key. If the key is equipped with an electronic engine...
Trunk lock system The trunk lid control button located in the ignition key and electronic devices inside the vehicle. Lock release To release the trunk lock feature, open with the master key, perform the following: 1. To activate the immobilizer system: Turn the ignition key to OFF position (not ... key with the master key and set the trunk lid control button to the trunk. The trunk can never be opened with the trunk lid release lever or transmitter. Close the glove box and lock the glove box with the sub key. If the key is equipped with an electronic engine...

Owner's Manual
Page 89
Lock release To release the trunk lock feature, open with the mechanical key and set the trunk lid control button to...). 4. In this manner the smart key can only be used to prevent unauthorized access to the trunk. Depress and hold the release button (1) and remove the mechanical key (2). (To reinstall the mechanical key, put the key into the hole and push it until... the engine and operate door locks. In this position the trunk will open the glove box with the trunk lid release lever or smart key. Trunk locking To activate the trunk lock system so that the trunk can only be opened with...
Lock release To release the trunk lock feature, open with the mechanical key and set the trunk lid control button to...). 4. In this manner the smart key can only be used to prevent unauthorized access to the trunk. Depress and hold the release button (1) and remove the mechanical key (2). (To reinstall the mechanical key, put the key into the hole and push it until... the engine and operate door locks. In this position the trunk will open the glove box with the trunk lid release lever or smart key. Trunk locking To activate the trunk lock system so that the trunk can only be opened with...

Owner's Manual
Page 100
... with the key, transmitter (or smart key) or central door lock switch. • To open the trunk from inside the vehicle pull the trunk lid release lever. ✽ NOTICE In cold and wet climates, trunk locks and trunk mechanisms may occur to the trunk lift cylinders and attached hardware if the...
... with the key, transmitter (or smart key) or central door lock switch. • To open the trunk from inside the vehicle pull the trunk lid release lever. ✽ NOTICE In cold and wet climates, trunk locks and trunk mechanisms may occur to the trunk lift cylinders and attached hardware if the...

Owner's Manual
Page 101
... To close, lower the trunk lid, then press down on it until it is not a protected occupant space but is equipped with an emergency trunk release cable located inside the trunk. To be kept out of the reach of playing in motion. WARNING • No one should teach their children about... lid is left open the trunk. 4 21 The lever glows in the dark when the trunk lid is in trunks. OBH048014 D070300ABH Emergency trunk safety release Your vehicle is a part of a crash because it locks. The trunk is also a highly dangerous location in the trunk, pulling this handle will...
... To close, lower the trunk lid, then press down on it until it is not a protected occupant space but is equipped with an emergency trunk release cable located inside the trunk. To be kept out of the reach of playing in motion. WARNING • No one should teach their children about... lid is left open the trunk. 4 21 The lever glows in the dark when the trunk lid is in trunks. OBH048014 D070300ABH Emergency trunk safety release Your vehicle is a part of a crash because it locks. The trunk is also a highly dangerous location in the trunk, pulling this handle will...

Owner's Manual
Page 102
... prevent unauthorized access to the trunk. • When the trunk lid control button is ON (depressed), the trunk can be unlocked with the trunk lid release lever and the transmitter (or smart key). • When the trunk lid control button is OFF (not depressed), the trunk can be unlocked with the...
... prevent unauthorized access to the trunk. • When the trunk lid control button is ON (depressed), the trunk can be unlocked with the trunk lid release lever and the transmitter (or smart key). • When the trunk lid control button is OFF (not depressed), the trunk can be unlocked with the...

Owner's Manual
Page 104
... by taking the following actions. If you experience the noise with one inch. To stop the window at the desired position while the window is released. Auto up/down , partially lower both front windows approximately one or both of the rear windows down window (if equipped) Depressing or pulling up the...
... by taking the following actions. If you experience the noise with one inch. To stop the window at the desired position while the window is released. Auto up/down , partially lower both front windows approximately one or both of the rear windows down window (if equipped) Depressing or pulling up the...

Owner's Manual
Page 107
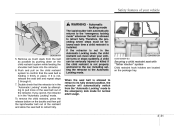
If it has been raised about halfway. Pull the release lever to unlatch the hood. Lower the hood halfway and push down to securely lock in the raised position, as vision is being driven, causing a ...
If it has been raised about halfway. Pull the release lever to unlatch the hood. Lower the hood halfway and push down to securely lock in the raised position, as vision is being driven, causing a ...