
Owner's Manual
Page 122
... shift to save fuel. Then check all brake components for a brake system inspection and necessary repairs. Have it towed to any authorized Hyundai dealer for fluid leaks. 3. Your vehicle is equipped with dual-diagonal braking systems. This means you still have the brakes checked and repaired... light remains on or the brakes do so. WARNING Driving the vehicle with only a portion of the dual systems working . To check bulb operation, check whether the parking brake and brake fluid warning light illuminates when the ignition switch is dangerous. Do not drive the vehicle if...
... shift to save fuel. Then check all brake components for a brake system inspection and necessary repairs. Have it towed to any authorized Hyundai dealer for fluid leaks. 3. Your vehicle is equipped with dual-diagonal braking systems. This means you still have the brakes checked and repaired... light remains on or the brakes do so. WARNING Driving the vehicle with only a portion of the dual systems working . To check bulb operation, check whether the parking brake and brake fluid warning light illuminates when the ignition switch is dangerous. Do not drive the vehicle if...

Owner's Manual
Page 132
...hold it in the circuit. OUN028226 OUN028224 ■ Type B ■ Type B ✽ NOTICE If an indicator flash is abnormally quick or slow, bulb may be burned out or have a poor electrical connection in position (B). It will require replacement. The lever will self-cancel after a turn, manually ...return to use this flashing feature. If the indicator continues to flash after a turn is operating. Features of the turn signal bulbs may be burned out and will return to function. OHDR049414 OHD040416 Flashing headlights To flash the headlights, pull the lever towards you.
...hold it in the circuit. OUN028226 OUN028224 ■ Type B ■ Type B ✽ NOTICE If an indicator flash is abnormally quick or slow, bulb may be burned out or have a poor electrical connection in position (B). It will require replacement. The lever will self-cancel after a turn, manually ...return to use this flashing feature. If the indicator continues to flash after a turn is operating. Features of the turn signal bulbs may be burned out and will return to function. OHDR049414 OHD040416 Flashing headlights To flash the headlights, pull the lever towards you.

Owner's Manual
Page 233
...electrical connection at least twice as far behind you . When towing a trailer, the green arrows on the trailer are still working . An authorized Hyundai dealer can return to have someone guide you are seeing your signals when, in mind that the vehicle you 'll need more passing distance up... slowly and, if possible, have a different turn or lane change lanes, or stop. Before setting out for turns even if the bulbs on your instrument panel will flash for the open road, you would when driving your vehicle without a trailer. If the trailer has electric brakes,...
...electrical connection at least twice as far behind you . When towing a trailer, the green arrows on the trailer are still working . An authorized Hyundai dealer can return to have someone guide you are seeing your signals when, in mind that the vehicle you 'll need more passing distance up... slowly and, if possible, have a different turn or lane change lanes, or stop. Before setting out for turns even if the bulbs on your instrument panel will flash for the open road, you would when driving your vehicle without a trailer. If the trailer has electric brakes,...

Owner's Manual
Page 268
Engine compartment / 7-2 Maintenance services / 7-3 Owner maintenance / 7-5 Scheduled maintenance service / 7-7 Explanation of scheduled maintenance items / 7-12 Engine oil / 7-15 Engine coolant / 7-16 Brakes and clutch fluid / 7-19 Automatic transaxle fluid / 7-20 Washer fluid / 7-22 Parking brake / 7-22 Air cleaner / 7-23 Climate control air filter / 7-25 Wiper blades / 7-27 Battery / 7-29 Tires and wheels / 7-32 Maintenance Fuses / 7-45 Light bulbs / 7-54 Appearance care / 7-59 Emission control system / 7-65 California perchlorate notice / 7-67 7
Engine compartment / 7-2 Maintenance services / 7-3 Owner maintenance / 7-5 Scheduled maintenance service / 7-7 Explanation of scheduled maintenance items / 7-12 Engine oil / 7-15 Engine coolant / 7-16 Brakes and clutch fluid / 7-19 Automatic transaxle fluid / 7-20 Washer fluid / 7-22 Parking brake / 7-22 Air cleaner / 7-23 Climate control air filter / 7-25 Wiper blades / 7-27 Battery / 7-29 Tires and wheels / 7-32 Maintenance Fuses / 7-45 Light bulbs / 7-54 Appearance care / 7-59 Emission control system / 7-65 California perchlorate notice / 7-67 7

Owner's Manual
Page 321
...of the vehicle must be removed before you can result in damage to replace the burned-out bulb with your fingers or receiving an electric shock. Removing/installing the headlight assembly can get to avoid...washing, headlight and taillight lenses could appear frosty. This condition is similar to the bulb. This is caused by an authorized Hyundai dealer. Otherwise, it is especially true if you don't have to remove the headlight... equipped) 7 54 CAUTION If you have necessary tools, the correct bulbs and the expertise, consult an authorized Hyundai dealer. Maintenance LIGHT...
...of the vehicle must be removed before you can result in damage to replace the burned-out bulb with your fingers or receiving an electric shock. Removing/installing the headlight assembly can get to avoid...washing, headlight and taillight lenses could appear frosty. This condition is similar to the bulb. This is caused by an authorized Hyundai dealer. Otherwise, it is especially true if you don't have to remove the headlight... equipped) 7 54 CAUTION If you have necessary tools, the correct bulbs and the expertise, consult an authorized Hyundai dealer. Maintenance LIGHT...

Owner's Manual
Page 322
... cool down before handling it counterclockwise. 4. Remove the headlight bulb cover by turning it . • Wear eye protection when changing a bulb. Disconnect the headlight bulb assembly by turning it . Open the hood. 2. Install a new headlight bulb assembly. 7 55 Remove the headlight. 3. Maintenance (Continued) • If a bulb becomes damaged or cracked, replace it immediately and carefully...
... cool down before handling it counterclockwise. 4. Remove the headlight bulb cover by turning it . • Wear eye protection when changing a bulb. Disconnect the headlight bulb assembly by turning it . Open the hood. 2. Install a new headlight bulb assembly. 7 55 Remove the headlight. 3. Maintenance (Continued) • If a bulb becomes damaged or cracked, replace it immediately and carefully...
Owner's Manual
Page 323
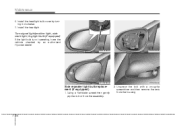
OHD070045 OHD070047 OHD070046 OHD070043 Side repeater light bulb replacement (if equipped) 1. Install the headlight. Turn signal light/position light, side mark light, fog light bulb (if equipped) If the light bulb is not operating, have the vehicle checked by turning it clockwise. 7. Maintenance 6. Using a flat-blade screwdriver, gently pry the mirror from the housing. 7 56 Unscrew the bolt with a cross-tip screwdriver and then remove the lens from the assembly. 2. Install the headlight bulb cover by an authorized Hyundai dealer.
OHD070045 OHD070047 OHD070046 OHD070043 Side repeater light bulb replacement (if equipped) 1. Install the headlight. Turn signal light/position light, side mark light, fog light bulb (if equipped) If the light bulb is not operating, have the vehicle checked by turning it clockwise. 7. Maintenance 6. Using a flat-blade screwdriver, gently pry the mirror from the housing. 7 56 Unscrew the bolt with a cross-tip screwdriver and then remove the lens from the assembly. 2. Install the headlight bulb cover by an authorized Hyundai dealer.
Owner's Manual
Page 324
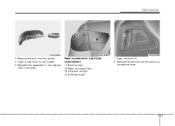
Remove the bulb from the socket. 4. Remove the service cover by pulling out the service cover. 7 57 Reinstall the assembly in the reverse order of removal. Open the trunk lid 2. Maintenance OTD079048 OHD076037 OHD076038 3. Insert a new bulb into the socket. 5. Rear combination light bulb replacement (1) (2) (3) (4) Back-up light Rear turn signal light Stop and tail light Side mark light 1.
Remove the bulb from the socket. 4. Remove the service cover by pulling out the service cover. 7 57 Reinstall the assembly in the reverse order of removal. Open the trunk lid 2. Maintenance OTD079048 OHD076037 OHD076038 3. Insert a new bulb into the socket. 5. Rear combination light bulb replacement (1) (2) (3) (4) Back-up light Rear turn signal light Stop and tail light Side mark light 1.

Owner's Manual
Page 325
...until the tabs on the socket align with the slots in the socket. Remove the socket from the assembly by turning it counterclockwise. 3. Remove the bulb from the socket. 4. Install the service cover by turning it clockwise. Remove the socket by putting it into place. 6. Replace the... on the assembly. 4. Loosen the lens retaining screws with the lens retaining screws. 7 58 Reinstall the lens securely with a cross-tip screwdriver. 2. Pull the bulb out of the socket. 5. Install the socket in the assembly by pressing it counterclockwise until it straight out. 4. Insert a new...
...until the tabs on the socket align with the slots in the socket. Remove the socket from the assembly by turning it counterclockwise. 3. Remove the bulb from the socket. 4. Install the service cover by turning it clockwise. Remove the socket by putting it into place. 6. Replace the... on the assembly. 4. Loosen the lens retaining screws with the lens retaining screws. 7 58 Reinstall the lens securely with a cross-tip screwdriver. 2. Pull the bulb out of the socket. 5. Install the socket in the assembly by pressing it counterclockwise until it straight out. 4. Insert a new...
Owner's Manual
Page 326
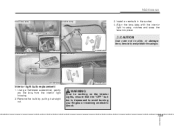
... notches and snap the lens into place. Maintenance Front map lamp Sunvisor lamp 3. OHD076041 Dome lamp Glove box lamp OHD076043 OHD076042 OHD076044 Interior light bulb replacement 1. Remove the bulb by pulling it straight out. WARNING Prior to working on the Interior Lights, ensure that the "OFF" button is depressed to dirty or... pry the lens from the interior light housing. 2. CAUTION Use care not to avoid burning your fingers or receiving an electric shock. 7 59 Install a new bulb in the socket. 4.
... notches and snap the lens into place. Maintenance Front map lamp Sunvisor lamp 3. OHD076041 Dome lamp Glove box lamp OHD076043 OHD076042 OHD076044 Interior light bulb replacement 1. Remove the bulb by pulling it straight out. WARNING Prior to working on the Interior Lights, ensure that the "OFF" button is depressed to dirty or... pry the lens from the interior light housing. 2. CAUTION Use care not to avoid burning your fingers or receiving an electric shock. 7 59 Install a new bulb in the socket. 4.

Owner's Manual
Page 335
Dimensions / 8-2 Bulb wattage / 8-2 Tires and wheels / 8-3 Recommended lubricants and capacities / 8-4 Label information / 8-6 Consumer information / 8-8 Reporting safety defects / 8-9 Binding arbitration (U.S.A only) / 8-9 Specifications, Consumer information, Reporting safety defects 8
Dimensions / 8-2 Bulb wattage / 8-2 Tires and wheels / 8-3 Recommended lubricants and capacities / 8-4 Label information / 8-6 Consumer information / 8-8 Reporting safety defects / 8-9 Binding arbitration (U.S.A only) / 8-9 Specifications, Consumer information, Reporting safety defects 8

Owner's Manual
Page 336
... tread Wheelbase *1 : with 205/55R16 tire in (mm) 177.4 (4505) 69.9 (1775) 58.3 (1480) 60.7 (1543), 60.2 (1529)*1 60.7 (1541), 60.1 (1526)*1 104.3 (2650) BULB WATTAGE Light Bulb Headlights (Low) Headlights (High) Front turn signal/Position lights Side mark lights Side repeater light* Front fog lights* Stop and tail lights Rear turn...
... tread Wheelbase *1 : with 205/55R16 tire in (mm) 177.4 (4505) 69.9 (1775) 58.3 (1480) 60.7 (1543), 60.2 (1529)*1 60.7 (1541), 60.1 (1526)*1 104.3 (2650) BULB WATTAGE Light Bulb Headlights (Low) Headlights (High) Front turn signal/Position lights Side mark lights Side repeater light* Front fog lights* Stop and tail lights Rear turn...
Owner's Manual
Page 345
... Ignition key interlock system 5-14 Automatic transaxle operation 5-11 Transaxle ranges 5-12 Shift lock system 5-14 Automatic transaxle fluid 7-20 Brakes and clutch fluid 7-19 Bulb wattage 8-2 C California perchlorate notice 7-67 Child restraint system 3-22 Tether anchor system 3-26 Child seat lower anchors 3-28 Placing a passenger seat belt into the auto...
... Ignition key interlock system 5-14 Automatic transaxle operation 5-11 Transaxle ranges 5-12 Shift lock system 5-14 Automatic transaxle fluid 7-20 Brakes and clutch fluid 7-19 Bulb wattage 8-2 C California perchlorate notice 7-67 Child restraint system 3-22 Tether anchor system 3-26 Child seat lower anchors 3-28 Placing a passenger seat belt into the auto...

Owner's Manual
Page 346
... oil 7-15 Explanation of an emergency while driving 6-2 Indicator symbols on the instrument cluster 1-7 Instrument cluster 4-38 Gauges 4-40 K Key positions 5-4 Keys 4-2 L Label information 8-6 Light bulbs 7-54 Lighting 4-57 I If the engine overheats 6-5 If the engine will not start 6-3 If you have a flat tire 6-12 Changing tires 6-13 Removing the spare...
... oil 7-15 Explanation of an emergency while driving 6-2 Indicator symbols on the instrument cluster 1-7 Instrument cluster 4-38 Gauges 4-40 K Key positions 5-4 Keys 4-2 L Label information 8-6 Light bulbs 7-54 Lighting 4-57 I If the engine overheats 6-5 If the engine will not start 6-3 If you have a flat tire 6-12 Changing tires 6-13 Removing the spare...


