

Owner's Manual
Page 88
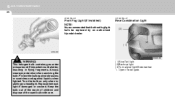
... signal operation Pulling down on the lever causes the turn signals on the left side of the car to blink. As the turn signal indicator light blinks more than usual, goes on but does not blink, or does not go on at all, there is completed, the lever will be displayed... Fuel Consumption Average fuel consumption 4. o Average fuel consumption is reset to zero (---), press and hold the RESET switch for a burned-out fuse or bulb or see your Hyundai dealer. Pushing upwards on the right side of the car to blink. o To reset the average fuel consumption to zero (---) if the battery is...
... signal operation Pulling down on the lever causes the turn signals on the left side of the car to blink. As the turn signal indicator light blinks more than usual, goes on but does not blink, or does not go on at all, there is completed, the lever will be displayed... Fuel Consumption Average fuel consumption 4. o Average fuel consumption is reset to zero (---), press and hold the RESET switch for a burned-out fuse or bulb or see your Hyundai dealer. Pushing upwards on the right side of the car to blink. o To reset the average fuel consumption to zero (---) if the battery is...
Owner's Manual
Page 215
... use the brake and accelerator pedal, and the clutch (if installed). o All passengers must be sure that is moving. Turn off all lights and accessories that all four tires with the tire and wheel of possible trouble. 2. Do not use a size and type of your vehicle... that are clean and in the "ON" position. ! Lock all bulbs when key is different from the one that all appropriate warning lights are operating and that the interior and exterior mirrors are not needed. 9. 2 DRIVING YOUR HYUNDAI 4 BEFORE STARTING THE ENGINE C020A03A-AAT ! After entering the car, check...
... use the brake and accelerator pedal, and the clutch (if installed). o All passengers must be sure that is moving. Turn off all lights and accessories that all four tires with the tire and wheel of possible trouble. 2. Do not use a size and type of your vehicle... that are clean and in the "ON" position. ! Lock all bulbs when key is different from the one that all appropriate warning lights are operating and that the interior and exterior mirrors are not needed. 9. 2 DRIVING YOUR HYUNDAI 4 BEFORE STARTING THE ENGINE C020A03A-AAT ! After entering the car, check...
Owner's Manual
Page 287
... Care ...6-15 Changing the Climate Control Air Filter ...6-16 Checking and Replacing Fuses ...6-17 Checking the Battery ...6-20 Power Steering Fluid Level ...6-23 Replacement of Light Bulbs ...6-24 Bulb Wattage ...6-31 Fuse Panel Description ...6-32 6 6
... Care ...6-15 Changing the Climate Control Air Filter ...6-16 Checking and Replacing Fuses ...6-17 Checking the Battery ...6-20 Power Steering Fluid Level ...6-23 Replacement of Light Bulbs ...6-24 Bulb Wattage ...6-31 Fuse Panel Description ...6-32 6 6
Owner's Manual
Page 310
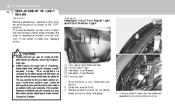
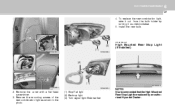
.... 6 DO-IT-YOURSELFMAINTENANCE 24 REPLACEMENT OF LIGHT BULBS G260A01CM-AAT G270A01CM-GAT Before attempting to replace a light bulb, be changed. Be sure to replace the burned-out bulb with petroleum products, such as oil, gasoline, etc. This is caused by an Authorized Hyundai Dealer. (1) Turn signal light/Side marker (2) Front position light (3) Headlight (Low Beam) (4) Headlight (High Beam...
.... 6 DO-IT-YOURSELFMAINTENANCE 24 REPLACEMENT OF LIGHT BULBS G260A01CM-AAT G270A01CM-GAT Before attempting to replace a light bulb, be changed. Be sure to replace the burned-out bulb with petroleum products, such as oil, gasoline, etc. This is caused by an Authorized Hyundai Dealer. (1) Turn signal light/Side marker (2) Front position light (3) Headlight (Low Beam) (4) Headlight (High Beam...
Owner's Manual
Page 311
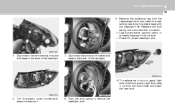
... aim. To replace the front turn signal light bulb or the front position light bulb, take it . 8. Disconnect the connector from the bulb base in the back of the old bulb. 11. Turn the plastic cover counterclockwise and remove it out from the replacement bulb and install the new bulb by matching the plastic base with the headlight...
... aim. To replace the front turn signal light bulb or the front position light bulb, take it . 8. Disconnect the connector from the bulb base in the back of the old bulb. 11. Turn the plastic cover counterclockwise and remove it out from the replacement bulb and install the new bulb by matching the plastic base with the headlight...
Owner's Manual
Page 312
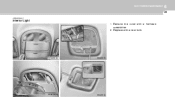
... children and dispose of the used bulb with care. (1)Stop/Tail light (2)Back-up light (3)Turn signal light/Side marker 1. 6 DO-IT-YOURSELFMAINTENANCE 26 G270K01CM-GAT G270B01CM-AAT Front Fog Light (If Installed) NOTE: It is recommended that the front fog light bulb be replaced by an authorized Hyundai dealer. Protect the bulb against abrasions or scratches and against...
... children and dispose of the used bulb with care. (1)Stop/Tail light (2)Back-up light (3)Turn signal light/Side marker 1. 6 DO-IT-YOURSELFMAINTENANCE 26 G270K01CM-GAT G270B01CM-AAT Front Fog Light (If Installed) NOTE: It is recommended that the front fog light bulb be replaced by an authorized Hyundai dealer. Protect the bulb against abrasions or scratches and against...
Owner's Manual
Page 313
G270I01CM-GAT (3) (1) OCM052016 OCM055026 High Mounted Rear Stop Light (If Installed) (2) (1) OCM055027 OCM055028 OCM055030 NOTE: It is recommended that the High-Mounted Rear Stop Light be replaced by turning it out from the bulb holder by an authorized Hyundai Dealer. 2. Install the new bulb. Remove the cover with a flat-head screwdriver. 3. DO-IT-YOURSELF MAINTENANCE 6 27...
G270I01CM-GAT (3) (1) OCM052016 OCM055026 High Mounted Rear Stop Light (If Installed) (2) (1) OCM055027 OCM055028 OCM055030 NOTE: It is recommended that the High-Mounted Rear Stop Light be replaced by turning it out from the bulb holder by an authorized Hyundai Dealer. 2. Install the new bulb. Remove the cover with a flat-head screwdriver. 3. DO-IT-YOURSELF MAINTENANCE 6 27...

Owner's Manual
Page 314
Open the tail gate. 2. Remove the mounting screws of the license plate light cover with a new bulb. 1. Disconnect the wire harness by turning the bulb cover counterclockwise and take the bulb out from the bulb cover by turning it clockwise. 3. Replace with a phillips screwdriver. 2. Remove the cover with a flat-head screwdriver. 3. 6 DO-IT-YOURSELFMAINTENANCE 28 G270J01CM...
Open the tail gate. 2. Remove the mounting screws of the license plate light cover with a new bulb. 1. Disconnect the wire harness by turning the bulb cover counterclockwise and take the bulb out from the bulb cover by turning it clockwise. 3. Replace with a phillips screwdriver. 2. Remove the cover with a flat-head screwdriver. 3. 6 DO-IT-YOURSELFMAINTENANCE 28 G270J01CM...
Owner's Manual
Page 315
Replace with a flat-head screwdriver. 2. OCM055016A OCM055033 OCM055032A OCM055034 DO-IT-YOURSELF MAINTENANCE 6 29 G270G01O-GAT Interior Light 1. Remove the cover with a new bulb.
Replace with a flat-head screwdriver. 2. OCM055016A OCM055033 OCM055032A OCM055034 DO-IT-YOURSELF MAINTENANCE 6 29 G270G01O-GAT Interior Light 1. Remove the cover with a new bulb.

Owner's Manual
Page 316
Disconnect the connector. 4. 6 DO-IT-YOURSELFMAINTENANCE 30 G270H01CM-AAT Glove Box Light OCM055017L 1. Replace with a flat-head screwdriver. 3. Open the glove box. 2. Remove the cover with a new bulb.
Disconnect the connector. 4. 6 DO-IT-YOURSELFMAINTENANCE 30 G270H01CM-AAT Glove Box Light OCM055017L 1. Replace with a flat-head screwdriver. 3. Open the glove box. 2. Remove the cover with a new bulb.

Owner's Manual
Page 317
... Combination Light Turn Signal Light Stop/Tail Light Back-up Light License Plate Light Wattage Socket Type 10 16 S8.5/8.5 W2.1 x 9.5D Headlight (Low/High) Turn Signal Light/Side Marker Map Light Interior Light Front Fog Light (If installed) Front Position Light Front Door Edge Warning Light 27 27/8 16 5 BAU15s BAY15D W2.1 x 9.5D W2.1 x 9.5D DO-IT-YOURSELF MAINTENANCE 6 31 BULB...
... Combination Light Turn Signal Light Stop/Tail Light Back-up Light License Plate Light Wattage Socket Type 10 16 S8.5/8.5 W2.1 x 9.5D Headlight (Low/High) Turn Signal Light/Side Marker Map Light Interior Light Front Fog Light (If installed) Front Position Light Front Door Edge Warning Light 27 27/8 16 5 BAU15s BAY15D W2.1 x 9.5D W2.1 x 9.5D DO-IT-YOURSELF MAINTENANCE 6 31 BULB...
Owner's Manual
Page 349
...15 Electronic stability control (ESC) system ...2-15 Checking the brakes ...6-14 Fluid ...6-14 Practices ...2-21 Breaking-In your New Hyundai ...1-3 Bulb Replacement ...6-24 C California Perchlorate Notice ...5-10 Care of Disc ...1-146 Catalytic Converter ...7-3 Child-Protector Rear Door Lock ...1-9 Child..."LATCH" System ...1-37 Cigarette Lighter ...1-85 Clock ...1-84 Combination Light Auto light ...1-78 Headlight flasher ...1-78 Headlight switch ...1-77 High-beam switch ...1-78 Lane change signal ...1-77 Parking light auto off ...1-77 Turn signal operation ...1-76 Consumer Information ...8-15...
...15 Electronic stability control (ESC) system ...2-15 Checking the brakes ...6-14 Fluid ...6-14 Practices ...2-21 Breaking-In your New Hyundai ...1-3 Bulb Replacement ...6-24 C California Perchlorate Notice ...5-10 Care of Disc ...1-146 Catalytic Converter ...7-3 Child-Protector Rear Door Lock ...1-9 Child..."LATCH" System ...1-37 Cigarette Lighter ...1-85 Clock ...1-84 Combination Light Auto light ...1-78 Headlight flasher ...1-78 Headlight switch ...1-77 High-beam switch ...1-78 Lane change signal ...1-77 Parking light auto off ...1-77 Turn signal operation ...1-76 Consumer Information ...8-15...
Owner's Manual
Page 351
...switch ...Bi-level heating ...Defrosting / Defogging ...Fan speed control (Blower control) ...Temperature control ...High-Mounted Rear Stop Light ...Hood Release ...Horn ...1-126 1-128 1-133 1-126 1-130 1-112 1-115 1-119 M Maintenance Intervals Explanation of ... ...1-111 I Ignition Switch ...2-5 Instrument Cluster and Indicator Lights ...1-62 Instrument Panel Light Control (Rheostat) ...1-84 Interior Light ...1-93 J Jump Starting ...3-3 K Keys ...1-3 If you lose your keys ...3-21 Positions ...2-5 L Light Bulbs Replacement ...6-24 Luggage Compartment ...1-109 Cargo security screen ...1-109...
...switch ...Bi-level heating ...Defrosting / Defogging ...Fan speed control (Blower control) ...Temperature control ...High-Mounted Rear Stop Light ...Hood Release ...Horn ...1-126 1-128 1-133 1-126 1-130 1-112 1-115 1-119 M Maintenance Intervals Explanation of ... ...1-111 I Ignition Switch ...2-5 Instrument Cluster and Indicator Lights ...1-62 Instrument Panel Light Control (Rheostat) ...1-84 Interior Light ...1-93 J Jump Starting ...3-3 K Keys ...1-3 If you lose your keys ...3-21 Positions ...2-5 L Light Bulbs Replacement ...6-24 Luggage Compartment ...1-109 Cargo security screen ...1-109...


