Owner's Manual
Page 66
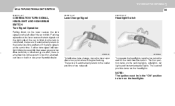
... on the left side of the car to blink. The lever will automatically return to turn on the headlights. Check for a burnedout fuse or bulb or see your Hyundai dealer. The second position turns on the parking lights, sidelights, tail lights and instrument panel lights. FEATURES OF YOUR... HYUNDAI 1 55 MULTI-FUNCTION LIGHT SWITCH B340A01A-AAT B340B01A-AAT B340C03E-AAT COMBINATION TURN SIGNAL, HEADLIGHT AND HIGH-BEAM SWITCH Turn Signal Operation Pulling down ...
... on the left side of the car to blink. The lever will automatically return to turn on the headlights. Check for a burnedout fuse or bulb or see your Hyundai dealer. The second position turns on the parking lights, sidelights, tail lights and instrument panel lights. FEATURES OF YOUR... HYUNDAI 1 55 MULTI-FUNCTION LIGHT SWITCH B340A01A-AAT B340B01A-AAT B340C03E-AAT COMBINATION TURN SIGNAL, HEADLIGHT AND HIGH-BEAM SWITCH Turn Signal Operation Pulling down ...
Owner's Manual
Page 144
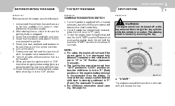
...around the vehicle to be sure they are in their proper positions. 6. Check that all other indications of warning lights and all bulbs when key is in the "P" (Park) position or the negative battery terminal is disconnected from the battery. Check your seat belt ... information about starting, see page 2-4. START C040A01E-1 o "START" The engine is started in "P" (park). Check that are not needed. 9. DRIVING YOUR HYUNDAI 2 3 BEFORE STARTING THE ENGINE C020A01A-AAT TO START THE ENGINE C030A01A-AAT KEY POSITIONS C040A01A-AAT Before you start the engine, you should not be...
...around the vehicle to be sure they are in their proper positions. 6. Check that all other indications of warning lights and all bulbs when key is in the "P" (Park) position or the negative battery terminal is disconnected from the battery. Check your seat belt ... information about starting, see page 2-4. START C040A01E-1 o "START" The engine is started in "P" (park). Check that are not needed. 9. DRIVING YOUR HYUNDAI 2 3 BEFORE STARTING THE ENGINE C020A01A-AAT TO START THE ENGINE C030A01A-AAT KEY POSITIONS C040A01A-AAT Before you start the engine, you should not be...
Owner's Manual
Page 194
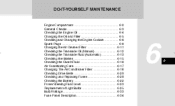
... Air Conditioner Filter ...6-18 Checking Drive Belts ...6-20 Checking and Replacing Fuses ...6-20 Checking the Battery ...6-22 Power Steering Fluid Level ...6-23 Replacement of Light Bulbs ...6-25 Bulb Wattage ...6-33 Fuse Panel Description ...6-34 6 6
... Air Conditioner Filter ...6-18 Checking Drive Belts ...6-20 Checking and Replacing Fuses ...6-20 Checking the Battery ...6-22 Power Steering Fluid Level ...6-23 Replacement of Light Bulbs ...6-25 Bulb Wattage ...6-33 Fuse Panel Description ...6-34 6 6
Owner's Manual
Page 218
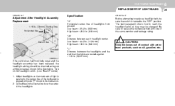
... "H" Horizontal center line of the headlights. CAUTION: Ground line G290B01A-1 Keep the lamps out of the body and is turned to replace a headlight bulb, be changed. Dotted lines in the illustration show the center of headlights from ground. If the vehicle has had front body repair and the headlight...checked using an aiming screen as oil, gasoline, etc. G260A03A-AAT Before attempting to the "OFF" position. Be sure to reach the headlight bulbs so they may be sure the switch is aligned with petroleum products, such as shown in . (3,000 mm). Adjust headlights so that the ...
... "H" Horizontal center line of the headlights. CAUTION: Ground line G290B01A-1 Keep the lamps out of the body and is turned to replace a headlight bulb, be changed. Dotted lines in the illustration show the center of headlights from ground. If the vehicle has had front body repair and the headlight...checked using an aiming screen as oil, gasoline, etc. G260A03A-AAT Before attempting to the "OFF" position. Be sure to reach the headlight bulbs so they may be sure the switch is aligned with petroleum products, such as shown in . (3,000 mm). Adjust headlights so that the ...
Owner's Manual
Page 219
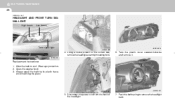
Using a socket wrench of the headlight. 7. Wear eye protection. 2. Open the engine hood. 3. Replacement instructions: 1. Always grasp the bulb by its plastic base, avoid touching the glass. HXDFL1009 HXDFL1011 5. 6 DO-IT-YOURSELFMAINTENANCE 26 G270A01A-AAT HEADLIGHT AND FRONT TURN SIGNAL LIGHT High beam Low ... power cord from the back of the correct size, remove the headlight assembly mounting bolts. Turn the plastic cover counterclockwise and remove it. Push the bulb spring to cool. Allow the bulb to remove the headlight...
Using a socket wrench of the headlight. 7. Wear eye protection. 2. Open the engine hood. 3. Replacement instructions: 1. Always grasp the bulb by its plastic base, avoid touching the glass. HXDFL1009 HXDFL1011 5. 6 DO-IT-YOURSELFMAINTENANCE 26 G270A01A-AAT HEADLIGHT AND FRONT TURN SIGNAL LIGHT High beam Low ... power cord from the back of the correct size, remove the headlight assembly mounting bolts. Turn the plastic cover counterclockwise and remove it. Push the bulb spring to cool. Allow the bulb to remove the headlight...
Owner's Manual
Page 220
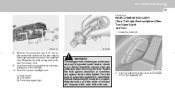
...-AAT REAR COMBINATION LIGHT (Stop / Tail Light, Back up light and Rear Turn Signal Light) 4 Door (3) 1. Remove the protective cap from the replacement bulb and install the new bulb by matching the plastic base with care. Use the protective cap and carton to promptly dispose of the used... bulb with the headlight hole. Protect the bulb against abrasions or scratches and against liquids when lighted. Turn the bulb on the inside of the rear luggage trim. Replace the headlight if damaged or cracked....
...-AAT REAR COMBINATION LIGHT (Stop / Tail Light, Back up light and Rear Turn Signal Light) 4 Door (3) 1. Remove the protective cap from the replacement bulb and install the new bulb by matching the plastic base with care. Use the protective cap and carton to promptly dispose of the used... bulb with the headlight hole. Protect the bulb against abrasions or scratches and against liquids when lighted. Turn the bulb on the inside of the rear luggage trim. Replace the headlight if damaged or cracked....

Owner's Manual
Page 221
... with a socket wrench. (1) (2) (2) (3) (4) HXDFL1016-A HXDFL334 (1) HXDFL1017 2. HXDFL1015 HXDFL335 3. 6 DO-IT-YOURSELFMAINTENANCE 28 4. To replace the rear combination light, remove it from the bulb holder and install the new bulb. (1) (2) (3) (4) Stop/Tail light Side marker light Rear turn signal light Back up light 5 Door (Luggage compartment) 1. Remove the mounting screws of the rear...
... with a socket wrench. (1) (2) (2) (3) (4) HXDFL1016-A HXDFL334 (1) HXDFL1017 2. HXDFL1015 HXDFL335 3. 6 DO-IT-YOURSELFMAINTENANCE 28 4. To replace the rear combination light, remove it from the bulb holder and install the new bulb. (1) (2) (3) (4) Stop/Tail light Side marker light Rear turn signal light Back up light 5 Door (Luggage compartment) 1. Remove the mounting screws of the rear...

Owner's Manual
Page 222
Open the trunk lid. 5 Door (Tail gate) 1. Open the tail gate. DO-IT-YOURSELF MAINTENANCE 6 29 (1) Stop/Tail light (2) Rear turn signal light G270C01L-GAT LUGGAGE COMPARTMENT LIGHT 4 Door 1. Remove the plastic cover with a flat blade screwdriver. HXDFL332 Back up light HXDFL341A HXDFL342 2. To replace the rear combination light, remove it from the bulb holder and install the new bulb. Tail light HXDFL333 3. Remove the cover with a flat blade screwdriver. 2.
Open the trunk lid. 5 Door (Tail gate) 1. Open the tail gate. DO-IT-YOURSELF MAINTENANCE 6 29 (1) Stop/Tail light (2) Rear turn signal light G270C01L-GAT LUGGAGE COMPARTMENT LIGHT 4 Door 1. Remove the plastic cover with a flat blade screwdriver. HXDFL332 Back up light HXDFL341A HXDFL342 2. To replace the rear combination light, remove it from the bulb holder and install the new bulb. Tail light HXDFL333 3. Remove the cover with a flat blade screwdriver. 2.

Owner's Manual
Page 223
HXDFL341 3. Disconnect the power cord. 2. HTB284 HTB284 4. Open the tail gate. Disconnect the power cord. Remove the luggage compartment light cover on the right side package tray panel with a new bulb. Replace with pushing it. HXDFL343 HXDFL341B 3. Replace with a new bulb. 4. 6 DO-IT-YOURSELFMAINTENANCE 30 5Door 1.
HXDFL341 3. Disconnect the power cord. 2. HTB284 HTB284 4. Open the tail gate. Disconnect the power cord. Remove the luggage compartment light cover on the right side package tray panel with a new bulb. Replace with pushing it. HXDFL343 HXDFL341B 3. Replace with a new bulb. 4. 6 DO-IT-YOURSELFMAINTENANCE 30 5Door 1.
Owner's Manual
Page 224
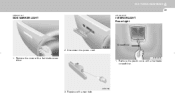
HXDFL1020 1. Remove the cover with a new bulb. HXDFL340 3. Replace with a flat blade screwdriver. DO-IT-YOURSELF MAINTENANCE 6 31 G270E01E-AAT G270G01E-GAT SIDE MARKER LIGHT INTERIOR LIGHT Room Light Screwdriver HXDFL339 2. Remove the plastic cover with a flat blade screwdriver. Disconnect the power cord. HXDFL338 1.
HXDFL1020 1. Remove the cover with a new bulb. HXDFL340 3. Replace with a flat blade screwdriver. DO-IT-YOURSELF MAINTENANCE 6 31 G270E01E-AAT G270G01E-GAT SIDE MARKER LIGHT INTERIOR LIGHT Room Light Screwdriver HXDFL339 2. Remove the plastic cover with a flat blade screwdriver. Disconnect the power cord. HXDFL338 1.

Owner's Manual
Page 225
Remove the plastic cover with a new bulb. Replace with a flat blade screwdriver. 6 DO-IT-YOURSELFMAINTENANCE 32 G270H01E-GAT Map Light (If installed) HXDFL1021 G270H01E-A 2. B460D02E-A 2. Replace with a new bulb. 1.
Remove the plastic cover with a new bulb. Replace with a flat blade screwdriver. 6 DO-IT-YOURSELFMAINTENANCE 32 G270H01E-GAT Map Light (If installed) HXDFL1021 G270H01E-A 2. B460D02E-A 2. Replace with a new bulb. 1.
Owner's Manual
Page 226
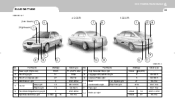
DO-IT-YOURSELF MAINTENANCE 6 33 BULB WATTAGE G280A04E-AAT 4 DOOR (Low beam) (High beam) 5 DOOR 1 5 7 8 7 12 8 1 4 2 No. 1 2 3 4 5 6 7 Part Name Head Light (High/Low) Front Fog Light Front Turn Signal Light Side ...
DO-IT-YOURSELF MAINTENANCE 6 33 BULB WATTAGE G280A04E-AAT 4 DOOR (Low beam) (High beam) 5 DOOR 1 5 7 8 7 12 8 1 4 2 No. 1 2 3 4 5 6 7 Part Name Head Light (High/Low) Front Fog Light Front Turn Signal Light Side ...


