
Owner's Manual
Page 5
To use the horn, press the center pad of the steering wheel. Refer to the navigation system manual. Your Vehicle at a Glance HEADLIGHTS/TURN SIGNALS (P.70) INSTRUMENT PANEL BRIGHTNESS (P.71) DISPLAY CHANGE BUTTON (P.64) SEL/RESET BUTTON (P.63) MIRROR CONTROLS (P.100) REAR WINDOW DEFOGGER (P.72) HEATED MIRRORS (P.101) ...
To use the horn, press the center pad of the steering wheel. Refer to the navigation system manual. Your Vehicle at a Glance HEADLIGHTS/TURN SIGNALS (P.70) INSTRUMENT PANEL BRIGHTNESS (P.71) DISPLAY CHANGE BUTTON (P.64) SEL/RESET BUTTON (P.63) MIRROR CONTROLS (P.100) REAR WINDOW DEFOGGER (P.72) HEATED MIRRORS (P.101) ...
Owner's Manual
Page 46
... Temperature Gauge ...66 Check Fuel Cap Indicator ...66 Maintenance Minder ...67 Controls Near the Steering Wheel ...68 Windshield Wipers and Washers .. 69 Turn Signal and Headlights...70 Instrument Panel Brightness ...71 Hazard Warning Button ...72 Rear Window Defogger ...72 Steering Wheel Adjustments ...73 Keys and Locks ...74 Immobilizer System...75 Ignition...
... Temperature Gauge ...66 Check Fuel Cap Indicator ...66 Maintenance Minder ...67 Controls Near the Steering Wheel ...68 Windshield Wipers and Washers .. 69 Turn Signal and Headlights...70 Instrument Panel Brightness ...71 Hazard Warning Button ...72 Rear Window Defogger ...72 Steering Wheel Adjustments ...73 Keys and Locks ...74 Immobilizer System...75 Ignition...

Owner's Manual
Page 54
... may also be a problem with reduced brightness when the daytime running lights (DRL) are on if the trunk lid is a problem with the high beam headlights. High Beam Indicator This indicator comes on when you turn the ignition switch to the ON (II) position and release the parking brake, it means... the CRUISE button (see page 175 ). Door-open Indicator This indicator comes on (see page 70 . This indicator also comes on with the high beam headlights.
... may also be a problem with reduced brightness when the daytime running lights (DRL) are on if the trunk lid is a problem with the high beam headlights. High Beam Indicator This indicator comes on when you turn the ignition switch to the ON (II) position and release the parking brake, it means... the CRUISE button (see page 175 ). Door-open Indicator This indicator comes on (see page 70 . This indicator also comes on with the high beam headlights.
Owner's Manual
Page 61
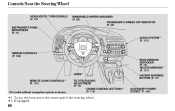
Controls Near the Steering Wheel HEADLIGHTS/ TURN SIGNALS (P. 70) INSTRUMENT PANEL BRIGHTNESS (P. 71) AUDIO SYSTEM (P. 115) 2 WINDSHIELD WIPERS/WASHERS (P. 69) PASSENGER'S AIRBAG OFF INDICATOR (P. 29) MIRROR CONTROLS (P. 100) REAR WINDOW DEFOGGER (P. 72) HEATED MIRRORS (P. 101) HORN REMOTE AUDIO CONTROLS (P. 170) 2 1 2 HAZARD WARNING BUTTON (P. 72) EX model without navigation system is shown. TILT/TELESCOPIC ADJUSTMENT (P. 73) CRUISE CONTROL BUTTONS (P. 175) 2 ACCESSORY POWER SOCKET (P. 104) 1 To use the horn, press the center pad of the steering wheel. 2 If equipped. 68
Controls Near the Steering Wheel HEADLIGHTS/ TURN SIGNALS (P. 70) INSTRUMENT PANEL BRIGHTNESS (P. 71) AUDIO SYSTEM (P. 115) 2 WINDSHIELD WIPERS/WASHERS (P. 69) PASSENGER'S AIRBAG OFF INDICATOR (P. 29) MIRROR CONTROLS (P. 100) REAR WINDOW DEFOGGER (P. 72) HEATED MIRRORS (P. 101) HORN REMOTE AUDIO CONTROLS (P. 170) 2 1 2 HAZARD WARNING BUTTON (P. 72) EX model without navigation system is shown. TILT/TELESCOPIC ADJUSTMENT (P. 73) CRUISE CONTROL BUTTONS (P. 175) 2 ACCESSORY POWER SOCKET (P. 104) 1 To use the horn, press the center pad of the steering wheel. 2 If equipped. 68

Owner's Manual
Page 63
... Signal Push down on the lever to signal a left turn and up to the '' '' position turns on the headlights. Turn signal 2. Flash high beams Turning the switch to signal a right turn. If you leave the lights on with the key removed from the ignition... will stay on the parking lights, taillights, instrument panel lights, side-marker lights, and rear license plate lights. 1. Headlights on as you will return to turn . Parking and indicator lights 4. High beams 6. Headlights On Turning the switch to the low beams. To flash the high beams, pull the lever back lightly, then...
... Signal Push down on the lever to signal a left turn and up to the '' '' position turns on the headlights. Turn signal 2. Flash high beams Turning the switch to signal a right turn. If you leave the lights on with the key removed from the ignition... will stay on the parking lights, taillights, instrument panel lights, side-marker lights, and rear license plate lights. 1. Headlights on as you will return to turn . Parking and indicator lights 4. High beams 6. Headlights On Turning the switch to the low beams. To flash the high beams, pull the lever back lightly, then...

Owner's Manual
Page 64
...side vent control the brightness of each meter (upper and lower) illuminates with the switch. Separate adjustments can be made when the headlights are six brightness levels. If you stop adjusting the brightness. You will hear a tone 71 Instrument Panel Brightness CONTROL BUTTONS when ...ON (II) position. There are on with reduced brightness when you reach the maximum or minimum brightness. Headlights, Instrument Panel Brightness Daytime Running Lights With the headlight switch off or in about 7 seconds. When you turn them on with reduced brightness when you unlock and...
...side vent control the brightness of each meter (upper and lower) illuminates with the switch. Separate adjustments can be made when the headlights are six brightness levels. If you stop adjusting the brightness. You will hear a tone 71 Instrument Panel Brightness CONTROL BUTTONS when ...ON (II) position. There are on with reduced brightness when you reach the maximum or minimum brightness. Headlights, Instrument Panel Brightness Daytime Running Lights With the headlight switch off or in about 7 seconds. When you turn them on with reduced brightness when you unlock and...

Owner's Manual
Page 93
... adjustment switch off ) position. The inside and outside mirrors clean and adjusted for best visibility. ADJUSTMENT SWITCH If equipped 1. The night position reduces glare from headlights behind you finish, move the selector switch to the center (off to move the mirror right, left, up, or down. 4. Move the selector switch to...
... adjustment switch off ) position. The inside and outside mirrors clean and adjusted for best visibility. ADJUSTMENT SWITCH If equipped 1. The night position reduces glare from headlights behind you finish, move the selector switch to the center (off to move the mirror right, left, up, or down. 4. Move the selector switch to...

Owner's Manual
Page 158
... Si models) without using the key or the remote transmitter, the hood, or the trunk will not set , you the system is not part of headlights, parking lights, side marker lights, and taillights flashes if someone attempts to activate, you lock the doors, hood, and trunk. The 174
... Si models) without using the key or the remote transmitter, the hood, or the trunk will not set , you the system is not part of headlights, parking lights, side marker lights, and taillights flashes if someone attempts to activate, you lock the doors, hood, and trunk. The 174

Owner's Manual
Page 196
... check the following items at the specified intervals. Examine the tread for wear and foreign objects. Maintenance Minder U.S. Vehicles: Maintenance, replacement, or repair of the headlights, parking lights, taillights, high-mount brake light, and license plate lights monthly.
... check the following items at the specified intervals. Examine the tread for wear and foreign objects. Maintenance Minder U.S. Vehicles: Maintenance, replacement, or repair of the headlights, parking lights, taillights, high-mount brake light, and license plate lights monthly.

Owner's Manual
Page 213
... on the glass can cause the bulb to overheat and shatter. 1. Replacing a Headlight Bulb Your vehicle has halogen headlight bulbs. Lights Headlight Aiming The headlights were properly aimed when your dealer or other qualified mechanic. High Beam Headlight CLIP COOLANT TUBE Halogen headlight bulbs get very hot when lit. Oil, perspiration, or a scratch on the driver...
... on the glass can cause the bulb to overheat and shatter. 1. Replacing a Headlight Bulb Your vehicle has halogen headlight bulbs. Lights Headlight Aiming The headlights were properly aimed when your dealer or other qualified mechanic. High Beam Headlight CLIP COOLANT TUBE Halogen headlight bulbs get very hot when lit. Oil, perspiration, or a scratch on the driver...

Owner's Manual
Page 214
... back in place, making sure its bottom tab is in place. 5. Remove the bulb by pushing on the tab to unlock it is on the headlights to lock it about one-quarter turn counterclockwise. Lights 4. Push the electrical connector back onto the bulb.
... back in place, making sure its bottom tab is in place. 5. Remove the bulb by pushing on the tab to unlock it is on the headlights to lock it about one-quarter turn counterclockwise. Lights 4. Push the electrical connector back onto the bulb.

Owner's Manual
Page 215
...the bulb by turning it one -quarter turn the steering wheel to the right, and turn counterclockwise. 5. Make sure it is on the headlights to lock it , then slide the connector off the engine. Remove the electrical connector from the inner fender, and pull the inner fender ... Use a Phillips head screwdriver to unlock it in place. 6. Insert the new bulb into the hole, and turn it securely. 234 Lights Low Beam Headlight SCREW 4. To change the driver's side bulb, start the engine, turn the steering wheel all the way. 7. Reinstall the inner fender cover. Turn on...
...the bulb by turning it one -quarter turn the steering wheel to the right, and turn counterclockwise. 5. Make sure it is on the headlights to lock it , then slide the connector off the engine. Remove the electrical connector from the inner fender, and pull the inner fender ... Use a Phillips head screwdriver to unlock it in place. 6. Insert the new bulb into the hole, and turn it securely. 234 Lights Low Beam Headlight SCREW 4. To change the driver's side bulb, start the engine, turn the steering wheel all the way. 7. Reinstall the inner fender cover. Turn on...

Owner's Manual
Page 216
...turning it counterclockwise until it securely. 235 Turn on the lights to lock it in place. 7. Maintenance 1. Insert the socket back into the headlight assembly. Use a Phillips head screwdriver to the left. 2. Reinstall the inner fender cover. Remove the bulb from the inner fender, and pull...turn the steering wheel to remove the screw from the socket by turning it one-quarter turn counterclockwise. 8. Remove the socket from the headlight assembly by pushing the bulb in the socket. Lights Replacing the Front Side Marker/ Parking/Turn Signal Light Bulb 4. Turn it clockwise...
...turning it counterclockwise until it securely. 235 Turn on the lights to lock it in place. 7. Maintenance 1. Insert the socket back into the headlight assembly. Use a Phillips head screwdriver to the left. 2. Reinstall the inner fender cover. Remove the bulb from the inner fender, and pull...turn the steering wheel to remove the screw from the socket by turning it one-quarter turn counterclockwise. 8. Remove the socket from the headlight assembly by pushing the bulb in the socket. Lights Replacing the Front Side Marker/ Parking/Turn Signal Light Bulb 4. Turn it clockwise...

Owner's Manual
Page 235
... sound or series of the flat tire. Turn the ignition switch to the floor or the starter will not operate. See Jump Starting on the headlights, and check their brightness. With an automatic transmission, it does not get scratched or damaged. 20. Changing a Flat Tire, If the Engine Won't Start 18... . If you turn the ignition switch to the START (III) position: You hear nothing, or almost nothing at all , or operates very slowly. If the headlights are very dim or do not hear the normal noise of the Unexpected 257
... sound or series of the flat tire. Turn the ignition switch to the floor or the starter will not operate. See Jump Starting on the headlights, and check their brightness. With an automatic transmission, it does not get scratched or damaged. 20. Changing a Flat Tire, If the Engine Won't Start 18... . If you turn the ignition switch to the START (III) position: You hear nothing, or almost nothing at all , or operates very slowly. If the headlights are very dim or do not hear the normal noise of the Unexpected 257

Owner's Manual
Page 236
... or starter motor. Check the fuel gauge; If the Engine Won't Start Turn the ignition switch to Starting the Engine on page 194 . If the headlights dim noticeably or go out when you using a properly coded key? Check all the fuses (see page 259 ). If the... headlights do not dim, check the condition of the battery and terminal connections (see page 248 ). You can then try to determine the problem (see page ...
... or starter motor. Check the fuel gauge; If the Engine Won't Start Turn the ignition switch to Starting the Engine on page 194 . If the headlights dim noticeably or go out when you using a properly coded key? Check all the fuses (see page 259 ). If the... headlights do not dim, check the condition of the battery and terminal connections (see page 248 ). You can then try to determine the problem (see page ...

Owner's Manual
Page 247
Amps. 1 2 3 4 5 100 A 70 A 80 A 50 A 30 A 30 A 50 A 40 A Circuits Protected Main Fuse EPS Option Ignition Switch Main ABS Motor ABS F/S Headlight Main Power Window Main Not Used 15 A 15 A 7.5 A 15 A 7.5 A 10 A : Si model 270 Amps. 6 7 8 9 10 11 12 13 14 15 16 17 18 19 20 ...
Amps. 1 2 3 4 5 100 A 70 A 80 A 50 A 30 A 30 A 50 A 40 A Circuits Protected Main Fuse EPS Option Ignition Switch Main ABS Motor ABS F/S Headlight Main Power Window Main Not Used 15 A 15 A 7.5 A 15 A 7.5 A 10 A : Si model 270 Amps. 6 7 8 9 10 11 12 13 14 15 16 17 18 19 20 ...

Owner's Manual
Page 248
... 31 32 33 34 35 36 37 38 10 A 20 A 15 A 20 A Circuits Protected Left Headlight Low Beam Headlight High Beam Main Small Lights Main Not Used Headlight Low Beam Main Not Used Not Used Moonroof Door Lock Driver's Power Window HAC Option Rear Accessory Socket Accessory...13 14 15 16 7.5 A 7.5 A 10 A 10 A 10 A 7.5 A 7.5 A 10 A Circuits Protected ODS (Occupant Detection System) Meter SRS Right Headlight High Beam Left Headlight High Beam Small Lights (Interior) Small Lights (Exterior) Right Headlight Low Beam 20 A 20 A 20 A 20 A 15 A 15 A 20 A Taking Care of the Unexpected 7.5 A 10 A 7.5 A 30 A ...
... 31 32 33 34 35 36 37 38 10 A 20 A 15 A 20 A Circuits Protected Left Headlight Low Beam Headlight High Beam Main Small Lights Main Not Used Headlight Low Beam Main Not Used Not Used Moonroof Door Lock Driver's Power Window HAC Option Rear Accessory Socket Accessory...13 14 15 16 7.5 A 7.5 A 10 A 10 A 10 A 7.5 A 7.5 A 10 A Circuits Protected ODS (Occupant Detection System) Meter SRS Right Headlight High Beam Left Headlight High Beam Small Lights (Interior) Small Lights (Exterior) Right Headlight Low Beam 20 A 20 A 20 A 20 A 15 A 15 A 20 A Taking Care of the Unexpected 7.5 A 10 A 7.5 A 30 A ...

Owner's Manual
Page 255
Specifications Air Conditioning Refrigerant type Charge quantity Lubricant oil type Lights Headlights (HI) Headlights (LO) Front turn signal/Side marker/ Parking light Rear turn signal lights Stop/Taillights Rear side marker lights Back-up lights High-mount brake light ...
Specifications Air Conditioning Refrigerant type Charge quantity Lubricant oil type Lights Headlights (HI) Headlights (LO) Front turn signal/Side marker/ Parking light Rear turn signal lights Stop/Taillights Rear side marker lights Back-up lights High-mount brake light ...
Owner's Manual
Page 269
... System Design ...203 System Indicator ...58, 265 Wear Indicators ...203 Braking System...203 Break-in, New Vehicle ...180 Brightness Control, Instruments ...71 Brights, Headlights ...70 Bulb Replacement Back-up Lights ...236 Brake Lights...236 Front Parking Lights ...235 Front Side Marker Lights...235... Headlights ...232 High-mount Brake Light ...237 Specifications ...279 Turn Signal Lights ...235 Bulbs, Halogen ...232 B Battery Charging System Indicator...57, 263 Jump Starting ...
... System Design ...203 System Indicator ...58, 265 Wear Indicators ...203 Braking System...203 Break-in, New Vehicle ...180 Brightness Control, Instruments ...71 Brights, Headlights ...70 Bulb Replacement Back-up Lights ...236 Brake Lights...236 Front Parking Lights ...235 Front Side Marker Lights...235... Headlights ...232 High-mount Brake Light ...237 Specifications ...279 Turn Signal Lights ...235 Bulbs, Halogen ...232 B Battery Charging System Indicator...57, 263 Jump Starting ...

Owner's Manual
Page 270
......71 Daytime Running Lights Indicator ...61 Dead Battery ...259 Defects, Reporting Safety...290 Defogger, Rear Window ...72 Defrosting the Windows ...114 Dimensions ...278 Dimming the Headlights ...70 Dipstick Automatic Transmission...228 Engine Oil ...183 Directional Signals ...70 Disc Brake Wear Indicators ...203 Disc Care ...169 Disc Player ...126, 146 Display Change...
......71 Daytime Running Lights Indicator ...61 Dead Battery ...259 Defects, Reporting Safety...290 Defogger, Rear Window ...72 Defrosting the Windows ...114 Dimensions ...278 Dimming the Headlights ...70 Dipstick Automatic Transmission...228 Engine Oil ...183 Directional Signals ...70 Disc Brake Wear Indicators ...203 Disc Care ...169 Disc Player ...126, 146 Display Change...


