
Owner's Manual
Page 72
Keys and Locks MASTER VALET KEY KEY NUMBER KEY WITH (LIGHT GREY) REMOTE TAG TRANSMITTER You should have to lock the steering wheel in the ...facility. 74 The valet key works only in that are damaged. Steering Wheel Adjustment, Keys and Locks 4. Use only Honda-approved key blanks. You can keep the trunk release handle, rear seat trunk access, and glove box locked when you...locked the steering wheel in , and out. Protect the keys from liquids. You will not work to start the engine if the circuits are activated by trying to move it up to get wet, dry them . They will need...
Keys and Locks MASTER VALET KEY KEY NUMBER KEY WITH (LIGHT GREY) REMOTE TAG TRANSMITTER You should have to lock the steering wheel in the ...facility. 74 The valet key works only in that are damaged. Steering Wheel Adjustment, Keys and Locks 4. Use only Honda-approved key blanks. You can keep the trunk release handle, rear seat trunk access, and glove box locked when you...locked the steering wheel in , and out. Protect the keys from liquids. You will not work to start the engine if the circuits are activated by trying to move it up to get wet, dry them . They will need...
Owner's Manual
Page 74
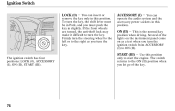
... when you turn the ignition switch from ACCESSORY (I) to the ON (II) position when you must be in Park, and you let go of the lights on the instrument panel come on as you turn the key. Several of the key. The switch returns to ON (II). Ignition Switch LOCK (0) You... shift lever must push the key in slightly. If the front wheels are turned, the anti-theft lock may make it difficult to start the engine. ACCESSORY (I ), ON (II), START (III). 76
... when you turn the ignition switch from ACCESSORY (I) to the ON (II) position when you must be in Park, and you let go of the lights on the instrument panel come on as you turn the key. Several of the key. The switch returns to ON (II). Ignition Switch LOCK (0) You... shift lever must push the key in slightly. If the front wheels are turned, the anti-theft lock may make it difficult to start the engine. ACCESSORY (I ), ON (II), START (III). 76
Owner's Manual
Page 90
...senses any obstacle while it is OFF. If your dealer. 92 Power Windows To open . 2. Push down or pull back on the window switch lightly and hold it. Auto reverse stops sensing when the window is fully open or close the window completely, then hold the switch for a second or...closing it will stop . You should always check that all passengers and objects are away from the window before closing automatically, it . Start the engine. The power window system needs to close the driver's window partially, push down and hold the driver's window switch until the window is almost ...
...senses any obstacle while it is OFF. If your dealer. 92 Power Windows To open . 2. Push down or pull back on the window switch lightly and hold it. Auto reverse stops sensing when the window is fully open or close the window completely, then hold the switch for a second or...closing it will stop . You should always check that all passengers and objects are away from the window before closing automatically, it . Start the engine. The power window system needs to close the driver's window partially, push down and hold the driver's window switch until the window is almost ...

Owner's Manual
Page 93
... switch to ON (II) to 10 minutes after you open either front door. To release it is fully released with the engine running (see page 59 ). 95 The parking brake light on the instrument panel should go out when the parking brake is covered with the parking brake applied can still open...
... switch to ON (II) to 10 minutes after you open either front door. To release it is fully released with the engine running (see page 59 ). 95 The parking brake light on the instrument panel should go out when the parking brake is covered with the parking brake applied can still open...
Owner's Manual
Page 165
...mirrors (see page 73 ). 11. Fasten your passengers have fastened their seat belts (see page 16 ). 6. Check the adjustment of the inside and outside lights are securely closed and locked. 10. Visually check the tires. If a tire looks low, use a gauge to Drive You should do the following checks... that your seat belt. Remove frost, snow, or ice. 2. Check that the trunk is fully closed . 4. Check that any items you start the engine, check the gauges and indicators in the instrument panel (see pages 85 to 66 ). 168 Check the seat adjustment (see pages 58 to 87 ). 7.
...mirrors (see page 73 ). 11. Fasten your passengers have fastened their seat belts (see page 16 ). 6. Check the adjustment of the inside and outside lights are securely closed and locked. 10. Visually check the tires. If a tire looks low, use a gauge to Drive You should do the following checks... that your seat belt. Remove frost, snow, or ice. 2. Check that the trunk is fully closed . 4. Check that any items you start the engine, check the gauges and indicators in the instrument panel (see pages 85 to 66 ). 168 Check the seat adjustment (see pages 58 to 87 ). 7.
Owner's Manual
Page 176
Use the engine to assist the brakes by taking your driving. Be extra cautious in your foot off ... the model. The ABS helps you apply the brake pedal. Resting your foot on the pedal keeps the brakes applied lightly, builds up heat and reduces their effectiveness. It also keeps your foot on all models except the U.S. Apply the ... do . It is normal for the brakes to see if they do not have audible brake wear indicators. Put your brake lights on the brake pedal only when you apply them gently and frequently until they feel normal. VP, U.S. Driving 179 If not...
Use the engine to assist the brakes by taking your driving. Be extra cautious in your foot off ... the model. The ABS helps you apply the brake pedal. Resting your foot on the pedal keeps the brakes applied lightly, builds up heat and reduces their effectiveness. It also keeps your foot on all models except the U.S. Apply the ... do . It is normal for the brakes to see if they do not have audible brake wear indicators. Put your brake lights on the brake pedal only when you apply them gently and frequently until they feel normal. VP, U.S. Driving 179 If not...
Owner's Manual
Page 187
... Maintenance Record ...200 Fluid Locations...202 Adding Engine Oil ...204 Recommended Engine Oil...204 Synthetic Oil ...205 Engine Oil Additives ...205 Changing the Oil and Filter ...206 Windshield Washers ...208 Engine Coolant ...209 Adding Engine Coolant ...209 Transmission Fluid ...211 Automatic Transmission......211 Manual Transmission...214 Brake and Clutch Fluid ...215 Brake Fluid ...216 Clutch Fluid ...216 Power Steering Fluid ...216 Timing Belt ...217 Lights ...218 Seat Belts...
... Maintenance Record ...200 Fluid Locations...202 Adding Engine Oil ...204 Recommended Engine Oil...204 Synthetic Oil ...205 Engine Oil Additives ...205 Changing the Oil and Filter ...206 Windshield Washers ...208 Engine Coolant ...209 Adding Engine Coolant ...209 Transmission Fluid ...211 Automatic Transmission......211 Manual Transmission...214 Brake and Clutch Fluid ...215 Brake Fluid ...216 Clutch Fluid ...216 Power Steering Fluid ...216 Timing Belt ...217 Lights ...218 Seat Belts...
Owner's Manual
Page 194
... may be performed in accordance with will not void your emissions warranties. See page 159 . Examine the tread for wear and foreign objects. Engine oil level Check every time you fill the fuel tank. Brakes Check the fluid level monthly. Lights Check the operation of ... should check the following items at the specified intervals. If you are unsure of the headlights, parking lights, taillights, high-mount brake light, and license plate lights monthly. Engine coolant level Check the radiator reserve tank every time you fill the fuel tank. Automatic transmission Check the...
... may be performed in accordance with will not void your emissions warranties. See page 159 . Examine the tread for wear and foreign objects. Engine oil level Check every time you fill the fuel tank. Brakes Check the fluid level monthly. Lights Check the operation of ... should check the following items at the specified intervals. If you are unsure of the headlights, parking lights, taillights, high-mount brake light, and license plate lights monthly. Engine coolant level Check the radiator reserve tank every time you fill the fuel tank. Automatic transmission Check the...
Owner's Manual
Page 198
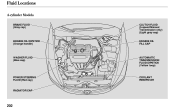
Fluid Locations 4-cylinder Models BRAKE FLUID (Gray cap) CLUTCH FLUID (5-speed Manual Transmission only) (Light gray cap) ENGINE OIL FILL CAP ENGINE OIL DIPSTICK (Orange handle) WASHER FLUID (Blue cap) AUTOMATIC TRANSMISSION FLUID DIPSTICK (Yellow loop) POWER STEERING FLUID (Red cap) COOLANT RESERVOIR RADIATOR CAP 202
Fluid Locations 4-cylinder Models BRAKE FLUID (Gray cap) CLUTCH FLUID (5-speed Manual Transmission only) (Light gray cap) ENGINE OIL FILL CAP ENGINE OIL DIPSTICK (Orange handle) WASHER FLUID (Blue cap) AUTOMATIC TRANSMISSION FLUID DIPSTICK (Yellow loop) POWER STEERING FLUID (Red cap) COOLANT RESERVOIR RADIATOR CAP 202

Owner's Manual
Page 199
Fluid Locations 6-cylinder Models ENGINE OIL FILL CAP ENGINE OIL DIPSTICK (Orange loop) CLUTCH FLUID (6-speed Manual Transmission only) (Light gray cap) AUTOMATIC TRANSMISSION FLUID DIPSTICK (Yellow loop) WASHER FLUID (Blue cap) COOLANT RESERVOIR POWER STEERING FLUID (Red cap) Maintenance RADIATOR CAP 203
Fluid Locations 6-cylinder Models ENGINE OIL FILL CAP ENGINE OIL DIPSTICK (Orange loop) CLUTCH FLUID (6-speed Manual Transmission only) (Light gray cap) AUTOMATIC TRANSMISSION FLUID DIPSTICK (Yellow loop) WASHER FLUID (Blue cap) COOLANT RESERVOIR POWER STEERING FLUID (Red cap) Maintenance RADIATOR CAP 203
Owner's Manual
Page 216
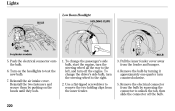
... secure them by squeezing the connector to unlock the tab, then slide the connector off the engine. Remove the electrical connector from the bulb by pushing on the headlights to the right. 2. Lights Low Beam Headlight BULB HOLDING CLIPS TAB 6-cylinder models BULB 5. Reinstall the air intake cover....1. To change the driver's side bulb, turn the steering wheel to test the new bulb. 7. To change the passenger's side bulb, start the engine, turn the steering wheel all the way to remove the two holding clips from the fender and bumper. 4. Use a flat-tipped screwdriver to the...
... secure them by squeezing the connector to unlock the tab, then slide the connector off the engine. Remove the electrical connector from the bulb by pushing on the headlights to the right. 2. Lights Low Beam Headlight BULB HOLDING CLIPS TAB 6-cylinder models BULB 5. Reinstall the air intake cover....1. To change the driver's side bulb, turn the steering wheel to test the new bulb. 7. To change the passenger's side bulb, start the engine, turn the steering wheel all the way to remove the two holding clips from the fender and bumper. 4. Use a flat-tipped screwdriver to the...
Owner's Manual
Page 217
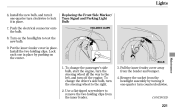
Push the electrical connector onto the bulb. 8. To change the passenger's side bulb, start the engine, turn the steering wheel all the way to the left, and turn counterclockwise. Pull the inner fender cover away from the inner fender. 3. Put the ... 221 Install the new bulb, and turn it one in place. Turn on the center. BULB Replacing the Front Side Marker/ Turn Signal and Parking Light Bulb HOLDING CLIPS Maintenance 1. Remove the socket from the headlight assembly by pushing on the headlights to lock it in place. 7. To change the driver...
Push the electrical connector onto the bulb. 8. To change the passenger's side bulb, start the engine, turn the steering wheel all the way to the left, and turn counterclockwise. Pull the inner fender cover away from the inner fender. 3. Put the ... 221 Install the new bulb, and turn it one in place. Turn on the center. BULB Replacing the Front Side Marker/ Turn Signal and Parking Light Bulb HOLDING CLIPS Maintenance 1. Remove the socket from the headlight assembly by pushing on the headlights to lock it in place. 7. To change the driver...
Owner's Manual
Page 244
... almost immediately. Everything is coming from under the hood, turn off all accessories, and turn off the engine. 5. If you find a leak, it does, wait until you do not see Emergency Towing on the hazard warning lights. 2. The only indication may see steam and/or spray coming from an overheated... engine can cause serious damage to the engine. 248 If you see no more signs of steam or spray, then open the hood...
... almost immediately. Everything is coming from under the hood, turn off all accessories, and turn off the engine. 5. If you find a leak, it does, wait until you do not see Emergency Towing on the hazard warning lights. 2. The only indication may see steam and/or spray coming from an overheated... engine can cause serious damage to the engine. 248 If you see no more signs of steam or spray, then open the hood...
Owner's Manual
Page 246
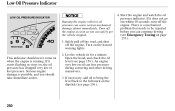
...page 255 ). There is possible, and you can cause serious mechanical damage almost immediately. Turn of f the engine as soon as you should never come on the hazard warning lights. Serious engine damage is a mechanical problem that needs to the full mark on , the oil pressure has dropped very ...low or lost pressure. Open the hood, and check the oil level (see Emergency Towing on oil can continue driving (see page 159 ). Start the engine and ...
...page 255 ). There is possible, and you can cause serious mechanical damage almost immediately. Turn of f the engine as soon as you should never come on the hazard warning lights. Serious engine damage is a mechanical problem that needs to the full mark on , the oil pressure has dropped very ...low or lost pressure. Open the hood, and check the oil level (see Emergency Towing on oil can continue driving (see page 159 ). Start the engine and ...
Owner's Manual
Page 278
Index A Accessories...162 ACCESSORY (Ignition Key Position) ...76 Accessory Power Socket ...99 Additives, Engine Oil...205 Airbag (SRS) ...11 Airbag System Components ...23 Air Conditioning...105 Usage ...107 Air Pressure, Tires ...228 Anti-lock ... Break-in, New Car ...154 Brightness Control, Instruments ...72 Brights, Headlights ...70 Bulb Replacement Back-up Lights ...223 Brake Lights...223 Front Parking Lights ...221 Headlights ...218 Specifications ...267 Turn Signal Lights...221, 222 Bulbs, Halogen ...218 C Capacities Chart...266 Carbon Monoxide Hazard ...52 Carrying Cargo ...164 CAUTION...
Index A Accessories...162 ACCESSORY (Ignition Key Position) ...76 Accessory Power Socket ...99 Additives, Engine Oil...205 Airbag (SRS) ...11 Airbag System Components ...23 Air Conditioning...105 Usage ...107 Air Pressure, Tires ...228 Anti-lock ... Break-in, New Car ...154 Brightness Control, Instruments ...72 Brights, Headlights ...70 Bulb Replacement Back-up Lights ...223 Brake Lights...223 Front Parking Lights ...221 Headlights ...218 Specifications ...267 Turn Signal Lights...221, 222 Bulbs, Halogen ...218 C Capacities Chart...266 Carbon Monoxide Hazard ...52 Carrying Cargo ...164 CAUTION...
Owner's Manual
Page 279
... Control Operation ...145 Customer Service Office ...278 Daytime Running Lights...70 Defects, Reporting Safety...280 Defogger, Rear Window ...72 Dimensions ...266 Dimming the Headlights ...69 Dipstick Automatic Transmission .. 211, 212 Engine Oil ...159 Directional Signals ...69 Disc Brake Wear Indicators...193 Oil Pressure Indicator ...250 Oil, What Kind to Use ...204 Overheating...248 Specifications ...266 Speed Limiter ...172, 175 Starting...169 Engine Speed Limiter ...172, 175 Evaporative Emissions Controls .. 272 Exhaust Fumes ...52 E D DANGER, Explanation of ...ii Dashboard ...4, 56 ...
... Control Operation ...145 Customer Service Office ...278 Daytime Running Lights...70 Defects, Reporting Safety...280 Defogger, Rear Window ...72 Dimensions ...266 Dimming the Headlights ...69 Dipstick Automatic Transmission .. 211, 212 Engine Oil ...159 Directional Signals ...69 Disc Brake Wear Indicators...193 Oil Pressure Indicator ...250 Oil, What Kind to Use ...204 Overheating...248 Specifications ...266 Speed Limiter ...172, 175 Starting...169 Engine Speed Limiter ...172, 175 Evaporative Emissions Controls .. 272 Exhaust Fumes ...52 E D DANGER, Explanation of ...ii Dashboard ...4, 56 ...
Owner's Manual
Page 280
...156 Fuses, Checking the ...257 H Halogen Headlight Bulbs...218 Hazard Warning Flashers...71 Headlights...69 Aiming ...218 Automatic Lighting Off ...70 Daytime Running Lights...71 Low Beams, Turning on ...69 Reminder Chime ...69 Replacing Halogen Bulbs ...218 Turning on ...69 Head ...Mileage, Improving...161 Gasoline ...154 Gauge ...66 Octane Requirement ...154 Tank, Filling the...156 Gas Station Procedures...156 Gauges Engine Coolant Temperature ...65 Fuel ...66 Speedometer ...64 Tachometer ...64 Gearshift Lever Positions Automatic Transmission...173 Manual Transmission ...170 Glove Box ...
...156 Fuses, Checking the ...257 H Halogen Headlight Bulbs...218 Hazard Warning Flashers...71 Headlights...69 Aiming ...218 Automatic Lighting Off ...70 Daytime Running Lights...71 Low Beams, Turning on ...69 Reminder Chime ...69 Replacing Halogen Bulbs ...218 Turning on ...69 Head ...Mileage, Improving...161 Gasoline ...154 Gauge ...66 Octane Requirement ...154 Tank, Filling the...156 Gas Station Procedures...156 Gauges Engine Coolant Temperature ...65 Fuel ...66 Speedometer ...64 Tachometer ...64 Gearshift Lever Positions Automatic Transmission...173 Manual Transmission ...170 Glove Box ...
Owner's Manual
Page 282
...(Ignition Key Position) ...76 Outside Mirrors ...90 Outside Temperature ...64 Overheating, Engine ...248 Owner's Maintenance Checks ...198 R Radiator Overheating ...248 Radio/CD Sound System ...118, 119, 122, 123 Rear Lights, Bulb Replacement ...222, 223 Rear Seat, Folding ...88 Rear View Mirror... Rear Window Defogger ...72 Reclining the Seat Backs ...86 Recommended Shift Speeds ...171 Reminder Lights ...58 Remote Transmitter ...78 Replacement Information Engine Oil and Filter ...206 Fuses ...257 Light Bulbs ...218 Timing Belt ...217 Tires ...231 Wiper Blades ...225 Replacing Seat Belts After...
...(Ignition Key Position) ...76 Outside Mirrors ...90 Outside Temperature ...64 Overheating, Engine ...248 Owner's Maintenance Checks ...198 R Radiator Overheating ...248 Radio/CD Sound System ...118, 119, 122, 123 Rear Lights, Bulb Replacement ...222, 223 Rear Seat, Folding ...88 Rear View Mirror... Rear Window Defogger ...72 Reclining the Seat Backs ...86 Recommended Shift Speeds ...171 Reminder Lights ...58 Remote Transmitter ...78 Replacement Information Engine Oil and Filter ...206 Fuses ...257 Light Bulbs ...218 Timing Belt ...217 Tires ...231 Wiper Blades ...225 Replacing Seat Belts After...
Owner's Manual
Page 283
...ii Satellite Radio...135 Seat Belts ...10 Additional Information ...20 Automatic Seat Belt Tensioners ...21 Lap/Shoulder Belt ...20 Maintenance ...22 Reminder Light and Beeper ...20, 58 System Components...20 Use During Pregnancy...18 Wearing a Lap/Shoulder Belt ...20 Seats, Adjusting the...85 87 Security...Side Airbags Works ...28 SRS Components ...23 SRS Indicator...30, 59 START (Ignition Key Position) ...76 Starting the Engine...169 With a Dead Battery ...245 Steam Coming from Engine ...248 Steering Wheel Adjustment ...73 Anti-theft Column Lock ...76 Stereo Sound System ...114, 122, 131, 135...
...ii Satellite Radio...135 Seat Belts ...10 Additional Information ...20 Automatic Seat Belt Tensioners ...21 Lap/Shoulder Belt ...20 Maintenance ...22 Reminder Light and Beeper ...20, 58 System Components...20 Use During Pregnancy...18 Wearing a Lap/Shoulder Belt ...20 Seats, Adjusting the...85 87 Security...Side Airbags Works ...28 SRS Components ...23 SRS Indicator...30, 59 START (Ignition Key Position) ...76 Starting the Engine...169 With a Dead Battery ...245 Steam Coming from Engine ...248 Steering Wheel Adjustment ...73 Anti-theft Column Lock ...76 Stereo Sound System ...114, 122, 131, 135...


