Owner's Manual
Page 6
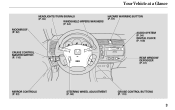
Your Vehicle at a Glance HEADLIGHTS/TURN SIGNALS (P. 65) WINDSHIELD WIPERS/WASHERS (P. 64) MOONROOF (P. 82) HAZARD WARNING BUTTON (P. 67) AUDIO SYSTEM (P. 94) DIGITAL CLOCK (P. 108) CRUISE CONTROL MASTER SWITCH (P. 110) REAR WINDOW DEFOGGER (P. 67) MIRROR CONTROLS (P. 83) STEERING WHEEL ADJUSTMENT (P. 68) CRUISE CONTROL BUTTONS (P. 110) 3
Your Vehicle at a Glance HEADLIGHTS/TURN SIGNALS (P. 65) WINDSHIELD WIPERS/WASHERS (P. 64) MOONROOF (P. 82) HAZARD WARNING BUTTON (P. 67) AUDIO SYSTEM (P. 94) DIGITAL CLOCK (P. 108) CRUISE CONTROL MASTER SWITCH (P. 110) REAR WINDOW DEFOGGER (P. 67) MIRROR CONTROLS (P. 83) STEERING WHEEL ADJUSTMENT (P. 68) CRUISE CONTROL BUTTONS (P. 110) 3
Owner's Manual
Page 54
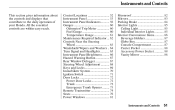
... ...60 Fuel Gauge ...60 Temperature Gauge ...61 Maintenance Required Indicator ...62 Controls Near the Steering Wheel ...63 Windshield Wipers and Washers .. 64 Turn Signal and Headlights...65 Instrument Panel Brightness ...66 Hazard Warning Button ...67 Rear Window Defogger ...67 Steering Wheel Adjustment ...68 Keys and Locks ...69 Immobilizer System...70 Ignition... ...88 Instruments and Controls 51 Instruments and Controls This section gives information about the controls and displays that contribute to the daily operation of your Honda. All the essential controls are within easy reach.
... ...60 Fuel Gauge ...60 Temperature Gauge ...61 Maintenance Required Indicator ...62 Controls Near the Steering Wheel ...63 Windshield Wipers and Washers .. 64 Turn Signal and Headlights...65 Instrument Panel Brightness ...66 Hazard Warning Button ...67 Rear Window Defogger ...67 Steering Wheel Adjustment ...68 Keys and Locks ...69 Immobilizer System...70 Ignition... ...88 Instruments and Controls 51 Instruments and Controls This section gives information about the controls and displays that contribute to the daily operation of your Honda. All the essential controls are within easy reach.
Owner's Manual
Page 60
Driving with the headlight switch off if you turn the ignition switch to ON (II) with the parking brake not fully released can damage the brakes and tires. 2. If it remains lit after you turn on when you have it comes on models equipped with the high beam headlights. This indicator... comes on the headlights or release the parking brake. If it means there is a problem in the ABS. CONTINUED Instruments and Controls 57 Instrument Panel ...
Driving with the headlight switch off if you turn the ignition switch to ON (II) with the parking brake not fully released can damage the brakes and tires. 2. If it remains lit after you turn on when you have it comes on models equipped with the high beam headlights. This indicator... comes on the headlights or release the parking brake. If it means there is a problem in the ABS. CONTINUED Instruments and Controls 57 Instrument Panel ...
Owner's Manual
Page 61
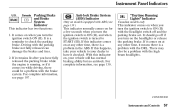
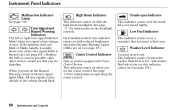
...comes on as possible, since other drivers cannot see page 156 ). 58 Instruments and Controls This indicator comes on with the high beam headlights. Instrument Panel Indicators Malfunction Indicator Lamp See page 196 . Turn Signal and Hazard Warning Indicators The left or right turn signal indicator ...(see that you are on operating the cruise control. Washer Level Indicator Canadian models only This indicator comes on when you turn on the headlight controls. All turn signal bulbs is burned out (see page 65 ). See page 110 for information on the Hazard Warning switch, both ...
...comes on as possible, since other drivers cannot see page 156 ). 58 Instruments and Controls This indicator comes on with the high beam headlights. Instrument Panel Indicators Malfunction Indicator Lamp See page 196 . Turn Signal and Hazard Warning Indicators The left or right turn signal indicator ...(see that you are on operating the cruise control. Washer Level Indicator Canadian models only This indicator comes on when you turn on the headlight controls. All turn signal bulbs is burned out (see page 65 ). See page 110 for information on the Hazard Warning switch, both ...

Owner's Manual
Page 66
Controls Near the Steering Wheel MOONROOF (P. 82) HEADLIGHTS/ TURN SIGNALS (P. 65) WINDSHIELD WIPERS/WASHERS (P. 64) HAZARD WARNING BUTTON (P. 67) CRUISE CONTROL MASTER SWITCH (P. 110) REAR WINDOW DEFOGGER (P. 67) MIRROR CONTROLS (P. 83) TILT ADJUSTMENT (P. 68) HORN CRUISE CONTROL BUTTONS (P. 110) To use the horn, press the center pad of the steering wheel. Instruments and Controls 63
Controls Near the Steering Wheel MOONROOF (P. 82) HEADLIGHTS/ TURN SIGNALS (P. 65) WINDSHIELD WIPERS/WASHERS (P. 64) HAZARD WARNING BUTTON (P. 67) CRUISE CONTROL MASTER SWITCH (P. 110) REAR WINDOW DEFOGGER (P. 67) MIRROR CONTROLS (P. 83) TILT ADJUSTMENT (P. 68) HORN CRUISE CONTROL BUTTONS (P. 110) To use the horn, press the center pad of the steering wheel. Instruments and Controls 63
Owner's Manual
Page 68
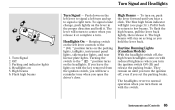
... 3. If you leave the lights on as long as you release it . The high beams will return to the '' '' position turns on 5. Headlights on the parking lights, taillights, instrument panel lights, side-marker lights, and rear license plate lights. Turning the switch to the '' '' position turns... and hold the lever back. High Beams To turn the ignition off , the high beam headlights come on the headlights. Pull it . Flash high beams Instruments and Controls 65 Turn Signal and Headlights Turn Signal Push down on with the switch. 1. To signal a lane change, push lightly...
... 3. If you leave the lights on as long as you release it . The high beams will return to the '' '' position turns on 5. Headlights on the parking lights, taillights, instrument panel lights, side-marker lights, and rear license plate lights. Turning the switch to the '' '' position turns... and hold the lever back. High Beams To turn the ignition off , the high beam headlights come on the headlights. Pull it . Flash high beams Instruments and Controls 65 Turn Signal and Headlights Turn Signal Push down on with the switch. 1. To signal a lane change, push lightly...
Owner's Manual
Page 69
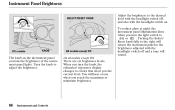
...to or . Turning the Select/ Reset knob fully to the right will return the instrument panel to the brightness adjusted with the headlight switch on the instrument panel controls the brightness of the instrument panel lights. Instrument Panel Brightness Adjust the brightness to the desired ...level with the headlight switch off, and also with the headlight switch off and a tone will sound. On all models except DX There are six brightness levels. Turn the ...
...to or . Turning the Select/ Reset knob fully to the right will return the instrument panel to the brightness adjusted with the headlight switch on the instrument panel controls the brightness of the instrument panel lights. Instrument Panel Brightness Adjust the brightness to the desired ...level with the headlight switch off, and also with the headlight switch off and a tone will sound. On all models except DX There are six brightness levels. Turn the ...
Owner's Manual
Page 86
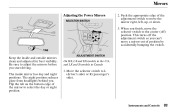
... out of position by accidentally bumping the switch. The inside and outside mirrors clean and adjusted for best visibility. The night position reduces glare from headlights behind you start driving. Push the appropriate edge of the mirror to L (driver's side) or R (passenger's side). Flip the tab on the bottom edge of...
... out of position by accidentally bumping the switch. The inside and outside mirrors clean and adjusted for best visibility. The night position reduces glare from headlights behind you start driving. Push the appropriate edge of the mirror to L (driver's side) or R (passenger's side). Flip the tab on the bottom edge of...
Owner's Manual
Page 147
.... 144 Maintenance U.S. See page 118 . Automatic transmission Check the fluid level monthly. Examine the tread for more information. However, Honda recommends that are unsure of how to perform any check, turn to perform maintenance on the items marked with will not void your ...163 . Maintenance Schedule Your authorized Honda dealer knows your warranties in effect. Tires Check the tire pressure monthly. Maintenance may be done by any automotive repair establishment or individual using parts that all the receipts as proof of the headlights, parking lights, taillights, high-...
.... 144 Maintenance U.S. See page 118 . Automatic transmission Check the fluid level monthly. Examine the tread for more information. However, Honda recommends that are unsure of how to perform any check, turn to perform maintenance on the items marked with will not void your ...163 . Maintenance Schedule Your authorized Honda dealer knows your warranties in effect. Tires Check the tire pressure monthly. Maintenance may be done by any automotive repair establishment or individual using parts that all the receipts as proof of the headlights, parking lights, taillights, high-...
Owner's Manual
Page 167
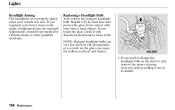
.... Oil, perspiration, or a scratch on the driver's side, remove the power steering reservoir tank by a Honda dealer or other qualified mechanic. Replacing a Headlight Bulb Your vehicle has halogen headlight bulb. HOLDER 1. If you regularly carry heavy items in the trunk, readjustment may be performed by pulling it...of its steel base and protect the glass from contact with denatured alcohol and a clean cloth. If you need to change the headlight bulb on the glass can cause the bulb to overheat and shatter. Adjustments should be required. Handle it with your vehicle was new...
.... Oil, perspiration, or a scratch on the driver's side, remove the power steering reservoir tank by a Honda dealer or other qualified mechanic. Replacing a Headlight Bulb Your vehicle has halogen headlight bulb. HOLDER 1. If you regularly carry heavy items in the trunk, readjustment may be performed by pulling it...of its steel base and protect the glass from contact with denatured alcohol and a clean cloth. If you need to change the headlight bulb on the glass can cause the bulb to overheat and shatter. Adjustments should be required. Handle it with your vehicle was new...
Owner's Manual
Page 168
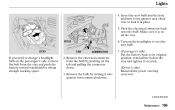
Make sure it securely. (Driver's side) Reinstall the power steering reservoir. TAB CONNECTOR STAY If you need to change a headlight bulb on all the way. Insert the new bulb into the hole and turn it in the stay and tighten it is on the passenger's ... lock it one-quarter turn counterclockwise. 7. (Passenger's side) Put the battery back to test the new bulb. Lights 4. Remove the bulb by pushing on the headlights to its original position, reinstall the bolt in place. 5. CONTINUED Maintenance 165 Turn on the tab and pulling the connector down. 3.
Make sure it securely. (Driver's side) Reinstall the power steering reservoir. TAB CONNECTOR STAY If you need to change a headlight bulb on all the way. Insert the new bulb into the hole and turn it in the stay and tighten it is on the passenger's ... lock it one-quarter turn counterclockwise. 7. (Passenger's side) Put the battery back to test the new bulb. Lights 4. Remove the bulb by pushing on the headlights to its original position, reinstall the bolt in place. 5. CONTINUED Maintenance 165 Turn on the tab and pulling the connector down. 3.
Owner's Manual
Page 169
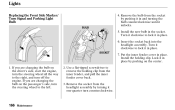
...to the left. 2. If you are changing the bulb on the center. 1. Install the new bulb in place. Remove the socket from the headlight assembly by pushing on the passenger's side, turn counterclockwise. 166 Maintenance Lights Replacing the Front Side Marker/ Turn Signal and Parking Light Bulb BULB ...4. Remove the bulb from the inner fender, and pull the inner fender cover back. 3. Insert the socket back into the headlight assembly. Install the holding clip from the socket by pushing it in place by turning it unlocks. 5. Lock it in and turning the ...
...to the left. 2. If you are changing the bulb on the center. 1. Install the new bulb in place. Remove the socket from the headlight assembly by pushing on the passenger's side, turn counterclockwise. 166 Maintenance Lights Replacing the Front Side Marker/ Turn Signal and Parking Light Bulb BULB ...4. Remove the bulb from the inner fender, and pull the inner fender cover back. 3. Insert the socket back into the headlight assembly. Install the holding clip from the socket by pushing it in place by turning it unlocks. 5. Lock it in and turning the ...

Owner's Manual
Page 192
...a qualified technician to determine the problem (see page 178 ). With an automatic transmission, it is discharged or the connections are corroded. If the headlights do not hear the normal noise of the fuses. Nothing Happens or the Starter Motor Operates Very Slowly When you turn the key to START...like it must be in Park or Neutral. Turn the ignition switch to START (III). Check these things: Check the transmission interlock. If the headlights dim noticeably or go out when you try jump starting the vehicle from a booster battery (see page 191 ). Check the condition of the ...
...a qualified technician to determine the problem (see page 178 ). With an automatic transmission, it is discharged or the connections are corroded. If the headlights do not hear the normal noise of the fuses. Nothing Happens or the Starter Motor Operates Very Slowly When you turn the key to START...like it must be in Park or Neutral. Turn the ignition switch to START (III). Check these things: Check the transmission interlock. If the headlights dim noticeably or go out when you try jump starting the vehicle from a booster battery (see page 191 ). Check the condition of the ...
Owner's Manual
Page 202
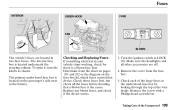
... box. 3. Checking and Replacing Fuses If something electrical in your vehicle stops working, check for there is located underneath the steering column. Make sure the headlights and all the fuses before deciding that a blown fuse is located on the fuse box lid, which fuses control that device. The primary under -hood...
... box. 3. Checking and Replacing Fuses If something electrical in your vehicle stops working, check for there is located underneath the steering column. Make sure the headlights and all the fuses before deciding that a blown fuse is located on the fuse box lid, which fuses control that device. The primary under -hood...
Owner's Manual
Page 204
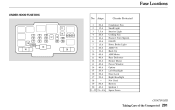
Fuse Locations UNDER-HOOD FUSE BOX No. Amps. 20 A 1 15 A 2 7.5 A 3 20 A 4 10 A 5 15 A 6 15 A 7 20 A 8 10 A 9 40 A 10 40 A 11 40 A 12 40 A 13 40 A 14 20 A 15 20 A 16 20 A 17 18 80 A 19 40 A 20 21 25 7.5 A 30 A Circuits Protected Condenser Fan Small Light Interior Light Cooling Fan Hazard, Turn Signals FI ECU Horn, Brake Light ABS F/S Back Up ABS Motor Rear Defroster Heater Motor Power Window Option Left Headlight Door Lock Right Headlight Not Used Battery Ignition 1 Spare Fuses CONTINUED Taking Care of the Unexpected 201
Fuse Locations UNDER-HOOD FUSE BOX No. Amps. 20 A 1 15 A 2 7.5 A 3 20 A 4 10 A 5 15 A 6 15 A 7 20 A 8 10 A 9 40 A 10 40 A 11 40 A 12 40 A 13 40 A 14 20 A 15 20 A 16 20 A 17 18 80 A 19 40 A 20 21 25 7.5 A 30 A Circuits Protected Condenser Fan Small Light Interior Light Cooling Fan Hazard, Turn Signals FI ECU Horn, Brake Light ABS F/S Back Up ABS Motor Rear Defroster Heater Motor Power Window Option Left Headlight Door Lock Right Headlight Not Used Battery Ignition 1 Spare Fuses CONTINUED Taking Care of the Unexpected 201
Owner's Manual
Page 212
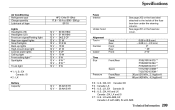
... with ABS, EX Canada: LX with ABS, Si with ABS Technical Information 209 Specifications Air Conditioning Refrigerant type Charge quantity Lubricant oil type Lights Headlights (HI) Headlights (LO) Front turn signal/Parking light Rear turn signal lights Stop/Taillights Back-up lights High-mount stop light License plate lights Ceiling light Front...
... with ABS, EX Canada: LX with ABS, Si with ABS Technical Information 209 Specifications Air Conditioning Refrigerant type Charge quantity Lubricant oil type Lights Headlights (HI) Headlights (LO) Front turn signal/Parking light Rear turn signal lights Stop/Taillights Back-up lights High-mount stop light License plate lights Ceiling light Front...
Owner's Manual
Page 224
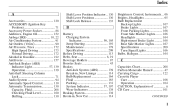
...Fluid Level ...160 Shifting ...130 Shift Lever Position Indicator .. 130 Shift Lever Positions ...130 Shift Lock Release ...133 Brightness Control, Instruments ...66 Brights, Headlights ...65 Bulb Replacement Back-up Lights ...167 Brake Lights...167 Front Parking Lights ...166 Front Side Marker Lights...166... Headlights ...164 High-mount Brake Light ...168 Rear Side Marker Lights ...167 Specifications ...209 Turn Signal Lights ...166 Bulbs, Halogen ...164 B Battery Charging ...
...Fluid Level ...160 Shifting ...130 Shift Lever Position Indicator .. 130 Shift Lever Positions ...130 Shift Lock Release ...133 Brightness Control, Instruments ...66 Brights, Headlights ...65 Bulb Replacement Back-up Lights ...167 Brake Lights...167 Front Parking Lights ...166 Front Side Marker Lights...166... Headlights ...164 High-mount Brake Light ...168 Rear Side Marker Lights ...167 Specifications ...209 Turn Signal Lights ...166 Bulbs, Halogen ...164 B Battery Charging ...
Owner's Manual
Page 225
... ...110 Customer Relations Office ...218 Defects, Reporting Safety...220 Defog and Defrost ...93 Defogger, Rear Window ...67 Defrosting the Windows ...93 Dimensions ...208 Dimming the Headlights ...65 Dipstick Automatic Transmission...160 Engine Oil ...118 Directional Signals ...65 Disc Brake Wear Indicators ...138 Disposal of Used Oil ...155 Doors Locking and Unlocking...
... ...110 Customer Relations Office ...218 Defects, Reporting Safety...220 Defog and Defrost ...93 Defogger, Rear Window ...67 Defrosting the Windows ...93 Dimensions ...208 Dimming the Headlights ...65 Dipstick Automatic Transmission...160 Engine Oil ...118 Directional Signals ...65 Disc Brake Wear Indicators ...138 Disposal of Used Oil ...155 Doors Locking and Unlocking...
Owner's Manual
Page 227
... Switch ...71 Timing Control System ...213 Important Safety Precautions ...6 Indicators ABS (Anti-Lock Brake)...57 Brake (Parking and Brake System) ...57 Charging System ...56 H Halogen Headlight Bulbs...164 Hazard Warning Flashers...67 Headlights Daytime Running Lights...65 High Beam Indicator ...58 IV
... Switch ...71 Timing Control System ...213 Important Safety Precautions ...6 Indicators ABS (Anti-Lock Brake)...57 Brake (Parking and Brake System) ...57 Charging System ...56 H Halogen Headlight Bulbs...164 Hazard Warning Flashers...67 Headlights Daytime Running Lights...65 High Beam Indicator ...58 IV


