Owner's Manual
Page 61
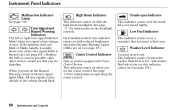
...models, this indicator comes on when you must refuel soon. Low Fuel Indicator This indicator comes on with reduced brightness when the Daytime Running Lights (DRL) are signaling. Washer Level Indicator Canadian models only This indicator comes on (see that you set the cruise control. Turn Signal ... the washer fluid level is burned out (see page 65 ). Instrument Panel Indicators Malfunction Indicator Lamp See page 196 . Replace the bulb as soon as a reminder that you signal a lane change or turn signal bulbs is low. See page 110 for information on (see page 166 ).
...models, this indicator comes on when you must refuel soon. Low Fuel Indicator This indicator comes on with reduced brightness when the Daytime Running Lights (DRL) are signaling. Washer Level Indicator Canadian models only This indicator comes on (see that you set the cruise control. Turn Signal ... the washer fluid level is burned out (see page 65 ). Instrument Panel Indicators Malfunction Indicator Lamp See page 196 . Replace the bulb as soon as a reminder that you signal a lane change or turn signal bulbs is low. See page 110 for information on (see page 166 ).
Owner's Manual
Page 167
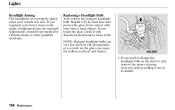
..., readjustment may be performed by its holder. 164 Maintenance Replacing a Headlight Bulb Your vehicle has halogen headlight bulb. If you need to change the headlight bulb on the glass can cause the bulb to overheat and shatter. Handle it out of its steel base and protect... the glass from contact with denatured alcohol and a clean cloth. Oil, perspiration, or a scratch on the driver's side, remove the power steering reservoir tank by pulling it by a Honda dealer or other qualified mechanic. Lights...
..., readjustment may be performed by its holder. 164 Maintenance Replacing a Headlight Bulb Your vehicle has halogen headlight bulb. If you need to change the headlight bulb on the glass can cause the bulb to overheat and shatter. Handle it out of its steel base and protect... the glass from contact with denatured alcohol and a clean cloth. Oil, perspiration, or a scratch on the driver's side, remove the power steering reservoir tank by pulling it by a Honda dealer or other qualified mechanic. Lights...
Owner's Manual
Page 168
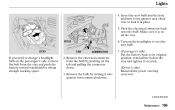
... pushing on the tab and pulling the connector down. 3. BULB 6. Lights 4. Push the electrical connector back onto the bulb. TAB CONNECTOR STAY If you need to obtain enough working space. 2. Make sure it securely. (Driver's side) Reinstall the power steering reservoir. Turn ...CONTINUED Maintenance 165 Remove the electrical connector from the stay and push the battery toward windshield to change a headlight bulb on the passenger's side, remove the bolt from the bulb by turning it onequarter turn clockwise to lock it in the stay and tighten it is on the headlights to ...
... pushing on the tab and pulling the connector down. 3. BULB 6. Lights 4. Push the electrical connector back onto the bulb. TAB CONNECTOR STAY If you need to obtain enough working space. 2. Make sure it securely. (Driver's side) Reinstall the power steering reservoir. Turn ...CONTINUED Maintenance 165 Remove the electrical connector from the stay and push the battery toward windshield to change a headlight bulb on the passenger's side, remove the bolt from the bulb by turning it onequarter turn clockwise to lock it in the stay and tighten it is on the headlights to ...
Owner's Manual
Page 169
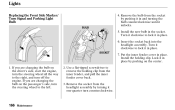
...pull the inner fender cover back. 3. Insert the socket back into the headlight assembly. If you are changing the bulb on the center. 1. If you are changing the bulb on the driver's side, start the engine, turn the steering wheel all the way to lock it clockwise to.... Put the inner fender cover in and turning the bulb counterclockwise until it in place. Remove the bulb from the headlight assembly by turning it in the socket. Lights Replacing the Front Side Marker/ Turn Signal and Parking Light Bulb BULB 4. Install the new bulb in place by pushing it unlocks. 5. Use a...
...pull the inner fender cover back. 3. Insert the socket back into the headlight assembly. If you are changing the bulb on the center. 1. If you are changing the bulb on the driver's side, start the engine, turn the steering wheel all the way to lock it clockwise to.... Put the inner fender cover in and turning the bulb counterclockwise until it in place. Remove the bulb from the headlight assembly by turning it in the socket. Lights Replacing the Front Side Marker/ Turn Signal and Parking Light Bulb BULB 4. Install the new bulb in place by pushing it unlocks. 5. Use a...
Owner's Manual
Page 170
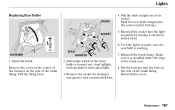
...lining. Reinstall the trunk lining. Push the new bulb straight into the socket until it is installed under the edge of the three bulbs is working. Test the lights to make sure the new bulb is burned out: stop/taillight, back-up light or turn counterclockwise. 7. Open the trunk. ...Remove the socket by turning it clockwise until it one-quarter turn signal light. 3. Make sure it locks....
...lining. Reinstall the trunk lining. Push the new bulb straight into the socket until it is installed under the edge of the three bulbs is working. Test the lights to make sure the new bulb is burned out: stop/taillight, back-up light or turn counterclockwise. 7. Open the trunk. ...Remove the socket by turning it clockwise until it one-quarter turn signal light. 3. Make sure it locks....
Owner's Manual
Page 171
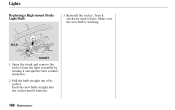
Reinstall the socket. Make sure the new bulb is working. Turn it clockwise until it bottoms. 168 Maintenance Open the trunk and remove the socket from the light assembly by turning it locks. Push the new bulb straight into the socket until it one-quarter turn counterclockwise. 2. Lights Replacing a High-mount Brake Light Bulb 3. Pull the bulb straight out of its socket. BULB SOCKET 1.
Reinstall the socket. Make sure the new bulb is working. Turn it clockwise until it bottoms. 168 Maintenance Open the trunk and remove the socket from the light assembly by turning it locks. Push the new bulb straight into the socket until it one-quarter turn counterclockwise. 2. Lights Replacing a High-mount Brake Light Bulb 3. Pull the bulb straight out of its socket. BULB SOCKET 1.
Owner's Manual
Page 224
... Shift Lock Release ...133 Brightness Control, Instruments ...66 Brights, Headlights ...65 Bulb Replacement Back-up Lights ...167 Brake Lights...167 Front Parking Lights ...166 Front Side Marker Lights...166 Headlights ...164 High-mount Brake Light ...168 Rear Side Marker Lights ...167 Specifications ...209 Turn Signal Lights ...166 Bulbs, Halogen ...164 B Battery Charging System Indicator...56, 195 Jump Starting ...191...
... Shift Lock Release ...133 Brightness Control, Instruments ...66 Brights, Headlights ...65 Bulb Replacement Back-up Lights ...167 Brake Lights...167 Front Parking Lights ...166 Front Side Marker Lights...166 Headlights ...164 High-mount Brake Light ...168 Rear Side Marker Lights ...167 Specifications ...209 Turn Signal Lights ...166 Bulbs, Halogen ...164 B Battery Charging System Indicator...56, 195 Jump Starting ...191...
Owner's Manual
Page 227
......60 Gearshift Lever Positions Automatic Transmission...130 5-speed Manual Transmission...129 Glove Box ...87 Reminder Beeper ...65 Replacing Halogen Bulbs ...164 Turning on ...65 Head Restraints ...78 Heating and Cooling ...90 High Altitude, Starting at ...127 High-Low Beam...Speed Driving ...173 Normal Driving ...172 Inside Mirror ...83 Inspection, Tire ...174 Instrument Panel ...2, 53 Instrument Panel Brightness ...66 Interior Lights ...85 I Identification Number, Vehicle...206 Ignition Keys...69 Switch ...71 Timing Control System ...213 Important Safety Precautions ...6 Indicators ABS (...
......60 Gearshift Lever Positions Automatic Transmission...130 5-speed Manual Transmission...129 Glove Box ...87 Reminder Beeper ...65 Replacing Halogen Bulbs ...164 Turning on ...65 Head Restraints ...78 Heating and Cooling ...90 High Altitude, Starting at ...127 High-Low Beam...Speed Driving ...173 Normal Driving ...172 Inside Mirror ...83 Inspection, Tire ...174 Instrument Panel ...2, 53 Instrument Panel Brightness ...66 Interior Lights ...85 I Identification Number, Vehicle...206 Ignition Keys...69 Switch ...71 Timing Control System ...213 Important Safety Precautions ...6 Indicators ABS (...
Owner's Manual
Page 228
... ...114 Normal Shift Speeds...129 NOTICE, Explanation of ...i Numbers, Identification ...206 K Keys ...69 M L Label, Certification ...206 Lane Change, Signaling ...65 Lap/Shoulder Belts ...14, 19 Lights Bulb Replacement ...164 Indicator ...56 Parking ...57 Turn Signal ...58 Load Limit ...123 LOCK (Ignition Key Position) ...71 Locks Anti-theft Steering Column ...71 Maintenance ...141...
... ...114 Normal Shift Speeds...129 NOTICE, Explanation of ...i Numbers, Identification ...206 K Keys ...69 M L Label, Certification ...206 Lane Change, Signaling ...65 Lap/Shoulder Belts ...14, 19 Lights Bulb Replacement ...164 Indicator ...56 Parking ...57 Turn Signal ...58 Load Limit ...123 LOCK (Ignition Key Position) ...71 Locks Anti-theft Steering Column ...71 Maintenance ...141...
Owner's Manual
Page 229
... Seats with Tethers...42 Using Lower Anchors ...38 Replacement Information Dust and Pollen Filter ...169 Engine Oil and Filter ...154 Fuses ...199 Light Bulbs ...164 Schedule ...143 Spark Plugs...208 Timing Belt ...162 Tires ...172 Wiper Blades ...170 Replacing Seat Belts After a Crash ...21 Reserve......18 Advice for Pregnant Women...17 R Radiator Overheating ...192 Radio/CD/Cassette Sound System ...94 Readiness Codes ...196, 215 Rear Lights, Bulb Replacement ...167 Rear Seat, Folding ...79 Rear View Mirror ...83 Rear Window Defogger ...67 Reclining the Seat Backs ...76 Recommended Shift ...
... Seats with Tethers...42 Using Lower Anchors ...38 Replacement Information Dust and Pollen Filter ...169 Engine Oil and Filter ...154 Fuses ...199 Light Bulbs ...164 Schedule ...143 Spark Plugs...208 Timing Belt ...162 Tires ...172 Wiper Blades ...170 Replacing Seat Belts After a Crash ...21 Reserve......18 Advice for Pregnant Women...17 R Radiator Overheating ...192 Radio/CD/Cassette Sound System ...94 Readiness Codes ...196, 215 Rear Lights, Bulb Replacement ...167 Rear Seat, Folding ...79 Rear View Mirror ...83 Rear Window Defogger ...67 Reclining the Seat Backs ...76 Recommended Shift ...
Owner's Manual
Page 230
... Belts ...8, 19 Additional Information ...19 Automatic Seat Belt Tensioners ...20 Cleaning ...169 Lap/Shoulder Belt ...14, 19 Maintenance ...21 Reminder Light and Beeper ...56 System Components...19 Use During Pregnancy...18 Wearing a Lap/Shoulder Belt ...19 Seats, Adjusting the ...76 Serial Number... Clock ...108 Shift Lever Position Indicator ...130 Shift Lock Release ...133 Side Airbags ...10, 25 Cutoff Indicator ...56 Side Marker Lights, Bulb Replacement in ...166, 168 Signaling Turns ...65 Snow Tires ...177 Sound System ...94 Spare Tire Inflating ...172 Specifications ...209 Specifications...
... Belts ...8, 19 Additional Information ...19 Automatic Seat Belt Tensioners ...20 Cleaning ...169 Lap/Shoulder Belt ...14, 19 Maintenance ...21 Reminder Light and Beeper ...56 System Components...19 Use During Pregnancy...18 Wearing a Lap/Shoulder Belt ...19 Seats, Adjusting the ...76 Serial Number... Clock ...108 Shift Lever Position Indicator ...130 Shift Lock Release ...133 Side Airbags ...10, 25 Cutoff Indicator ...56 Side Marker Lights, Bulb Replacement in ...166, 168 Signaling Turns ...65 Snow Tires ...177 Sound System ...94 Spare Tire Inflating ...172 Specifications ...209 Specifications...


