
Owner's Manual
Page 6
...Information About Your SRS...52 SRS Components...52 How Your Airbags Work...52 How the Automatic Seat Belt Tensioners Work...54 How the SRS Indicator Light Works...54 SRS Service...55 Additional Safety Precautions...56 Carbon Monoxide Hazard...57 Safety Labels...58 Driver and Passenger Safety Important Safety Precautions...6 Your ...And it tells you how to protect yourself and your Supplemental Restraint System. Adjust the Front Seats...12 3. Head Restraints...10 Door Locks...10 Pre-Drive Safety Checklist...11 Protecting Adults...12 1. Fasten and Position the Seat Belts...15 6.
...Information About Your SRS...52 SRS Components...52 How Your Airbags Work...52 How the Automatic Seat Belt Tensioners Work...54 How the SRS Indicator Light Works...54 SRS Service...55 Additional Safety Precautions...56 Carbon Monoxide Hazard...57 Safety Labels...58 Driver and Passenger Safety Important Safety Precautions...6 Your ...And it tells you how to protect yourself and your Supplemental Restraint System. Adjust the Front Seats...12 3. Head Restraints...10 Door Locks...10 Pre-Drive Safety Checklist...11 Protecting Adults...12 1. Fasten and Position the Seat Belts...15 6.

Owner's Manual
Page 50
...belt. CONTINUED Driver and Passenger Safety Guide the belt across your hips. All seat belts have a one-piece lap/shoulder belt. In normal driving, the retractor lets you and your passengers to help restrain your belts. Lap/Shoulder Belt Your vehicle has two types of a lap belt and... a shoulder belt. All other seating positions have an emergency locking retractor. The system also includes a light on the belt to be sure the belt is latched. After exiting the vehicle, be used together. Additional Information About Your Seat Belts Seat...
...belt. CONTINUED Driver and Passenger Safety Guide the belt across your hips. All seat belts have a one-piece lap/shoulder belt. In normal driving, the retractor lets you and your passengers to help restrain your belts. Lap/Shoulder Belt Your vehicle has two types of a lap belt and... a shoulder belt. All other seating positions have an emergency locking retractor. The system also includes a light on the belt to be sure the belt is latched. After exiting the vehicle, be used together. Additional Information About Your Seat Belts Seat...

Owner's Manual
Page 56
... indication, the airbags might not inflate when you to a problem. Do not try to an authorized Honda dealer as soon as possible. Driver and Passenger Safety The SRS indicator light alerts you need them (see any of these indications, your vehicle to remove or replace the airbags ... Supplemental Restraint System is virtually maintenance-free, and there are no parts you need them . This must have your Honda dealer as soon as possible. The airbags, seat belt tensioners, and control unit must be done by a dealer as soon as possible if the SRS light alerts you drive.
... indication, the airbags might not inflate when you to a problem. Do not try to an authorized Honda dealer as soon as possible. Driver and Passenger Safety The SRS indicator light alerts you need them (see any of these indications, your vehicle to remove or replace the airbags ... Supplemental Restraint System is virtually maintenance-free, and there are no parts you need them . This must have your Honda dealer as soon as possible. The airbags, seat belt tensioners, and control unit must be done by a dealer as soon as possible if the SRS light alerts you drive.

Owner's Manual
Page 63
... switch ON (II). If you do . Supplemental Restraint System Indicator This indicator lights when you turn the ignition switch ON (II). Canada Parking Brake and Brake System Indicator This light has two functions: BRAKE 1. Driving with the parking brake not fully released can be severely damaged if this... on when the engine is running , or if it comes on the ignition. Both the light and the beeper stay off if you and your seat belt before turning on while driving, it indicates a problem in the brake system. For complete information, see page 322 . For complete information,...
... switch ON (II). If you do . Supplemental Restraint System Indicator This indicator lights when you turn the ignition switch ON (II). Canada Parking Brake and Brake System Indicator This light has two functions: BRAKE 1. Driving with the parking brake not fully released can be severely damaged if this... on when the engine is running , or if it comes on the ignition. Both the light and the beeper stay off if you and your seat belt before turning on while driving, it indicates a problem in the brake system. For complete information, see page 322 . For complete information,...

Owner's Manual
Page 69
...resets (approximately ten seconds). first 6,000 miles (9,600 km) e Maintenance Required or is reset, it is take your Honda dealer, reset the indicator a follows. 1. Between 6,000 miles (9,600 km) and 7,500 miles (12,000 km)... switch ON (II), and then flash for ten seconds. o the Maintenance Schedules mal and Severe Driving ons on for conds when you first turn the ignition switch ON SELECT/RESET BUTTON (II). dicator...will come on pages 240 - 244. If you that it will light for schedaintenance. Press and hold the select/reset button in for two seconds when you turn the switch ...
...resets (approximately ten seconds). first 6,000 miles (9,600 km) e Maintenance Required or is reset, it is take your Honda dealer, reset the indicator a follows. 1. Between 6,000 miles (9,600 km) and 7,500 miles (12,000 km)... switch ON (II), and then flash for ten seconds. o the Maintenance Schedules mal and Severe Driving ons on for conds when you first turn the ignition switch ON SELECT/RESET BUTTON (II). dicator...will come on pages 240 - 244. If you that it will light for schedaintenance. Press and hold the select/reset button in for two seconds when you turn the switch ...

Owner's Manual
Page 70
...TILT ADJUSTMENT HORN* HEADLIGHTS/ TURN SIGNALS * To use most often. The left air vent are located to tilt the steering wheel. LIGHT CONTROL SWITCH REAR WINDOW DEFOGGER Instruments and Controls Controls Near the Steering Wheel The two levers on the underside of the steering column. ...turn signals, headlights, and high beams. The right lever controls the windshield washers and wipers. The switches for the hazard warning lights and rear window defogger are for driving features you to the right of the steering column allows you use the horn, press the pad around the " H "...
...TILT ADJUSTMENT HORN* HEADLIGHTS/ TURN SIGNALS * To use most often. The left air vent are located to tilt the steering wheel. LIGHT CONTROL SWITCH REAR WINDOW DEFOGGER Instruments and Controls Controls Near the Steering Wheel The two levers on the underside of the steering column. ...turn signals, headlights, and high beams. The right lever controls the windshield washers and wipers. The switches for the hazard warning lights and rear window defogger are for driving features you to the right of the steering column allows you use the horn, press the pad around the " H "...

Owner's Manual
Page 76
... visibility before starting to drive. Instruments and Controls The light above the button lights to show the defogger is disabled. It also shuts off the ignition. This causes all four outside turn off when you have to turn it on the hazard warning lights (four-way flashers). Use the hazard warning lights if you need...
... visibility before starting to drive. Instruments and Controls The light above the button lights to show the defogger is disabled. It also shuts off the ignition. This causes all four outside turn off when you have to turn it on the hazard warning lights (four-way flashers). Use the hazard warning lights if you need...
Owner's Manual
Page 77
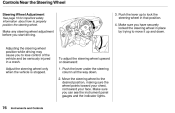
... how to the desired position, making sure the wheel points toward your chest, not toward your face. Adjusting the steering wheel position while driving may cause you start driving. Make sure you have securely locked the steering wheel in place by trying to move it up to lose control of the vehicle... vehicle is stopped. Move the steering wheel to properly position the steering wheel. 3. Make sure you can see the instrument panel gauges and the indicator lights.
... how to the desired position, making sure the wheel points toward your chest, not toward your face. Adjusting the steering wheel position while driving may cause you start driving. Make sure you have securely locked the steering wheel in place by trying to move it up to lose control of the vehicle... vehicle is stopped. Move the steering wheel to properly position the steering wheel. 3. Make sure you can see the instrument panel gauges and the indicator lights.

Owner's Manual
Page 78
... can lead to show the system is not recommended for conditions such as city driving, winding roads, slippery roads, heavy rain, or bad weather. The indicator in the switch will light. 2. CONTINUED Instruments and Controls The CRUISE CONTROL light on the instrument panel comes on open highways. Steering Wheel Controls Cruise Control Cruise...
... can lead to show the system is not recommended for conditions such as city driving, winding roads, slippery roads, heavy rain, or bad weather. The indicator in the switch will light. 2. CONTINUED Instruments and Controls The CRUISE CONTROL light on the instrument panel comes on open highways. Steering Wheel Controls Cruise Control Cruise...
Owner's Manual
Page 84
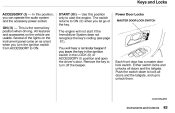
This is the normal key position when driving. START (III) - The engine will hear a reminder beeper if you leave the key in the ignition switch in the LOCK (0) or ACCESSORY (I ) - Power Door Locks ... lock all doors and the tailgate. Remove the key to turn the ignition switch from ACCESSORY to ON (II) when you let go of the lights on the instrument panel come on the vehicle are usable. Keys and Locks ACCESSORY (I ) position and open the driver's door. The switch returns to ON...
This is the normal key position when driving. START (III) - The engine will hear a reminder beeper if you leave the key in the ignition switch in the LOCK (0) or ACCESSORY (I ) - Power Door Locks ... lock all doors and the tailgate. Remove the key to turn the ignition switch from ACCESSORY to ON (II) when you let go of the lights on the instrument panel come on the vehicle are usable. Keys and Locks ACCESSORY (I ) position and open the driver's door. The switch returns to ON...

Owner's Manual
Page 123
With the ignition switch ON (II), turn the heaters off. The parking brake light on the heaters by pressing the button. Mirrors, Parking Brake Parking Brake NOTICE Driving the vehicle with your foot. To apply the parking brake, push the parking brake pedal down with the parking brake applied can damage the rear...
With the ignition switch ON (II), turn the heaters off. The parking brake light on the heaters by pressing the button. Mirrors, Parking Brake Parking Brake NOTICE Driving the vehicle with your foot. To apply the parking brake, push the parking brake pedal down with the parking brake applied can damage the rear...
Owner's Manual
Page 136
......169 CD Changer Error Indications...172 Audio System (EX)...173 A M / F M / C D Audio System...173 Operating the Radio...174 Adjusting the Sound...178 Audio System Lighting...179 Radio Frequencies...179 Radio Reception...179 Operating the CD Player...181 Operating the CD Changer...183 Protecting Compact Discs...184 CD Player Error Indications...Controls...191 Theft Protection...192 Security System...193 Comfort and Convenience Features Comfort and Convenience Features The heating and air conditioning systems in your Honda provide a comfortable driving environment in all weather conditions.
......169 CD Changer Error Indications...172 Audio System (EX)...173 A M / F M / C D Audio System...173 Operating the Radio...174 Adjusting the Sound...178 Audio System Lighting...179 Radio Frequencies...179 Radio Reception...179 Operating the CD Player...181 Operating the CD Changer...183 Protecting Compact Discs...184 CD Player Error Indications...Controls...191 Theft Protection...192 Security System...193 Comfort and Convenience Features Comfort and Convenience Features The heating and air conditioning systems in your Honda provide a comfortable driving environment in all weather conditions.
Owner's Manual
Page 141
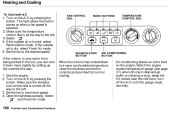
...the left . 3. If the interior is dry, select Fresh Air mode. 5. Open the windows partially. Watch the engine coolant temperature gauge (see page 67) when driving in the sun, you can cool it moves near the red zone, turn off the A / C until the gauge reads normally. Select 4. Set the fan ...to the desired speed. Turn on the A / C by pressing the button. The light above the button comes on the engine. If the outside air is very warm from being parked in stop-and-go traffic or climbing a long...
...the left . 3. If the interior is dry, select Fresh Air mode. 5. Open the windows partially. Watch the engine coolant temperature gauge (see page 67) when driving in the sun, you can cool it moves near the red zone, turn off the A / C until the gauge reads normally. Select 4. Set the fan ...to the desired speed. Turn on the A / C by pressing the button. The light above the button comes on the engine. If the outside air is very warm from being parked in stop-and-go traffic or climbing a long...
Owner's Manual
Page 167
... REW button. The Skip Function allows you which side of the cassette is turned off by pressing the button. The system will pull it will light to take the system out of rewind or fast forward. SKIP - If you want to play the other side, press the PROG button. If you... rewinds. You will see FF displayed. You will see FF flashing in fast forward or rewind, it goes back to remove the cassette from the drive, press the EJECT button. To fast forward the tape, push the FF button. To find the beginning of the song or passage currently playing, push...
... REW button. The Skip Function allows you which side of the cassette is turned off by pressing the button. The system will pull it will light to take the system out of rewind or fast forward. SKIP - If you want to play the other side, press the PROG button. If you... rewinds. You will see FF displayed. You will see FF flashing in fast forward or rewind, it goes back to remove the cassette from the drive, press the EJECT button. To fast forward the tape, push the FF button. To find the beginning of the song or passage currently playing, push...

Owner's Manual
Page 180
...of the station you will see page 71). Comfort and Convenience Features Audio System Audio System Lighting You can use these frequencies: AM band: 530 to 1,710 kilohertz FM band: 87.7... least ten kilohertz apart (530, 540, 550). You may identify the station as you will Driving very near the transmitter of a station that is turned off and the sound will fade completely ... flickering off the frequency in and out. CONTINUED go off . Radio Frequencies Your Honda's radio can also affect your Honda's radio receives stations is fairly common for stations to an FM station, you are...
...of the station you will see page 71). Comfort and Convenience Features Audio System Audio System Lighting You can use these frequencies: AM band: 530 to 1,710 kilohertz FM band: 87.7... least ten kilohertz apart (530, 540, 550). You may identify the station as you will Driving very near the transmitter of a station that is turned off and the sound will fade completely ... flickering off the frequency in and out. CONTINUED go off . Radio Frequencies Your Honda's radio can also affect your Honda's radio receives stations is fairly common for stations to an FM station, you are...
Owner's Manual
Page 189
... remains off until you turn it automatically stops that function, reverses direction, and begins to play. If you want to remove the cassette from the drive, press the EJECT button on the cassette player. F F / R E W - To stop fast forward or rewind, press either with Dolby B noise reduction, turn it will ... off the ignition, the cassette will remain in the display. To begin playing, press the PLAY button. Audio System The tape direction indicator will light to show you turn the system off while a tape is playing, either side of the TUNE bar or the PLAY button. If the tape ...
... remains off until you turn it automatically stops that function, reverses direction, and begins to play. If you want to remove the cassette from the drive, press the EJECT button on the cassette player. F F / R E W - To stop fast forward or rewind, press either with Dolby B noise reduction, turn it will ... off the ignition, the cassette will remain in the display. To begin playing, press the PLAY button. Audio System The tape direction indicator will light to show you turn the system off while a tape is playing, either side of the TUNE bar or the PLAY button. If the tape ...
Owner's Manual
Page 203
...been designed and approved for additional information.) operation of your vehicle unsafe. Non-Honda accessories are improperly installed, or exceed your vehicle's electrical system capacity, they may ...can interfere with the Before installing any accessory: Make sure the accessory does not obscure any lights, or interfere with your vehicle's handling, stability and performance, and cause a crash in...Be sure electronic accessories do not overload electrical circuits (see page 323). Before Driving Although aftermarket accessories may fit on page 204 for your vehicle. Before you ...
...been designed and approved for additional information.) operation of your vehicle unsafe. Non-Honda accessories are improperly installed, or exceed your vehicle's electrical system capacity, they may ...can interfere with the Before installing any accessory: Make sure the accessory does not obscure any lights, or interfere with your vehicle's handling, stability and performance, and cause a crash in...Be sure electronic accessories do not overload electrical circuits (see page 323). Before Driving Although aftermarket accessories may fit on page 204 for your vehicle. Before you ...
Owner's Manual
Page 210
...fastened their seat belts (see page 211). 12. If a tire looks low, use a gauge to Drive You should do the following checks and adjustments every day before you inside and outside lights are securely closed . 3. Check the adjustment of the steering wheel (see page 61). Make sure the...its pressure. 4. Check that any items you may be carrying with you drive your vehicle. 1. Check the adjustment of the inside are fully closed and locked. 9. Check the gauges and indicator lights in the instrument panel. 11. Driving Remove frost, snow, or ice. 2. Check that the hood and ...
...fastened their seat belts (see page 211). 12. If a tire looks low, use a gauge to Drive You should do the following checks and adjustments every day before you inside and outside lights are securely closed . 3. Check the adjustment of the steering wheel (see page 61). Make sure the...its pressure. 4. Check that any items you may be carrying with you drive your vehicle. 1. Check the adjustment of the inside are fully closed and locked. 9. Check the gauges and indicator lights in the instrument panel. 11. Driving Remove frost, snow, or ice. 2. Check that the hood and ...

Owner's Manual
Page 217
...toward the curb. Never park over dry leaves, tall grass, or other flammable materials. If the vehicle is fully released before you want to drive away. Place any packages, valuables, etc., in the cargo area or take them with the key or the remote transmitter. Make sure the ...brake is facing downhill, turn the front wheels away from moving and putting pressure on an incline. Driving with the parking brake partially set . Driving Lock the doors with you. Turn off the lights. Parking Always use the parking brake when you park your vehicle may roll if it is not...
...toward the curb. Never park over dry leaves, tall grass, or other flammable materials. If the vehicle is fully released before you want to drive away. Place any packages, valuables, etc., in the cargo area or take them with the key or the remote transmitter. Make sure the ...brake is facing downhill, turn the front wheels away from moving and putting pressure on an incline. Driving with the parking brake partially set . Driving Lock the doors with you. Turn off the lights. Parking Always use the parking brake when you park your vehicle may roll if it is not...
Owner's Manual
Page 218
...brakes after driving through deep water. If you apply them to see if they do not have audible brake wear indicators. Constant application of the brakes when going down a long hill builds up can reduce how well your foot off the accelerator pedal. Check your brake lights on all... the time. The brakes on the rear wheels are drum. Heat build-up heat and reduces their effectiveness. When the brake pads need replacing, you will begin screeching all the time, confusing drivers behind you intend to brake. Driving The Braking System Your Honda is needed...
...brakes after driving through deep water. If you apply them to see if they do not have audible brake wear indicators. Constant application of the brakes when going down a long hill builds up can reduce how well your foot off the accelerator pedal. Check your brake lights on all... the time. The brakes on the rear wheels are drum. Heat build-up heat and reduces their effectiveness. When the brake pads need replacing, you will begin screeching all the time, confusing drivers behind you intend to brake. Driving The Braking System Your Honda is needed...


