Owner's Manual
Page 60
...Door Locks...83 Remote Transmitter...85 Childproof Door Locks...89 Tailgate...89 Glove Box...91 Manual Sliding Doors...92 Power Sliding Doors......93 HomeLink Universal Transmitter...99 Seats...104 Passenger Seating...104 Seat Adjustments...105 Driver's Seat Manual Height Adjustment...107 Driver's Seat Power Adjustments...108 Armrests...109 Head Restraints...110 Third Seat Access...111 Moving the Second Row Bucket Seat...112 Removing...Lighting Off Feature...71 Daytime Running Lights...71 Instrument Panel Brightness...71 Turn Signals...72 Windshield Wipers...72 ...
...Door Locks...83 Remote Transmitter...85 Childproof Door Locks...89 Tailgate...89 Glove Box...91 Manual Sliding Doors...92 Power Sliding Doors......93 HomeLink Universal Transmitter...99 Seats...104 Passenger Seating...104 Seat Adjustments...105 Driver's Seat Manual Height Adjustment...107 Driver's Seat Power Adjustments...108 Armrests...109 Head Restraints...110 Third Seat Access...111 Moving the Second Row Bucket Seat...112 Removing...Lighting Off Feature...71 Daytime Running Lights...71 Instrument Panel Brightness...71 Turn Signals...72 Windshield Wipers...72 ...
Owner's Manual
Page 72
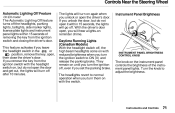
... until you turn them on with the switch. Instrument Panel Brightness INSTRUMENT PANEL BRIGHTNESS CONTROL KNOB The knob on the instrument panel controls the brightness of removing the key from the ignition switch with the headlight switch on, but do not open , then close the driver's door. Turn the knob to ON (II) and release...
... until you turn them on with the switch. Instrument Panel Brightness INSTRUMENT PANEL BRIGHTNESS CONTROL KNOB The knob on the instrument panel controls the brightness of removing the key from the ignition switch with the headlight switch on, but do not open , then close the driver's door. Turn the knob to ON (II) and release...
Owner's Manual
Page 84
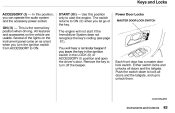
Keys and Locks ACCESSORY (I ) position and open the driver's door. All features and accessories on as a test when you let go of the lights on the instrument panel come on the vehicle are usable. Use this position, you leave the key in the ignition switch in the LOCK (0) or ACCESSORY (I ) ... you turn off the beeper. Remove the key to start if the Immobilizer System does not recognize the key's coding (see page 81). Push the switch down to lock all doors and the tailgate. Power Door Locks MASTER DOOR LOCK SWITCH Each front door has a master door lock switch. The engine will ...
Keys and Locks ACCESSORY (I ) position and open the driver's door. All features and accessories on as a test when you let go of the lights on the instrument panel come on the vehicle are usable. Use this position, you leave the key in the ignition switch in the LOCK (0) or ACCESSORY (I ) ... you turn off the beeper. Remove the key to start if the Immobilizer System does not recognize the key's coding (see page 81). Push the switch down to lock all doors and the tailgate. Power Door Locks MASTER DOOR LOCK SWITCH Each front door has a master door lock switch. The engine will ...

Owner's Manual
Page 194
...To reset an alarming system before the two minutes have elapsed, unlock either front door with the key, or remote transmitter. With the system set , check the Door Lamp Monitor on the instrument panel (see if the doors and tailgate are fully closed . The security system will sound if the tailgate lock... to the low oil pressure indicator starts blinking immediately to see page 64), to show you must lock the doors from theft. It also alarms if the radio is removed from the dashboard or the wiring is not part of headlights, parking lights, side marker lights and taillights flashes...
...To reset an alarming system before the two minutes have elapsed, unlock either front door with the key, or remote transmitter. With the system set , check the Door Lamp Monitor on the instrument panel (see if the doors and tailgate are fully closed . The security system will sound if the tailgate lock... to the low oil pressure indicator starts blinking immediately to see page 64), to show you must lock the doors from theft. It also alarms if the radio is removed from the dashboard or the wiring is not part of headlights, parking lights, side marker lights and taillights flashes...
Owner's Manual
Page 210
Make sure all windows, mirrors, and outside mirrors (see page 76). 8. Remove frost, snow, or ice. 2. If a tire looks low, use a gauge ... properly or fastened down securely. 5. Check the adjustment of the steering wheel (see page 121). 7. Make sure the doors and tailgate are fully closed and locked. 9. Driving Preparing to check its pressure. 4. Check that the hood and tailgate...inside are clean and unobstructed. Check the indicator lights in the instrument panel (see page 15). 10.Turn the ignition switch ON (II). Check the gauges and indicator lights in the ...
Make sure all windows, mirrors, and outside mirrors (see page 76). 8. Remove frost, snow, or ice. 2. If a tire looks low, use a gauge ... properly or fastened down securely. 5. Check the adjustment of the steering wheel (see page 121). 7. Make sure the doors and tailgate are fully closed and locked. 9. Driving Preparing to check its pressure. 4. Check that the hood and tailgate...inside are clean and unobstructed. Check the indicator lights in the instrument panel (see page 15). 10.Turn the ignition switch ON (II). Check the gauges and indicator lights in the ...

Owner's Manual
Page 297
... chips and scratches in the paint as soon as you discover them. Removal of the vehicle stays damp, promoting corrosion in that use road salt in... body cavities. Use a high-pressure spray to clean the underside of the doors and body. It is especially important in areas that area. 2. Inspect and... and areas subject to salt air. This dampness can help keep your Honda. Appearance Care Corrosion Protection Two factors normally contribute to causing corrosion in ...wheel. You can eventually cause the floor panels to corrode. Be careful of the vehicle. Carpeting and floor mats may...
... chips and scratches in the paint as soon as you discover them. Removal of the vehicle stays damp, promoting corrosion in that use road salt in... body cavities. Use a high-pressure spray to clean the underside of the doors and body. It is especially important in areas that area. 2. Inspect and... and areas subject to salt air. This dampness can help keep your Honda. Appearance Care Corrosion Protection Two factors normally contribute to causing corrosion in ...wheel. You can eventually cause the floor panels to corrode. Be careful of the vehicle. Carpeting and floor mats may...
Owner's Manual
Page 356
...that Burn...217 PGM-FI System...341 Polishing and Waxing...295 Power Sliding Doors Indicator...64, 98 Operation...94 Switches...94 Pre-Drive Safety Checklist...11 Pregnancy... Reclining the Third Seat...106 Reminder Lights...61 Remote Audio Controls...191 Remote Transmitter...85 Removing the Second Seats...114 Replacement Information Air Cleaner Element...262 Coolant...255 Engine Oil and ... Engine...315 Owner Maintenance Checks...247 Oxygenated Fuels...338 Paint Touch-up...295 Panel Brightness Control...71 Park Gear Position...213 Parking...217 Parking Brake...122 Radiator Overheating...315 ...
...that Burn...217 PGM-FI System...341 Polishing and Waxing...295 Power Sliding Doors Indicator...64, 98 Operation...94 Switches...94 Pre-Drive Safety Checklist...11 Pregnancy... Reclining the Third Seat...106 Reminder Lights...61 Remote Audio Controls...191 Remote Transmitter...85 Removing the Second Seats...114 Replacement Information Air Cleaner Element...262 Coolant...255 Engine Oil and ... Engine...315 Owner Maintenance Checks...247 Oxygenated Fuels...338 Paint Touch-up...295 Panel Brightness Control...71 Park Gear Position...213 Parking...217 Parking Brake...122 Radiator Overheating...315 ...


