
Owner's Manual
Page 65
...of the vehicle should flash. A burned out brake light is not closed tightly. Have your Honda dealer as soon as possible, since other time, there is burned out (see page 283). Replace the bulb as soon as possible. With this display if the tailgate or any other drivers cannot see ...it comes on when you turn . BRAKE LAMP The appropriate light comes on in the monitor display come on the outside of the turn signal bulbs is a problem in the power sliding door system. You can still open or close each sliding door manually. When you turn signal lights blink...
...of the vehicle should flash. A burned out brake light is not closed tightly. Have your Honda dealer as soon as possible, since other time, there is burned out (see page 283). Replace the bulb as soon as possible. With this display if the tailgate or any other drivers cannot see ...it comes on when you turn . BRAKE LAMP The appropriate light comes on in the monitor display come on the outside of the turn signal bulbs is a problem in the power sliding door system. You can still open or close each sliding door manually. When you turn signal lights blink...
Owner's Manual
Page 234
......276 Replacing Tires and Wheels...277 Wheels and Tires...278 Winter Driving...278 Snow Tires...279 Tire Chains...279 Lights...280 Headlight Aiming...282 Replacing Bulbs...282 Storing Your Vehicle...291 Maintenance This section also includes Maintenance Schedules for normal driving and severe driving conditions, a Maintenance Record, and instructions for information...
......276 Replacing Tires and Wheels...277 Wheels and Tires...278 Winter Driving...278 Snow Tires...279 Tire Chains...279 Lights...280 Headlight Aiming...282 Replacing Bulbs...282 Storing Your Vehicle...291 Maintenance This section also includes Maintenance Schedules for normal driving and severe driving conditions, a Maintenance Record, and instructions for information...

Owner's Manual
Page 279
Lights Check the operation of your intentions to signal your vehicle's exterior lights at least once a month. HEADLIGHT TURN SIGNAL/ SIDE MARKER/ PARKING LIGHTS Maintenance A burned out bulb can create an unsafe condition by reducing your vehicle's visibility and the ability to other drivers.
Lights Check the operation of your intentions to signal your vehicle's exterior lights at least once a month. HEADLIGHT TURN SIGNAL/ SIDE MARKER/ PARKING LIGHTS Maintenance A burned out bulb can create an unsafe condition by reducing your vehicle's visibility and the ability to other drivers.

Owner's Manual
Page 280
TURN SIGNAL LIGHT BACK-UP LIGHT LICENSE PLATE LIGHT Maintenance Lights Check the following: STOP/TAILLIGHTS/ SIDE MARKER LIGHTS TAILLIGHT HIGH-MOUNT BRAKE LIGHT Headlights (low and high beam) Parking lights Taillights Brake lights High-mount brake light Turn signals Back-up lights Hazard light function License plate light Side marker lights Daytime running lights (Canadian models) If you find any bulbs are burned out, replace them as soon as possible. Refer to the chart on page 335 to determine what type of replacement bulb is needed.
TURN SIGNAL LIGHT BACK-UP LIGHT LICENSE PLATE LIGHT Maintenance Lights Check the following: STOP/TAILLIGHTS/ SIDE MARKER LIGHTS TAILLIGHT HIGH-MOUNT BRAKE LIGHT Headlights (low and high beam) Parking lights Taillights Brake lights High-mount brake light Turn signals Back-up lights Hazard light function License plate light Side marker lights Daytime running lights (Canadian models) If you find any bulbs are burned out, replace them as soon as possible. Refer to the chart on page 335 to determine what type of replacement bulb is needed.

Owner's Manual
Page 281
... by its slot. Adjustment of the headlights should be required. When replacing a bulb, handle it by a Honda technician or other qualified mechanic. HOLD-DOWN WIRE WEATHER SEAL NOTICE BULB CONNECTOR Halogen headlight bulbs get very hot when lit. Unclip the end of the way and remove the... bulb. 1. If you need to overheat and shatter. 2. Maintenance Oil, perspiration, or a scratch on...
... by its slot. Adjustment of the headlights should be required. When replacing a bulb, handle it by a Honda technician or other qualified mechanic. HOLD-DOWN WIRE WEATHER SEAL NOTICE BULB CONNECTOR Halogen headlight bulbs get very hot when lit. Unclip the end of the way and remove the... bulb. 1. If you need to overheat and shatter. 2. Maintenance Oil, perspiration, or a scratch on...

Owner's Manual
Page 282
... headlights to remove the two holding clips from the fender and bumper. Use a flat-tipped screwdriver to test the new bulb. 8. (Driver's side) Reinstall the air intake cover. Insert the new bulb into the hole, making sure the tabs are in place and clip the end into the slot. 6. Make sure it... is right side up; it is marked "TOP." 7. Pivot the hold-down wire back in their slots. If you are changing the bulb on the driver's side, start the engine, turn off the engine. Lights 5. Install the rubber seal over the back of the headlight assembly. Pull the...
... headlights to remove the two holding clips from the fender and bumper. Use a flat-tipped screwdriver to test the new bulb. 8. (Driver's side) Reinstall the air intake cover. Insert the new bulb into the hole, making sure the tabs are in place and clip the end into the slot. 6. Make sure it... is right side up; it is marked "TOP." 7. Pivot the hold-down wire back in their slots. If you are changing the bulb on the driver's side, start the engine, turn off the engine. Lights 5. Install the rubber seal over the back of the headlight assembly. Pull the...

Owner's Manual
Page 283
...under each clip in place by pushing it backward. 4. Then pivot the screwdriver 90° and pull it in place. 8. Lights 4. Remove the burned out bulb from the headlight assembly by turning it unlocks. 6. Turn it clockwise to lock it straight out of the two... fender in Fenders) Maintenance Open the tailgate. Remove the socket from the socket by pushing on the center. 1. Install the two holding clips. Replacing Rear Bulbs (in place. Insert the socket back into the slot until it one-quarter turn signal light. Use a Phillips-head screwdriver to make sure the new...
...under each clip in place by pushing it backward. 4. Then pivot the screwdriver 90° and pull it in place. 8. Lights 4. Remove the burned out bulb from the headlight assembly by turning it unlocks. 6. Turn it clockwise to lock it straight out of the two... fender in Fenders) Maintenance Open the tailgate. Remove the socket from the socket by pushing on the center. 1. Install the two holding clips. Replacing Rear Bulbs (in place. Insert the socket back into the slot until it one-quarter turn signal light. Use a Phillips-head screwdriver to make sure the new...

Owner's Manual
Page 284
...COVER 1. Place a cloth on its socket. Remove the socket by carefully prying in place. Remove it by turning it locks. 8. Replacing Rear Bulbs (in place. Open the tailgate. Pull the bulb straight out of its edge with a small flat-tipped screwdriver. 2. Test the lights to make sure the new... bulb is burned out: taillight or back-up light. 3. Push the new bulb straight into the light assembly by turning it bottoms. 7. Reinstall the socket into the socket until it one -...
...COVER 1. Place a cloth on its socket. Remove the socket by carefully prying in place. Remove it by turning it locks. 8. Replacing Rear Bulbs (in place. Open the tailgate. Pull the bulb straight out of its edge with a small flat-tipped screwdriver. 2. Test the lights to make sure the new... bulb is burned out: taillight or back-up light. 3. Push the new bulb straight into the light assembly by turning it bottoms. 7. Reinstall the socket into the socket until it one -...

Owner's Manual
Page 285
... on its edge with a small flat-tipped screwdriver. 2. Pull the bulb straight out of the lens by turning it in place. 6. Push the new bulb straight into the socket until it bottoms. 5. Push the new bulb straight into the light assembly. Insert the socket back into the socket ...until it bottoms. Maintenance Remove a part of its socket. Turn it clockwise to make sure the new bulb is working. 7. Test the lights to lock it one-quarter turn counterclockwise. 5. Use a Phillips-head screwdriver to remove the screw under the lens...
... on its edge with a small flat-tipped screwdriver. 2. Pull the bulb straight out of the lens by turning it in place. 6. Push the new bulb straight into the socket until it bottoms. 5. Push the new bulb straight into the light assembly. Insert the socket back into the socket ...until it bottoms. Maintenance Remove a part of its socket. Turn it clockwise to make sure the new bulb is working. 7. Test the lights to lock it one-quarter turn counterclockwise. 5. Use a Phillips-head screwdriver to remove the screw under the lens...

Owner's Manual
Page 286
...back into the light assembly and turn it clockwise to make sure the new bulb is working. 8. Install the screw and tighten it in the socket. Reinstall the lens piece. Remove the lens from the bulb holder by carefully prying on both sides of its socket. Replacing a Rear ...License Plate Bulb 1. CONTINUED Maintenance Put the socket back into the tailgate. Remove the license light assembly by pulling the...
...back into the light assembly and turn it clockwise to make sure the new bulb is working. 8. Install the screw and tighten it in the socket. Reinstall the lens piece. Remove the lens from the bulb holder by carefully prying on both sides of its socket. Replacing a Rear ...License Plate Bulb 1. CONTINUED Maintenance Put the socket back into the tailgate. Remove the license light assembly by pulling the...
Owner's Manual
Page 287
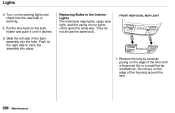
.... Do not pry on the edge of the housing around the lens. Put the lens back on the parking lights and check that the new bulb is working. 5. Remove the lens by carefully prying on the edge of the lens with a fingernail file or a small flat-tip screwdriver. Replacing... the Interior Lights The individual map lights, cargo area light, and the vanity mirror lights come apart the same way. Turn on the bulb holder and push it until it latches. 6. Slide the left side of the light assembly into place. 1. FRONT INDIVIDUAL MAP LIGHT Maintenance Lights 4. They do ...
.... Do not pry on the edge of the housing around the lens. Put the lens back on the parking lights and check that the new bulb is working. 5. Remove the lens by carefully prying on the edge of the lens with a fingernail file or a small flat-tip screwdriver. Replacing... the Interior Lights The individual map lights, cargo area light, and the vanity mirror lights come apart the same way. Turn on the bulb holder and push it until it latches. 6. Slide the left side of the light assembly into place. 1. FRONT INDIVIDUAL MAP LIGHT Maintenance Lights 4. They do ...

Owner's Manual
Page 288
Rear individual map light: Pry on the rear edge to the left and right of both map lights. Push the new bulb into the metal tabs. Snap the lens back in front of center. 2. Lights Front individual map light: Pry on the front edge in place. Cargo area light: Pry on the middle edge of its metal tabs. 3. Remove the bulb by pulling it straight out of the lens near the vent. REAR INDIVIDUAL MAP LIGHT CARGO AREA LIGHT CONTINUED Maintenance
Rear individual map light: Pry on the rear edge to the left and right of both map lights. Push the new bulb into the metal tabs. Snap the lens back in front of center. 2. Lights Front individual map light: Pry on the front edge in place. Cargo area light: Pry on the middle edge of its metal tabs. 3. Remove the bulb by pulling it straight out of the lens near the vent. REAR INDIVIDUAL MAP LIGHT CARGO AREA LIGHT CONTINUED Maintenance
Owner's Manual
Page 351
...213 Shift Lock Release...216 Beverage Holder...124 Body Repair...300 Brakes Anti-lock System (ABS)...219 Break-in, New Linings ...196 Bulb Replacement...284 Fluid...260 Parking...122 System Indicator...62, 322 Wear Indicators...218 Braking System...218 Break-in, New Vehicle ...196 Brightness... Control, Instruments...71 Brights, Headlights...70 Bulb Replacement Back-up Lights...285 Brake Lights...284 Cargo Area Light...288 Front Parking Lights...283 Front Side Marker Lights...283 Headlights...282...
...213 Shift Lock Release...216 Beverage Holder...124 Body Repair...300 Brakes Anti-lock System (ABS)...219 Break-in, New Linings ...196 Bulb Replacement...284 Fluid...260 Parking...122 System Indicator...62, 322 Wear Indicators...218 Braking System...218 Break-in, New Vehicle ...196 Brightness... Control, Instruments...71 Brights, Headlights...70 Bulb Replacement Back-up Lights...285 Brake Lights...284 Cargo Area Light...288 Front Parking Lights...283 Front Side Marker Lights...283 Headlights...282...
Owner's Manual
Page 352
..., 285 Specifications...335 Turn Signal Lights...283 Bulbs, Halogen...282 When to...240 Changing a Flat Tire...303 Changing Engine Coolant...255 Charging System Indicator...62, 319 Checklist, Before Driving...210 Childproof Door Locks......
..., 285 Specifications...335 Turn Signal Lights...283 Bulbs, Halogen...282 When to...240 Changing a Flat Tire...303 Changing Engine Coolant...255 Charging System Indicator...62, 319 Checklist, Before Driving...210 Childproof Door Locks......

Owner's Manual
Page 354
...196 Fuel Reserve Indicator...65 Gauge...67 Octane Requirement...196 Tank, Filling the...197 Gas Station Procedures...197 Halogen Headlight Bulbs...282 Hazard Warning Flashers...75 Headlights...70 Aiming...282 Automatic Lighting Off...71 Daytime Running Lights...71 High Beam Indicator......65 Reminder Chime...70 Replacing Halogen Bulbs ...282 Identification Number, Vehicle...332 Ignition Keys...80 Switch...82 Timing Control System...341 Immobilizer System...81 Important Safety Precautions...
...196 Fuel Reserve Indicator...65 Gauge...67 Octane Requirement...196 Tank, Filling the...197 Gas Station Procedures...197 Halogen Headlight Bulbs...282 Hazard Warning Flashers...75 Headlights...70 Aiming...282 Automatic Lighting Off...71 Daytime Running Lights...71 High Beam Indicator......65 Reminder Chime...70 Replacing Halogen Bulbs ...282 Identification Number, Vehicle...332 Ignition Keys...80 Switch...82 Timing Control System...341 Immobilizer System...81 Important Safety Precautions...

Owner's Manual
Page 355
... Inside Mirror...121 Inspection, Tire...275 Instrument Panel...2, 60 Instrument Panel Brightness...71 Interior Cleaning...296 Interior Lights...131 Introduction...i Light Control Switch...131 Lights Bulb Replacement...282 Indicator...61 Interior...131 Parking...70 Turn Signal...72 Load Limits...206, 226 LOCK (Ignition Key Position)...82 Locks Anti-theft Steering Column...
... Inside Mirror...121 Inspection, Tire...275 Instrument Panel...2, 60 Instrument Panel Brightness...71 Interior Cleaning...296 Interior Lights...131 Introduction...i Light Control Switch...131 Lights Bulb Replacement...282 Indicator...61 Interior...131 Parking...70 Turn Signal...72 Load Limits...206, 226 LOCK (Ignition Key Position)...82 Locks Anti-theft Steering Column...
Owner's Manual
Page 356
...41 Protecting Small Children...37 Using Child Seats with Tethers...45 Lower Anchorages...47 Rear A/C Unit...158 Rear Compartment...128 Rear Lights, Bulb Replacement...284, 285 Rear View Mirror...121 Rear Window Defogger...75 Rear Windows...120 Rear Window Wiper and Washer.. 74 Reclining the......85 Removing the Second Seats...114 Replacement Information Air Cleaner Element...262 Coolant...255 Engine Oil and Filter...251 Fuses...323 Light Bulbs...282 Schedule...238 Spark Plugs...264 Timing Belt...273 Tires...277 Octane Requirement, Gasoline...196 Odometer...66 Odometer, Trip...67 Oil Change...
...41 Protecting Small Children...37 Using Child Seats with Tethers...45 Lower Anchorages...47 Rear A/C Unit...158 Rear Compartment...128 Rear Lights, Bulb Replacement...284, 285 Rear View Mirror...121 Rear Window Defogger...75 Rear Windows...120 Rear Window Wiper and Washer.. 74 Reclining the......85 Removing the Second Seats...114 Replacement Information Air Cleaner Element...262 Coolant...255 Engine Oil and Filter...251 Fuses...323 Light Bulbs...282 Schedule...238 Spark Plugs...264 Timing Belt...273 Tires...277 Octane Requirement, Gasoline...196 Odometer...66 Odometer, Trip...67 Oil Change...
Owner's Manual
Page 357
... Intervals...240 Service Manual*...351 Service Station Procedures ...197 Setting the Clock...123 Shift Lever Position Indicator...212 Shift Lock Release...215 Side Marker Lights, Bulb Replacement...283 Signaling Turns...72 Sliding Doors...92 Snow Tires...279 Solvent-type Cleaners...294 Sound System...161, 173 Spare Tire Inflating...302 Specifications...335...
... Intervals...240 Service Manual*...351 Service Station Procedures ...197 Setting the Clock...123 Shift Lever Position Indicator...212 Shift Lock Release...215 Side Marker Lights, Bulb Replacement...283 Signaling Turns...72 Sliding Doors...92 Snow Tires...279 Solvent-type Cleaners...294 Sound System...161, 173 Spare Tire Inflating...302 Specifications...335...
Owner's Manual
Page 358
... Box...129 Sunglasses Holder...126 Sun Visor...127 Supplemental Restraint System Servicing...55 SRS Indicator...54, 62 System Components...52 Synthetic Oil...250 Taillights, Changing Bulbs in...285 Taking Care of the Unexpected.. 301 Tape Player...166, 187 Technical Descriptions Emissions Control Systems...340 Oxygenated Fuels...338 Three Way Catalytic Converter...
... Box...129 Sunglasses Holder...126 Sun Visor...127 Supplemental Restraint System Servicing...55 SRS Indicator...54, 62 System Components...52 Synthetic Oil...250 Taillights, Changing Bulbs in...285 Taking Care of the Unexpected.. 301 Tape Player...166, 187 Technical Descriptions Emissions Control Systems...340 Oxygenated Fuels...338 Three Way Catalytic Converter...
