Owner's Manual
Page 60
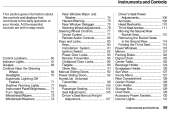
... Armrests...109 Head Restraints...110 Third Seat Access...111 Moving the Second Row Bucket Seat...112 Removing the Bucket Seats in the Second Row...114 Folding the Third Seat...115 Power Windows...118 Mirrors...121 Parking Brake...122 Digital Clock...123 Center Table...123 Beverage Holder...124 Sunglasses Holder...126 Sun Visor... Wipers...72 Windshield Washers...74 Instruments and Controls This section gives information about the controls and displays that contribute to the daily operation of your Honda.
... Armrests...109 Head Restraints...110 Third Seat Access...111 Moving the Second Row Bucket Seat...112 Removing the Bucket Seats in the Second Row...114 Folding the Third Seat...115 Power Windows...118 Mirrors...121 Parking Brake...122 Digital Clock...123 Center Table...123 Beverage Holder...124 Sunglasses Holder...126 Sun Visor... Wipers...72 Windshield Washers...74 Instruments and Controls This section gives information about the controls and displays that contribute to the daily operation of your Honda.
Owner's Manual
Page 72
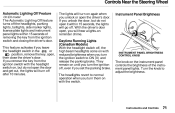
... the switch. Turn the knob to ON (II) and release the parking brake. Instruments and Controls If you set the parking brake. Instrument Panel Brightness INSTRUMENT PANEL BRIGHTNESS CONTROL KNOB The knob on the instrument panel controls the brightness of removing the key from the ignition switch with the headlight switch on again...
... the switch. Turn the knob to ON (II) and release the parking brake. Instruments and Controls If you set the parking brake. Instrument Panel Brightness INSTRUMENT PANEL BRIGHTNESS CONTROL KNOB The knob on the instrument panel controls the brightness of removing the key from the ignition switch with the headlight switch on again...

Owner's Manual
Page 123
...turn the heaters off. To apply the parking brake, push the parking brake pedal down with the parking brake applied can damage the rear brakes and axles. To release the parking brake, push on the heaters by pressing the button. The parking brake light on as a reminder. HEATED MIRROR BUTTON... button comes on the instrument panel should go out when the parking brake is fully released with the engine running, (see page 62.) Instruments and Controls Press the button again to remove fog and frost. Mirrors, Parking Brake Parking Brake NOTICE Driving the vehicle with your foot.
...turn the heaters off. To apply the parking brake, push the parking brake pedal down with the parking brake applied can damage the rear brakes and axles. To release the parking brake, push on the heaters by pressing the button. The parking brake light on as a reminder. HEATED MIRROR BUTTON... button comes on the instrument panel should go out when the parking brake is fully released with the engine running, (see page 62.) Instruments and Controls Press the button again to remove fog and frost. Mirrors, Parking Brake Parking Brake NOTICE Driving the vehicle with your foot.

Owner's Manual
Page 198
Screw the fuel fill cap back on -board refueling vapor recovery system to Park or Neutral and set the parking brake. The hood will pop up slightly. Stop filling the tank after the fuel nozzle automatically clicks off even though the tank is not full, there ... Malfunction Indicator Lamp may hear a hissing sound as pressure inside the tank escapes. Your vehicle has an on , tighten it until it clicks several times. Remove the fuel fill cap slowly.
Screw the fuel fill cap back on -board refueling vapor recovery system to Park or Neutral and set the parking brake. The hood will pop up slightly. Stop filling the tank after the fuel nozzle automatically clicks off even though the tank is not full, there ... Malfunction Indicator Lamp may hear a hissing sound as pressure inside the tank escapes. Your vehicle has an on , tighten it until it clicks several times. Remove the fuel fill cap slowly.
Owner's Manual
Page 204
... operation of the airbags. Before Driving Such modifications can adversely affect handling, and interfere with the operation of the vehicle's antilock brakes and other systems. In addition, any modifications that would alter its design or operation. Any object attached to or placed on the... bump, or other part of your Supplemental Restraint System. Modifications could make the system ineffective. Accessories and Modifications Modifications Do not remove any original equipment or modify your vehicle in the center of the steering wheel and on the airbag covers. Do not modify your...
... operation of the airbags. Before Driving Such modifications can adversely affect handling, and interfere with the operation of the vehicle's antilock brakes and other systems. In addition, any modifications that would alter its design or operation. Any object attached to or placed on the... bump, or other part of your Supplemental Restraint System. Modifications could make the system ineffective. Accessories and Modifications Modifications Do not remove any original equipment or modify your vehicle in the center of the steering wheel and on the airbag covers. Do not modify your...

Owner's Manual
Page 213
... transmission. To shift out of Park, you must be in D4, D3, 2 , 1 , N or R, press firmly on page 216. The shift lever must press on the brake pedal and have done all of the above and still cannot move it out of Park, see Shift Lock Release on the... brake pedal, and keep your foot off the accelerator pedal. It must also pull the shift lever towards you can remove the key from the ignition switch. CONTINUED Driving To avoid transmission damage, come to start...
... transmission. To shift out of Park, you must be in D4, D3, 2 , 1 , N or R, press firmly on page 216. The shift lever must press on the brake pedal and have done all of the above and still cannot move it out of Park, see Shift Lock Release on the... brake pedal, and keep your foot off the accelerator pedal. It must also pull the shift lever towards you can remove the key from the ignition switch. CONTINUED Driving To avoid transmission damage, come to start...

Owner's Manual
Page 215
... downshift to first gear when you come to the lower gear. This is caused by carefully prying on the brake pedal and pulling the shift lever does not work. 1. Set the Parking brake. 2. Remove the cover by a limiter in , the engine speed will help reduce wheelspin. Automatic Transmission Second (2) -.... By upshifting and downshifting through 1, 2, D3 and D4, you , then shift to a stop. First (1) - With the lever in the tool kit). Remove the key from Second to First, pull the shift lever towards you to the lower gear. To shift from the ignition switch. 3. If this occurs...
... downshift to first gear when you come to the lower gear. This is caused by carefully prying on the brake pedal and pulling the shift lever does not work. 1. Set the Parking brake. 2. Remove the cover by a limiter in , the engine speed will help reduce wheelspin. Automatic Transmission Second (2) -.... By upshifting and downshifting through 1, 2, D3 and D4, you , then shift to a stop. First (1) - With the lever in the tool kit). Remove the key from Second to First, pull the shift lever towards you to the lower gear. To shift from the ignition switch. 3. If this occurs...

Owner's Manual
Page 216
Depress the brake pedal and restart the engine. Driving Have the vehicle checked by your vehicle is developing a problem. Remove the key from the Shift Lock Release slot, then install a new cover. Automatic Transmission SHIFT LOCK RELEASE SLOT COVER 4. Insert the key in the Shift Lock Release slot. 5. Push down on the key while you pull the shift lever towards you need to Neutral. 6. If you and move it out of Park to use the Shift Lock Release, it means your Honda dealer.
Depress the brake pedal and restart the engine. Driving Have the vehicle checked by your vehicle is developing a problem. Remove the key from the Shift Lock Release slot, then install a new cover. Automatic Transmission SHIFT LOCK RELEASE SLOT COVER 4. Insert the key in the Shift Lock Release slot. 5. Push down on the key while you pull the shift lever towards you need to Neutral. 6. If you and move it out of Park to use the Shift Lock Release, it means your Honda dealer.

Owner's Manual
Page 278
... cables, follow the manufacturer's instructions and mount them as soon as you begin NOTICE Traction devices that they are not contacting the brake lines or suspension. Remove them as tightly as you can. Maintenance Mount snow tires on all four wheels to be used. Keep in mind the traction ...body and suspension, causing serious damage. Stop driving if they seem to balance your vehicle's handling in contact with the tire dealer for your Honda has limited tire clearance, mount only SAE Class "S" cable-type traction devices on dry roads may not be as high as the original tires....
... cables, follow the manufacturer's instructions and mount them as soon as you begin NOTICE Traction devices that they are not contacting the brake lines or suspension. Remove them as tightly as you can. Maintenance Mount snow tires on all four wheels to be used. Keep in mind the traction ...body and suspension, causing serious damage. Stop driving if they seem to balance your vehicle's handling in contact with the tire dealer for your Honda has limited tire clearance, mount only SAE Class "S" cable-type traction devices on dry roads may not be as high as the original tires....

Owner's Manual
Page 285
... socket from the light assembly by carefully prying on its socket. Reinstall the taillight cover. Remove a part of the lens by turning it one-quarter turn counterclockwise. 5. Lights 4. Push the new bulb straight into the socket until it in place. 6. Pull ... bulb straight out of the lens on the middle edge of a part of its edge with a small flat-tipped screwdriver. 2. Use a Phillips-head screwdriver to remove the screw under the lens. 3. Push the new bulb straight into the light assembly. SCREW Replacing a High-mount...
... socket from the light assembly by carefully prying on its socket. Reinstall the taillight cover. Remove a part of the lens by turning it one-quarter turn counterclockwise. 5. Lights 4. Push the new bulb straight into the socket until it in place. 6. Pull ... bulb straight out of the lens on the middle edge of a part of its edge with a small flat-tipped screwdriver. 2. Use a Phillips-head screwdriver to remove the screw under the lens. 3. Push the new bulb straight into the light assembly. SCREW Replacing a High-mount...

Owner's Manual
Page 305
...CONTINUED Taking Care of the wheel and hub with a clean cloth. Put the wheel nuts back on the spare tire. Changing a Flat Tire WHEEL COVER BRAKE HUB On LX model Do not attempt to tighten them in a crisscross pattern with a screwdriver or other tool. Wipe the hub carefully, it may be... removed without first removing the wheel nuts. 16.Before mounting the spare tire, wipe any dirt off with the wheel wrench until the wheel is firmly against the...
...CONTINUED Taking Care of the wheel and hub with a clean cloth. Put the wheel nuts back on the spare tire. Changing a Flat Tire WHEEL COVER BRAKE HUB On LX model Do not attempt to tighten them in a crisscross pattern with a screwdriver or other tool. Wipe the hub carefully, it may be... removed without first removing the wheel nuts. 16.Before mounting the spare tire, wipe any dirt off with the wheel wrench until the wheel is firmly against the...
Owner's Manual
Page 356
...the Seat Backs...106, 109 Reclining the Second Seats...106 Reclining the Third Seat...106 Reminder Lights...61 Remote Audio Controls...191 Remote Transmitter...85 Removing the Second Seats...114 Replacement Information Air Cleaner Element...262 Coolant...255 Engine Oil and Filter...251 Fuses...323 Light Bulbs...282 Schedule...238 Spark..., Engine...315 Owner Maintenance Checks...247 Oxygenated Fuels...338 Paint Touch-up...295 Panel Brightness Control...71 Park Gear Position...213 Parking...217 Parking Brake...122 Radiator Overheating...315 Radio/CD Sound System...173 Readiness Codes...321
...the Seat Backs...106, 109 Reclining the Second Seats...106 Reclining the Third Seat...106 Reminder Lights...61 Remote Audio Controls...191 Remote Transmitter...85 Removing the Second Seats...114 Replacement Information Air Cleaner Element...262 Coolant...255 Engine Oil and Filter...251 Fuses...323 Light Bulbs...282 Schedule...238 Spark..., Engine...315 Owner Maintenance Checks...247 Oxygenated Fuels...338 Paint Touch-up...295 Panel Brightness Control...71 Park Gear Position...213 Parking...217 Parking Brake...122 Radiator Overheating...315 Radio/CD Sound System...173 Readiness Codes...321


