Owner's Manual
Page 4
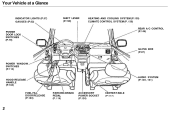
Your Vehicle at a Glance INDICATOR LIGHTS (P.57) GAUGES (P.62) SHIFT LEVER (P.199) HEATING AND COOLING SYSTEM (P.130) CLIMATE CONTROL SYSTEM (P. 138) REAR A/C CONTROL (P.146) POWER DOOR LOCK SWITCHES (P.79) GLOVE BOX (P.87) POWER WINDOW SWITCHES (P.113) HOOD RELEASE HANDLE (P.184) CENTER TABLE (P:117) AUDIO SYSTEM (P.149, 161) FUEL FILL DOOR RELEASE (P.183) PARKING BRAKE PEDAL (P. 116) ACCESSORY POWER SOCKET (P.124)
Your Vehicle at a Glance INDICATOR LIGHTS (P.57) GAUGES (P.62) SHIFT LEVER (P.199) HEATING AND COOLING SYSTEM (P.130) CLIMATE CONTROL SYSTEM (P. 138) REAR A/C CONTROL (P.146) POWER DOOR LOCK SWITCHES (P.79) GLOVE BOX (P.87) POWER WINDOW SWITCHES (P.113) HOOD RELEASE HANDLE (P.184) CENTER TABLE (P:117) AUDIO SYSTEM (P.149, 161) FUEL FILL DOOR RELEASE (P.183) PARKING BRAKE PEDAL (P. 116) ACCESSORY POWER SOCKET (P.124)

Owner's Manual
Page 22
Do not attach or place objects on seat belts. Protecting Adults Do not put any accessories on the airbag covers. Devices intended to the airbag covers in the center of the steering wheel and on top of the dashboard, they could ...
Do not attach or place objects on seat belts. Protecting Adults Do not put any accessories on the airbag covers. Devices intended to the airbag covers in the center of the steering wheel and on top of the dashboard, they could ...

Owner's Manual
Page 43
... the child's neck, the child needs to wear the seat belt. To determine if a lap/shoulder belt properly fits a child, have the child put any accessories on page 15. This could cause very serious injuries during a crash. This could result in a crash. Then check how the belt fits.
... the child's neck, the child needs to wear the seat belt. To determine if a lap/shoulder belt properly fits a child, have the child put any accessories on page 15. This could cause very serious injuries during a crash. This could result in a crash. Then check how the belt fits.
Owner's Manual
Page 60
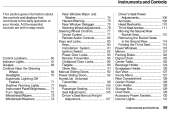
...easy reach. Instruments and Controls This section gives information about the controls and displays that contribute to the daily operation of your Honda. Rear Window Wiper and Washer...74 Hazard Warning...75 Rear Window Defogger...75 Steering Wheel Adjustment...76 Steering Wheel Controls...77 ...126 Sun Visor...127 Vanity Mirror...127 Rear Compartment...128 Center Pocket...128 Coin Holder...128 Storage Box...129 Coat Hook...129 Accessory Power Sockets...130 Interior Lights...131 Instruments and Controls Control Locations...60 Indicator Lights...61 Gauges...66 Controls Near the Steering Wheel...
...easy reach. Instruments and Controls This section gives information about the controls and displays that contribute to the daily operation of your Honda. Rear Window Wiper and Washer...74 Hazard Warning...75 Rear Window Defogger...75 Steering Wheel Adjustment...76 Steering Wheel Controls...77 ...126 Sun Visor...127 Vanity Mirror...127 Rear Compartment...128 Center Pocket...128 Coin Holder...128 Storage Box...129 Coat Hook...129 Accessory Power Sockets...130 Interior Lights...131 Instruments and Controls Control Locations...60 Indicator Lights...61 Gauges...66 Controls Near the Steering Wheel...
Owner's Manual
Page 64
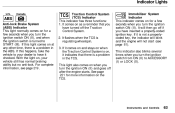
... this light comes on , it comes on and stays on when the Traction Control System is on at any other time, there is turned to ACCESSORY (I) or LOCK (0). For complete information, see page 81). TCS 2. If it indicates that you have it is regulating wheelspin. 3.
... this light comes on , it comes on and stays on when the Traction Control System is on at any other time, there is turned to ACCESSORY (I) or LOCK (0). For complete information, see page 81). TCS 2. If it indicates that you have it is regulating wheelspin. 3.
Owner's Manual
Page 71
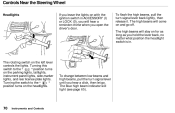
... will light (see page 65). Instruments and Controls Controls Near the Steering Wheel Headlights If you leave the lights on with the ignition switch in ACCESSORY (I) or LOCK (0), you will stay on for as long as you hold the lever back, no matter what position the headlight switch is in. To...
... will light (see page 65). Instruments and Controls Controls Near the Steering Wheel Headlights If you leave the lights on with the ignition switch in ACCESSORY (I) or LOCK (0), you will stay on for as long as you hold the lever back, no matter what position the headlight switch is in. To...
Owner's Manual
Page 82
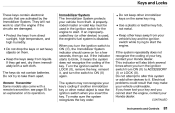
Remote Transmitter Immobilizer System The Immobilizer System protects your Honda dealer. Do not attempt to alter this system or add other devices to... key ring. If you have lost your key and you turn the ignition switch from ON (II) to ACCESSORY (I) or LOCK (0). see page 85 for the engine to start the engine if the circuits are activated by... your vehicle from your vehicle's key and the ignition switch while trying to start the engine, contact your Honda dealer. The keys do not contain batteries. To make your vehicle undriveable. Keep other keys away from theft...
Remote Transmitter Immobilizer System The Immobilizer System protects your Honda dealer. Do not attempt to alter this system or add other devices to... key ring. If you have lost your key and you turn the ignition switch from ON (II) to ACCESSORY (I) or LOCK (0). see page 85 for the engine to start the engine if the circuits are activated by... your vehicle from your vehicle's key and the ignition switch while trying to start the engine, contact your Honda dealer. The keys do not contain batteries. To make your vehicle undriveable. Keep other keys away from theft...

Owner's Manual
Page 83
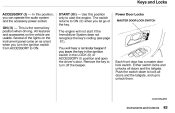
... the user's authority to operate the equipment. The shift lever must also be in slightly as you turn it difficult to turn the key from ACCESSORY to LOCK, you must accept any interference received, including interference that may not cause interference, and (2) this position. Instruments and Controls If the front wheels... right as you remove the key. The anti-theft lock will lock the steering column when you turn the key. It has four positions: LOCK (0) ACCESSORY (I) ON (II) START (III) Ignition Switch LOCK (0) - Firmly turn the steering wheel to the left or to...
... the user's authority to operate the equipment. The shift lever must also be in slightly as you turn it difficult to turn the key from ACCESSORY to LOCK, you must accept any interference received, including interference that may not cause interference, and (2) this position. Instruments and Controls If the front wheels... right as you remove the key. The anti-theft lock will lock the steering column when you turn the key. It has four positions: LOCK (0) ACCESSORY (I) ON (II) START (III) Ignition Switch LOCK (0) - Firmly turn the steering wheel to the left or to...
Owner's Manual
Page 84
... and open the driver's door. Use this position, you leave the key in the ignition switch in the LOCK (0) or ACCESSORY (I ) - CONTINUED Instruments and Controls In this position only to ON (II) when you let go of the lights on the instrument panel come on the ...vehicle are usable. This is the normal key position when driving. ON (II) - All features and accessories on as a test when you turn the ignition switch from ACCESSORY to turn off the beeper. START (III) - The switch returns to start if the Immobilizer System does not recognize the...
... and open the driver's door. Use this position, you leave the key in the ignition switch in the LOCK (0) or ACCESSORY (I ) - CONTINUED Instruments and Controls In this position only to ON (II) when you let go of the lights on the instrument panel come on the ...vehicle are usable. This is the normal key position when driving. ON (II) - All features and accessories on as a test when you turn the ignition switch from ACCESSORY to turn off the beeper. START (III) - The switch returns to start if the Immobilizer System does not recognize the...
Owner's Manual
Page 131
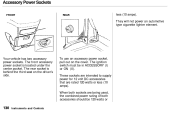
...the center pocket. These sockets are intended to supply power for 12 volt DC accessories that are being used, the combined power rating of both sockets are rated 120 watts or less (10 amps). To use an accessory power socket, pull out on the driver's side. The ignition switch must be... 120 watts or Instruments and Controls When both accessories should be in ACCESSORY (I) or ON (II). The front accessory power socket is behind the third seat on the cover....
...the center pocket. These sockets are intended to supply power for 12 volt DC accessories that are being used, the combined power rating of both sockets are rated 120 watts or less (10 amps). To use an accessory power socket, pull out on the driver's side. The ignition switch must be... 120 watts or Instruments and Controls When both accessories should be in ACCESSORY (I) or ON (II). The front accessory power socket is behind the third seat on the cover....
Owner's Manual
Page 134
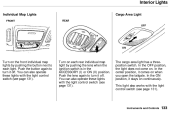
... FRONT REAR OFF Cargo Area Light ON Turn on the front individual map lights by pushing the lens when the ignition switch is in the ACCESSORY (I) or ON (II) position. The cargo area light has a threeposition switch. In the OFF position, the light does not come on continuously. Turn on when...
... FRONT REAR OFF Cargo Area Light ON Turn on the front individual map lights by pushing the lens when the ignition switch is in the ACCESSORY (I) or ON (II) position. The cargo area light has a threeposition switch. In the OFF position, the light does not come on continuously. Turn on when...
Owner's Manual
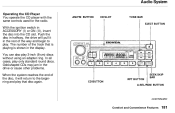
Page 163
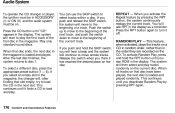
... reproduction on which way you push the switch, the system scans upward or downward from the current frequency. TUNE - The frequency numbers will be in ACCESSORY CD or ON (II) to change rapidly. SEEK - The SEEK function searches the band for a station with a strong signal.
... reproduction on which way you push the switch, the system scans upward or downward from the current frequency. TUNE - The frequency numbers will be in ACCESSORY CD or ON (II) to change rapidly. SEEK - The SEEK function searches the band for a station with a strong signal.
Owner's Manual
Page 170
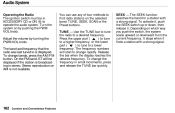
Using the instructions that is available from your dealer. It holds up to multiple discs) in the changer. Your dealer also has an accessory indash single CD player available that came with the same controls used for those relating to six discs, providing several hours of continuous entertainment. Audio ...
Using the instructions that is available from your dealer. It holds up to multiple discs) in the changer. Your dealer also has an accessory indash single CD player available that came with the same controls used for those relating to six discs, providing several hours of continuous entertainment. Audio ...
Owner's Manual
Page 171
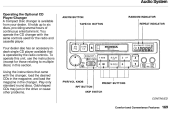
... continues until you will hear a beep and the system will start to play . If you push and hold the RPT button until "CD" appears in ACCESSORY (I) or ON (II) and the audio system must be in the display. This feature, when activated, plays the tracks on a CD in random order, rather...
... continues until you will hear a beep and the system will start to play . If you push and hold the RPT button until "CD" appears in ACCESSORY (I) or ON (II) and the audio system must be in the display. This feature, when activated, plays the tracks on a CD in random order, rather...

Owner's Manual
Page 175
... methods to operate the audio system. Stereo reproduction on either the or side, then release it , press the SEEK bar on AM is broadcasting in ACCESSORY CD or ON (II) to find radio stations on by turning the same knob. To activate it . Depending on which side you press, the system...
... methods to operate the audio system. Stereo reproduction on either the or side, then release it , press the SEEK bar on AM is broadcasting in ACCESSORY CD or ON (II) to find radio stations on by turning the same knob. To activate it . Depending on which side you press, the system...
Owner's Manual
Page 182
... ignition switch in halfway, the drive will pull it will return to play 3-inch (8-cm) discs without using an adapter ring. Push the disc in ACCESSORY (I) or ON (II), insert the disc into the CD slot. You can also play .
... ignition switch in halfway, the drive will pull it will return to play 3-inch (8-cm) discs without using an adapter ring. Push the disc in ACCESSORY (I) or ON (II), insert the disc into the CD slot. You can also play .
Owner's Manual
Page 195
... know what gasoline to use, and how to properly store luggage or packages. Break-in this section will help you plan to add any accessories to your Honda, you should know how to check the levels of important fluids. Before Driving Before you begin driving your vehicle, please read the information in... Filling the Fuel Tank...197 Opening the Hood...198 Oil Check...200 Engine Coolant Check...201 Fuel Economy...202 Vehicle Condition...202 Driving Habits...202 Accessories and Modifications...203 Carrying Cargo...205 Before Driving
... know what gasoline to use, and how to properly store luggage or packages. Break-in this section will help you plan to add any accessories to your Honda, you should know how to check the levels of important fluids. Before Driving Before you begin driving your vehicle, please read the information in... Filling the Fuel Tank...197 Opening the Hood...198 Oil Check...200 Engine Coolant Check...201 Fuel Economy...202 Vehicle Condition...202 Driving Habits...202 Accessories and Modifications...203 Carrying Cargo...205 Before Driving
Owner's Manual
Page 203
...-powered audio systems should not interfere with proper vehicle operation or performance. Have the installer contact your Honda dealer for universal applications. Accessories Your dealer has genuine Honda accessories that allow you make your vehicle unsafe. Improper accessories or modifications can affect your vehicle's handling, stability and performance, and cause a crash in this owner's manual...
...-powered audio systems should not interfere with proper vehicle operation or performance. Have the installer contact your Honda dealer for universal applications. Accessories Your dealer has genuine Honda accessories that allow you make your vehicle unsafe. Improper accessories or modifications can affect your vehicle's handling, stability and performance, and cause a crash in this owner's manual...
Owner's Manual
Page 204
... ground clearance increase the chance of undercarriage parts striking a curb, speed bump, or other part of your airbags to or placed on the airbag covers. Accessories and Modifications Modifications Do not remove any original equipment or modify your vehicle in the center of the steering wheel and on top of the...
... ground clearance increase the chance of undercarriage parts striking a curb, speed bump, or other part of your airbags to or placed on the airbag covers. Accessories and Modifications Modifications Do not remove any original equipment or modify your vehicle in the center of the steering wheel and on top of the...

Owner's Manual
Page 206
... seats cannot roll under the seats and interfere with the driver's ability to operate the pedals, or with the proper operation of all occupants, cargo, accessories, and the tongue weight if you can carry. The load for your vehicle is open, a passenger could be hurt or killed.
... seats cannot roll under the seats and interfere with the driver's ability to operate the pedals, or with the proper operation of all occupants, cargo, accessories, and the tongue weight if you can carry. The load for your vehicle is open, a passenger could be hurt or killed.
