Owner's Manual
Page 59
Instruments and Controls This section gives information about the controls and displays that contribute to the daily operation of your Honda. All the essential controls are within easy reach. Odometer ...66 Trip Meter ...67 Fuel Gauge ...67 Temperature Gauge ...68 Controls ... Armrest ...91 Rear Seat Access ...91 Head Restraints ...93 Folding Rear Seat ...94 Power Windows ...96 Moonroof ...98 Mirrors ...99 Adjusting the Power Mirrors ...99 Parking Brake ...100 Glove Box ...101 Beverage Holder ...102 Console Compartment ...102 Coin Box ...103 Center Pocket ...103 Accessory Power Socket ...103 ...
Instruments and Controls This section gives information about the controls and displays that contribute to the daily operation of your Honda. All the essential controls are within easy reach. Odometer ...66 Trip Meter ...67 Fuel Gauge ...67 Temperature Gauge ...68 Controls ... Armrest ...91 Rear Seat Access ...91 Head Restraints ...93 Folding Rear Seat ...94 Power Windows ...96 Moonroof ...98 Mirrors ...99 Adjusting the Power Mirrors ...99 Parking Brake ...100 Glove Box ...101 Beverage Holder ...102 Console Compartment ...102 Coin Box ...103 Center Pocket ...103 Accessory Power Socket ...103 ...

Owner's Manual
Page 73
Turn the knob on until you turn the ignition off , the high beam headlights come on with the switch. Controls Near the Steering Wheel Daytime Running Lights Canadian models only Instrument Panel Brightness With the headlight switch off , even if you turn them on with reduced brightness when you set the parking brake. Instruments and Controls 71 The headlights revert to normal operation when you turn the ignition switch to adjust the brightness of the instrument panel lights. They remain on the left side of the instrument panel to ON (II) and release the parking brake.
Turn the knob on until you turn the ignition off , the high beam headlights come on with the switch. Controls Near the Steering Wheel Daytime Running Lights Canadian models only Instrument Panel Brightness With the headlight switch off , even if you turn them on with reduced brightness when you set the parking brake. Instruments and Controls 71 The headlights revert to normal operation when you turn the ignition switch to adjust the brightness of the instrument panel lights. They remain on the left side of the instrument panel to ON (II) and release the parking brake.

Owner's Manual
Page 189
...vehicle reaches the maximum speed in any shift position, you need to get more power when climbing, and for better acceleration and increased engine braking. The engine will automatically ''kick down'' to run normally when you are moving the shift lever from Neutral to leave the vehicle for...Low (L) To shift to Low, press the release button on the brake pedal when you need to another position. Neutral (N) Use Neutral if you are going down a steep hill, or in stop first. The transmission automatically adjusts to keep the engine at higher speeds when it is caused by ...
...vehicle reaches the maximum speed in any shift position, you need to get more power when climbing, and for better acceleration and increased engine braking. The engine will automatically ''kick down'' to run normally when you are moving the shift lever from Neutral to leave the vehicle for...Low (L) To shift to Low, press the release button on the brake pedal when you need to another position. Neutral (N) Use Neutral if you are going down a steep hill, or in stop first. The transmission automatically adjusts to keep the engine at higher speeds when it is caused by ...

Owner's Manual
Page 195
... application of the brakes can forget some snow-driving techniques during daylight hours, turn on the inside (see clearly in all directions and being visible to react, even in these conditions. 193 This is more clearly during the summer months. A person can cause loss of driving while you adjust to drive in...
... application of the brakes can forget some snow-driving techniques during daylight hours, turn on the inside (see clearly in all directions and being visible to react, even in these conditions. 193 This is more clearly during the summer months. A person can cause loss of driving while you adjust to drive in...
Owner's Manual
Page 202
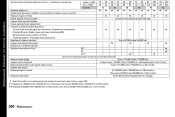
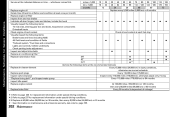
... once per month) Replace engine oil filter Check engine oil and coolant Inspect front and rear brakes Check parking brake adjustment Visually inspect the following items: Tie rod ends, steering gear box and boots, Suspension components Driveshaft boots, Brake hoses and lines (including ABS) All fluid levels and condition of fluids Exhaust system, Fuel...
... once per month) Replace engine oil filter Check engine oil and coolant Inspect front and rear brakes Check parking brake adjustment Visually inspect the following items: Tie rod ends, steering gear box and boots, Suspension components Driveshaft boots, Brake hoses and lines (including ABS) All fluid levels and condition of fluids Exhaust system, Fuel...
Owner's Manual
Page 203
.... Do items in A, E. Replace spark plugs. Do items in A, C, D. Inspect idle speed. Inspect and adjust drive belts. Replace brake fluid every 3 years (independent of fluids, and check for leaks. U.S. Replace transmission fluid (CVT) 2. Check parking brake adjustment. Check and adjust valve clearance, cold engine, only if noisy. A B Replace engine oil. Replace engine oil filter. Check...
.... Do items in A, E. Replace spark plugs. Do items in A, C, D. Inspect idle speed. Inspect and adjust drive belts. Replace brake fluid every 3 years (independent of fluids, and check for leaks. U.S. Replace transmission fluid (CVT) 2. Check parking brake adjustment. Check and adjust valve clearance, cold engine, only if noisy. A B Replace engine oil. Replace engine oil filter. Check...
Owner's Manual
Page 204
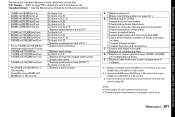
...and lines (including ABS) All fluid levels and condition of fluids Exhaust system, Fuel lines and connections Lights and controls, Vehicle underbody Check parking brake adjustment Inspect and adjust drive belts Replace air conditioning filter 1 Replace transmission fluid 24 36 48 60 Replace every 5,000 miles (8,000 km) or 6 months Check ...km) in dusty conditions, otherwise use normal schedule Every 110,000 miles (176,000 km) Inspect every 110,000 miles (176,000 km), otherwise adjust only if noisy Every 110,000 miles (176,000 km) or 84 months At 120,000 miles (192,000 km) or 120 months, then ...
...and lines (including ABS) All fluid levels and condition of fluids Exhaust system, Fuel lines and connections Lights and controls, Vehicle underbody Check parking brake adjustment Inspect and adjust drive belts Replace air conditioning filter 1 Replace transmission fluid 24 36 48 60 Replace every 5,000 miles (8,000 km) or 6 months Check ...km) in dusty conditions, otherwise use normal schedule Every 110,000 miles (176,000 km) Inspect every 110,000 miles (176,000 km), otherwise adjust only if noisy Every 110,000 miles (176,000 km) or 84 months At 120,000 miles (192,000 km) or 120 months, then ...
Owner's Manual
Page 205
...Do items in A, B. Do items in A, B. Inspect tie rod ends, steering gear box and boots. Inspect suspension components. Check parking brake adjustment. Inspect exhaust system. Maintenance Schedule C D for Severe Conditions. Do items in A. Canadian Owners 5,000 mil/8,000 km/6 mos 10,000 ...C, D, E. Owners Refer to page 198 to determine which schedule to use. Do items in A. Rotate tires (follow pattern on page 237). Replace brake fluid every 3 years independent of fluids, and check for leaks. Do items in A. Do items in A, B, C. Do items in A. Replace transmission ...
...Do items in A, B. Do items in A, B. Inspect tie rod ends, steering gear box and boots. Inspect suspension components. Check parking brake adjustment. Inspect exhaust system. Maintenance Schedule C D for Severe Conditions. Do items in A. Canadian Owners 5,000 mil/8,000 km/6 mos 10,000 ...C, D, E. Owners Refer to page 198 to determine which schedule to use. Do items in A. Rotate tires (follow pattern on page 237). Replace brake fluid every 3 years independent of fluids, and check for leaks. Do items in A. Do items in A, B, C. Do items in A. Replace transmission ...


