
Owner's Manual
Page 5
Your Vehicle at a Glance TRACTION CONTROL SYSTEM (P. 213) HEADLIGHTS/ TURN SIGNALS (P. 66/68) HAZARD WARNING LIGHTS (P. 70) DIGITAL CLOCK (P. 117) POWER SLIDING DOOR SWITCHES (P. 90) MIRROR CONTROLS (P. 115) REAR WINDOW DEFOGGER (P. 71) LIGHT CONTROL SWITCH (P. 125) HORN* CRUISE CONTROL (P. 73) REMOTE AUDIO CONTROLS (P. 185) (P. 72) STEERING WHEEL ADJUSTMENT CRUISE CONTROL (P. 73) WINDSHIELD WIPERS/WASHERS (P. 68/70) * : To use the horn, press the pad around the " H " logo.
Your Vehicle at a Glance TRACTION CONTROL SYSTEM (P. 213) HEADLIGHTS/ TURN SIGNALS (P. 66/68) HAZARD WARNING LIGHTS (P. 70) DIGITAL CLOCK (P. 117) POWER SLIDING DOOR SWITCHES (P. 90) MIRROR CONTROLS (P. 115) REAR WINDOW DEFOGGER (P. 71) LIGHT CONTROL SWITCH (P. 125) HORN* CRUISE CONTROL (P. 73) REMOTE AUDIO CONTROLS (P. 185) (P. 72) STEERING WHEEL ADJUSTMENT CRUISE CONTROL (P. 73) WINDSHIELD WIPERS/WASHERS (P. 68/70) * : To use the horn, press the pad around the " H " logo.
Owner's Manual
Page 56
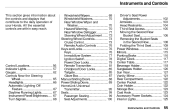
Instruments and Controls This section gives information about the controls and displays that contribute to the daily operation of your Honda. All the essential controls are within easy reach. Windshield Wipers...68 Windshield Washers...70 Rear Window Wiper and Washer...70 Hazard Warning...70 ... Power Sockets...124 Interior Lights...125 Instruments and Controls Control Locations...56 Indicator Lights...57 Gauges...62 Controls Near the Steering Wheel...65 Headlights...66 Automatic Lighting Off Feature...67 Daytime Running Lights...67 Instrument Panel Brightness...67 Turn Signals...68
Instruments and Controls This section gives information about the controls and displays that contribute to the daily operation of your Honda. All the essential controls are within easy reach. Windshield Wipers...68 Windshield Washers...70 Rear Window Wiper and Washer...70 Hazard Warning...70 ... Power Sockets...124 Interior Lights...125 Instruments and Controls Control Locations...56 Indicator Lights...57 Gauges...62 Controls Near the Steering Wheel...65 Headlights...66 Automatic Lighting Off Feature...67 Daytime Running Lights...67 Instrument Panel Brightness...67 Turn Signals...68

Owner's Manual
Page 62
...light come on (see page 67). Indicator Lights "Daytime Running Lights" Indicator Canadian models only This indicator lights when you turn on the headlights or release the parking brake. See page 66 for information on operating the cruise control. Low Fuel Indicator This light comes on when the ... Indicator Canadian models only This light comes on as a reminder that you turn the ignition switch to ON (II) with the high beam headlights. Add washer fluid when you set . Instruments and Controls It should go off and the parking brake set the cruise control. If it ...
...light come on (see page 67). Indicator Lights "Daytime Running Lights" Indicator Canadian models only This indicator lights when you turn on the headlights or release the parking brake. See page 66 for information on operating the cruise control. Low Fuel Indicator This light comes on when the ... Indicator Canadian models only This light comes on as a reminder that you turn the ignition switch to ON (II) with the high beam headlights. Add washer fluid when you set . Instruments and Controls It should go off and the parking brake set the cruise control. If it ...

Owner's Manual
Page 66
... windshield washers and wipers. POWER SLIDING DOOR TRACTION CONTROL SYSTEM WINDSHIELD WIPERS/WASHERS SHIFT LEVER HAZARD WARNING LIGHTS CRUISE CONTROL MIRROR CONTROL TILT ADJUSTMENT HORN* HEADLIGHTS/ TURN SIGNALS LIGHT CONTROL SWITCH REAR WINDOW DEFOGGER Instruments and Controls The switches for the TCS, the cruise control, the power sliding doors and the...
... windshield washers and wipers. POWER SLIDING DOOR TRACTION CONTROL SYSTEM WINDSHIELD WIPERS/WASHERS SHIFT LEVER HAZARD WARNING LIGHTS CRUISE CONTROL MIRROR CONTROL TILT ADJUSTMENT HORN* HEADLIGHTS/ TURN SIGNALS LIGHT CONTROL SWITCH REAR WINDOW DEFOGGER Instruments and Controls The switches for the TCS, the cruise control, the power sliding doors and the...

Owner's Manual
Page 67
... rotating switch on the parking lights, taillights, instrument panel lights, side-marker lights, and rear license plate lights. Controls Near the Steering Wheel Headlights If you leave the lights on with the ignition switch in . To change between low beams and high beams, pull the turn signal lever ... driver's door. Instruments and Controls The high beams will stay on for as long as you hold the lever back, no matter what position the headlight switch is in ACCESSORY (I) or LOCK (0), you will hear a reminder chime when you hear a click, then let go off. Turning this switch to ...
... rotating switch on the parking lights, taillights, instrument panel lights, side-marker lights, and rear license plate lights. Controls Near the Steering Wheel Headlights If you leave the lights on with the ignition switch in . To change between low beams and high beams, pull the turn signal lever ... driver's door. Instruments and Controls The high beams will stay on for as long as you hold the lever back, no matter what position the headlight switch is in ACCESSORY (I) or LOCK (0), you will hear a reminder chime when you hear a click, then let go off. Turning this switch to ...

Owner's Manual
Page 68
... INSTRUMENT PANEL BRIGHTNESS CONTROL KNOB The knob on the instrument panel controls the brightness of removing the key from the ignition switch with the headlight switch on with the switch. Instruments and Controls If you unlock or open the door and get out, the lights will turn off ... even if you will hear a lights-on with reduced brightness when you turn the ignition switch to adjust the brightness. If you leave the headlight switch in the or position, remove the key, open , you set the parking brake. This feature activates if you remove the key from the...
... INSTRUMENT PANEL BRIGHTNESS CONTROL KNOB The knob on the instrument panel controls the brightness of removing the key from the ignition switch with the headlight switch on with the switch. Instruments and Controls If you unlock or open the door and get out, the lights will turn off ... even if you will hear a lights-on with reduced brightness when you turn the ignition switch to adjust the brightness. If you leave the headlight switch in the or position, remove the key, open , you set the parking brake. This feature activates if you remove the key from the...

Owner's Manual
Page 83
... Panic Mode Panic mode allows you cannot open or close the sliding doors with the remote transmitter. When activated, the horn will sound, and the headlights, parking lights, side marker lights, taillights and instrument panel lights will not activate if the key is in the ON (II) position. Panic mode will...
... Panic Mode Panic mode allows you cannot open or close the sliding doors with the remote transmitter. When activated, the horn will sound, and the headlights, parking lights, side marker lights, taillights and instrument panel lights will not activate if the key is in the ON (II) position. Panic mode will...

Owner's Manual
Page 116
... appropriate edge of the adjustment switch to move a mirror out of the mirror to L (driver's side) or R (passenger's side). 3. The night position reduces glare from headlights behind you start driving.
... appropriate edge of the adjustment switch to move a mirror out of the mirror to L (driver's side) or R (passenger's side). 3. The night position reduces glare from headlights behind you start driving.

Owner's Manual
Page 217
... while you would in Bad Weather Driving Technique - Being able to see pages 135 and 145/150). To be used in wet weather. Inspect your headlights. Driving in dry weather. Abrupt steering wheel movements or sudden, hard application of control in these conditions. Have the windshield wiper blades replaced if they...
... while you would in Bad Weather Driving Technique - Being able to see pages 135 and 145/150). To be used in wet weather. Inspect your headlights. Driving in dry weather. Abrupt steering wheel movements or sudden, hard application of control in these conditions. Have the windshield wiper blades replaced if they...

Owner's Manual
Page 226
...Maintenance...266 Tire Rotation...266 Replacing Tires and Wheels...267 Wheels and Tires...268 Winter Driving...268 Snow Tires...269 Tire Chains...269 Lights...270 Headlight Aiming...272 Replacing Bulbs...272 Storing Your Vehicle...281 Maintenance This section also includes Maintenance Schedules for normal driving and severe driving conditions, a ... may want to take care of yourself. Maintenance This section explains why it is important to keep your Honda dealer. If you have the skills and tools to perform more complex maintenance tasks on how to obtain a copy, or see your vehicle ...
...Maintenance...266 Tire Rotation...266 Replacing Tires and Wheels...267 Wheels and Tires...268 Winter Driving...268 Snow Tires...269 Tire Chains...269 Lights...270 Headlight Aiming...272 Replacing Bulbs...272 Storing Your Vehicle...281 Maintenance This section also includes Maintenance Schedules for normal driving and severe driving conditions, a ... may want to take care of yourself. Maintenance This section explains why it is important to keep your Honda dealer. If you have the skills and tools to perform more complex maintenance tasks on how to obtain a copy, or see your vehicle ...

Owner's Manual
Page 238
... page 192. See page 263. If weather conditions cause you to use the washers frequently, check the reservoir each time you are unsure of the headlights, parking lights, taillights, high-mount brake light, turn to perform any check, turn signals, brake lights, and license plate light monthly. See page 248. See...
... page 192. See page 263. If weather conditions cause you to use the washers frequently, check the reservoir each time you are unsure of the headlights, parking lights, taillights, high-mount brake light, turn to perform any check, turn signals, brake lights, and license plate light monthly. See page 248. See...

Owner's Manual
Page 249
... level by removing the cap and looking at least monthly during normal usage. This will light when the level is located behind the passenger's side headlight. LEVEL GAUGE Use only commercially-available windshield washer fluid. When you refill the reservoir, clean the edges of the windshield wiper blades with a good-quality...
... level by removing the cap and looking at least monthly during normal usage. This will light when the level is located behind the passenger's side headlight. LEVEL GAUGE Use only commercially-available windshield washer fluid. When you refill the reservoir, clean the edges of the windshield wiper blades with a good-quality...

Owner's Manual
Page 271
A burned out bulb can create an unsafe condition by reducing your vehicle's visibility and the ability to other drivers. Lights Check the operation of your intentions to signal your vehicle's exterior lights at least once a month. HEADLIGHT TURN SIGNAL/ SIDE MARKER/ PARKING LIGHTS Maintenance
A burned out bulb can create an unsafe condition by reducing your vehicle's visibility and the ability to other drivers. Lights Check the operation of your intentions to signal your vehicle's exterior lights at least once a month. HEADLIGHT TURN SIGNAL/ SIDE MARKER/ PARKING LIGHTS Maintenance

Owner's Manual
Page 272
Refer to the chart on page 323 to determine what type of replacement bulb is needed. Lights Check the following: STOP/TAILLIGHTS/ SIDE MARKER LIGHTS TAILLIGHT HIGH-MOUNT BRAKE LIGHT Headlights (low and high beam) Parking lights Taillights Brake lights High-mount brake light Turn signals Back-up lights Hazard light function License plate light Side marker lights Daytime running lights (Canadian models) If you find any bulbs are burned out, replace them as soon as possible. TURN SIGNAL LIGHT BACK-UP LIGHT LICENSE PLATE LIGHT Maintenance
Refer to the chart on page 323 to determine what type of replacement bulb is needed. Lights Check the following: STOP/TAILLIGHTS/ SIDE MARKER LIGHTS TAILLIGHT HIGH-MOUNT BRAKE LIGHT Headlights (low and high beam) Parking lights Taillights Brake lights High-mount brake light Turn signals Back-up lights Hazard light function License plate light Side marker lights Daytime running lights (Canadian models) If you find any bulbs are burned out, replace them as soon as possible. TURN SIGNAL LIGHT BACK-UP LIGHT LICENSE PLATE LIGHT Maintenance

Owner's Manual
Page 273
..., or a scratch on the driver's side, remove the air intake cover (see page 252). 2. Remove the rubber weather seal by a Honda technician or other qualified mechanic. Unclip the end of the way and remove the bulb. When replacing a bulb, handle it by pulling the connector... straight back. 3. HOLD-DOWN WIRE WEATHER SEAL NOTICE BULB CONNECTOR Halogen headlight bulbs get very hot when lit. Replacing a Headlight Bulb Your vehicle has halogen headlight bulbs, one on the tab. 4. Remove the electrical connector from its steel base and protect the...
..., or a scratch on the driver's side, remove the air intake cover (see page 252). 2. Remove the rubber weather seal by a Honda technician or other qualified mechanic. Unclip the end of the way and remove the bulb. When replacing a bulb, handle it by pulling the connector... straight back. 3. HOLD-DOWN WIRE WEATHER SEAL NOTICE BULB CONNECTOR Halogen headlight bulbs get very hot when lit. Replacing a Headlight Bulb Your vehicle has halogen headlight bulbs, one on the tab. 4. Remove the electrical connector from its steel base and protect the...

Owner's Manual
Page 274
Install the rubber seal over the back of the headlight assembly. Make sure it is right side up; Replacing the Front Side Marker/ Turn Signal and Parking Light Bulb HOLDING CLIP 1. it is marked "TOP." 7. ... on the passenger's side, turn off the engine. Pull the inner fender away from the inner fender. 3. If you are changing the bulb on the headlights to test the new bulb. 8. (Driver's side) Reinstall the air intake cover. CONTINUED Maintenance Insert the new bulb into the slot. 6. Push the electrical connector...
Install the rubber seal over the back of the headlight assembly. Make sure it is right side up; Replacing the Front Side Marker/ Turn Signal and Parking Light Bulb HOLDING CLIP 1. it is marked "TOP." 7. ... on the passenger's side, turn off the engine. Pull the inner fender away from the inner fender. 3. If you are changing the bulb on the headlights to test the new bulb. 8. (Driver's side) Reinstall the air intake cover. CONTINUED Maintenance Insert the new bulb into the slot. 6. Push the electrical connector...

Owner's Manual
Page 275
Remove the socket from the socket by pushing it in place. Remove the burned out bulb from the headlight assembly by inserting a flat-tip screwdriver into the headlight assembly. Insert the socket back into the slot until it in place. 8. Release the covers by turning it backward. 4. Pull the taillight assembly out of...
Remove the socket from the socket by pushing it in place. Remove the burned out bulb from the headlight assembly by inserting a flat-tip screwdriver into the headlight assembly. Insert the socket back into the slot until it in place. 8. Release the covers by turning it backward. 4. Pull the taillight assembly out of...

Owner's Manual
Page 301
...engine does not start up and run. You will need a qualified technician to determine the problem. (See Emergency Towing on page 317.) If the headlights dim noticeably or go out when you try jump starting the vehicle from a booster battery (see page 257). You can hear the starter motor operating... is probably something wrong with the electrical circuit for the ignition switch or starter motor. Turn the ignition switch to START (III). If the headlights are very dim or don't light at all , or operates very slowly. The transmission must be in Park or Neutral or the starter will...
...engine does not start up and run. You will need a qualified technician to determine the problem. (See Emergency Towing on page 317.) If the headlights dim noticeably or go out when you try jump starting the vehicle from a booster battery (see page 257). You can hear the starter motor operating... is probably something wrong with the electrical circuit for the ignition switch or starter motor. Turn the ignition switch to START (III). If the headlights are very dim or don't light at all , or operates very slowly. The transmission must be in Park or Neutral or the starter will...

Owner's Manual
Page 311
... compartment on the kick panel below the fuse box), which fuse or fuses control that a blown fuse is on the passenger's side. Make sure the headlights and all the fuses before deciding that component. Fuses UNDER-HOOD UNDER-HOOD The primary under-hood fuse box is located in your vehicle stops...
... compartment on the kick panel below the fuse box), which fuse or fuses control that a blown fuse is on the passenger's side. Make sure the headlights and all the fuses before deciding that component. Fuses UNDER-HOOD UNDER-HOOD The primary under-hood fuse box is located in your vehicle stops...

Owner's Manual
Page 339
... Bulb Replacement Back-up Lights...275 Brake Lights...274 Cargo Area Light...278 Front Parking Lights...273 Front Side Marker Lights...273 Headlights...272 High-mount Brake Light...276 Individual Map Lights...278 License Plate Light...277 Rear Bulbs...274, 275 Specifications...323 Turn Signal Lights...273 Bulbs, ...
... Bulb Replacement Back-up Lights...275 Brake Lights...274 Cargo Area Light...278 Front Parking Lights...273 Front Side Marker Lights...273 Headlights...272 High-mount Brake Light...276 Individual Map Lights...278 License Plate Light...277 Rear Bulbs...274, 275 Specifications...323 Turn Signal Lights...273 Bulbs, ...


