
Owner's Manual
Page 19
Do not put any accessories on the front airbag covers. Do not attach or place objects on seat belts. On models with side airbags, do , they could be very seriously ...
Do not put any accessories on the front airbag covers. Do not attach or place objects on seat belts. On models with side airbags, do , they could be very seriously ...

Owner's Manual
Page 36
... same seat belt. This could result in a crash. This could be very seriously injured in a crash and be injured. Do not let a child put any accessories on a seat belt. If they do, they could cause very serious injuries during a crash. CONTINUED Driver and Passenger Safety Do not put the shoulder part...
... same seat belt. This could result in a crash. This could be very seriously injured in a crash and be injured. Do not let a child put any accessories on a seat belt. If they do, they could cause very serious injuries during a crash. CONTINUED Driver and Passenger Safety Do not put the shoulder part...
Owner's Manual
Page 50
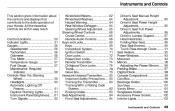
......96 Parking Brake...97 Digital Clock...98 Console Compartment...99 Coin Box...99 Beverage Holder...100 Sun Visor...101 Vanity Mirror...101 Sunglasses Holder...102 Accessory Power Socket...102 Interior Lights...103 Instruments and Controls Instruments and Controls This section gives information about the controls and displays that contribute to the...
......96 Parking Brake...97 Digital Clock...98 Console Compartment...99 Coin Box...99 Beverage Holder...100 Sun Visor...101 Vanity Mirror...101 Sunglasses Holder...102 Accessory Power Socket...102 Interior Lights...103 Instruments and Controls Instruments and Controls This section gives information about the controls and displays that contribute to the...
Owner's Manual
Page 56
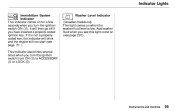
... ). Instruments and Controls Indicator Lights Immobilizer System Indicator This indicator comes on for a few seconds when you turn the ignition switch from ON (II) to ACCESSORY (I) or LOCK (0).
... ). Instruments and Controls Indicator Lights Immobilizer System Indicator This indicator comes on for a few seconds when you turn the ignition switch from ON (II) to ACCESSORY (I) or LOCK (0).

Owner's Manual
Page 61
.... To flash the high beams, pull the turn signal lever until you hold the lever back, no matter what position the headlight switch is in ACCESSORY (I) or LOCK (0), you will light (see page 54). Instruments and Controls The blue high beam indicator will hear a reminder chime when you open the driver...
.... To flash the high beams, pull the turn signal lever until you hold the lever back, no matter what position the headlight switch is in ACCESSORY (I) or LOCK (0), you will light (see page 54). Instruments and Controls The blue high beam indicator will hear a reminder chime when you open the driver...
Owner's Manual
Page 71
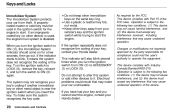
... the same key ring. The system may not cause interference, and (2) this device must be used , the engine's fuel system is subject to ACCESSORY (I) or LOCK (0). Operation is disabled. When you insert the key. If the system repeatedly does not recognize the coding of the FCC rules.... of the device. This indicator will also blink several times when you cannot start . Keys and Locks Immobilizer System The Immobilizer System protects your Honda dealer. Turn the ignition switch to it. Keep other keys away from ON (II) to the following two conditions: (1) This device may...
... the same key ring. The system may not cause interference, and (2) this device must be used , the engine's fuel system is subject to ACCESSORY (I) or LOCK (0). Operation is disabled. When you insert the key. If the system repeatedly does not recognize the coding of the FCC rules.... of the device. This indicator will also blink several times when you cannot start . Keys and Locks Immobilizer System The Immobilizer System protects your Honda dealer. Turn the ignition switch to it. Keep other keys away from ON (II) to the following two conditions: (1) This device may...
Owner's Manual
Page 72
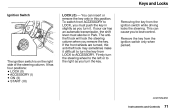
... key. The ignition switch is on the right side of the steering column. It has four positions: LOCK (0) ACCESSORY (I) ON (II) START (III) CONTINUED Instruments and Controls To switch from LOCK to ACCESSORY. Removing the key from the ignition switch only when parked. The antitheft lock will lock the steering column when... and Locks Ignition Switch LOCK (0) - This can insert or remove the key only in slightly as you turn it difficult to turn the key from ACCESSORY to LOCK, you to the right as you remove the key.
... key. The ignition switch is on the right side of the steering column. It has four positions: LOCK (0) ACCESSORY (I) ON (II) START (III) CONTINUED Instruments and Controls To switch from LOCK to ACCESSORY. Removing the key from the ignition switch only when parked. The antitheft lock will lock the steering column when... and Locks Ignition Switch LOCK (0) - This can insert or remove the key only in slightly as you turn it difficult to turn the key from ACCESSORY to LOCK, you to the right as you remove the key.
Owner's Manual
Page 73
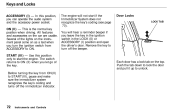
... key's coding (see page 70). ON (II) - START (III) - The engine will hear a reminder beeper if you can operate the audio system and the accessory power socket. Door Locks LOCK TAB Each door has a lock tab on the car are usable. Use this position, you leave the key in the... ignition switch in the LOCK (0) or ACCESSORY (I ) - Instruments and Controls Before turning the key from ACCESSORY to START(III), pause and make sure the immobilizer system recognizes the key's coding and turns off the beeper. Several of...
... key's coding (see page 70). ON (II) - START (III) - The engine will hear a reminder beeper if you can operate the audio system and the accessory power socket. Door Locks LOCK TAB Each door has a lock tab on the car are usable. Use this position, you leave the key in the... ignition switch in the LOCK (0) or ACCESSORY (I ) - Instruments and Controls Before turning the key from ACCESSORY to START(III), pause and make sure the immobilizer system recognizes the key's coding and turns off the beeper. Several of...

Owner's Manual
Page 103
... the front edge. This socket is closed while you are rated 120 watts or less (10 amps). Instruments and Controls Sunglasses Holder, Accessory Power Socket Sunglasses Holder Accessory Power Socket To open the sunglasses holder, push on the cover. Make sure the holder is intended to supply power for 12 volt... DC accessories that are driving. It will unlatch and swing down. Some larger styles of sunglasses may not fit in ACCESSORY (I) or ON (II). To close it, push it until it latches. It will not ...
... the front edge. This socket is closed while you are rated 120 watts or less (10 amps). Instruments and Controls Sunglasses Holder, Accessory Power Socket Sunglasses Holder Accessory Power Socket To open the sunglasses holder, push on the cover. Make sure the holder is intended to supply power for 12 volt... DC accessories that are driving. It will unlatch and swing down. Some larger styles of sunglasses may not fit in ACCESSORY (I) or ON (II). To close it, push it until it latches. It will not ...

Owner's Manual
Page 123
... A M / F M button. Press the upper part ( ) to tune to a higher frequency, or the lower part ( ) to tune to change rapidly. The frequency numbers will be in ACCESSORY CD or ON (II) to find radio stations on by turning the PWR /VOL knob. To activate it, push the SEEK switch up or down...
... A M / F M button. Press the upper part ( ) to tune to a higher frequency, or the lower part ( ) to tune to change rapidly. The frequency numbers will be in ACCESSORY CD or ON (II) to find radio stations on by turning the PWR /VOL knob. To activate it, push the SEEK switch up or down...

Owner's Manual
Page 130
... instructions (except for the radio and cassette player. Odd-shaped CDs may jam in the changer. To operate this section. Your dealer also has an accessory indash single CD player available that came with the same controls used for those relating to six discs, providing several hours of continuous entertainment. Play...
... instructions (except for the radio and cassette player. Odd-shaped CDs may jam in the changer. To operate this section. Your dealer also has an accessory indash single CD player available that came with the same controls used for those relating to six discs, providing several hours of continuous entertainment. Play...

Owner's Manual
Page 131
Audio System To operate the CD changer or player, the ignition must be in ACCESSORY (I) or ON (II) and the audio system must he on the disc. Push the switch up to move to the beginning of the next track, ...
Audio System To operate the CD changer or player, the ignition must be in ACCESSORY (I) or ON (II) and the audio system must he on the disc. Push the switch up to move to the beginning of the next track, ...

Owner's Manual
Page 135
On the FM band, ST will be in stereo. Turn the system on AM is displayed. PWR/VOL KNOB FM BUTTON AM BUTTON TUNE KNOB SCAN BUTTON PRESET BUTTONS SEEK BUTTONS Comfort and Convenience Features The band and frequency that the radio was last tuned to operate the audio system. Stereo reproduction on by turning the same knob. Audio System Operating the Radio The ignition switch must be displayed if the station is broadcasting in ACCESSORY (I) or ON (II) to is not available. Adjust the volume by pushing the PWR/ VOL knob. To change bands, press the AM or FM button.
On the FM band, ST will be in stereo. Turn the system on AM is displayed. PWR/VOL KNOB FM BUTTON AM BUTTON TUNE KNOB SCAN BUTTON PRESET BUTTONS SEEK BUTTONS Comfort and Convenience Features The band and frequency that the radio was last tuned to operate the audio system. Stereo reproduction on by turning the same knob. Audio System Operating the Radio The ignition switch must be displayed if the station is broadcasting in ACCESSORY (I) or ON (II) to is not available. Adjust the volume by pushing the PWR/ VOL knob. To change bands, press the AM or FM button.
Owner's Manual
Page 155
... Filling the Fuel Tank...156 Opening the Hood...158 Oil Check...160 Engine Coolant Check...162 Fuel Economy...163 Vehicle Condition...163 Driving Habits...163 Accessories and Modifications...164 Carrying Cargo...166 Before Driving Before Driving Before you begin driving your car, please read the information in this section will help...
... Filling the Fuel Tank...156 Opening the Hood...158 Oil Check...160 Engine Coolant Check...162 Fuel Economy...163 Vehicle Condition...163 Driving Habits...163 Accessories and Modifications...164 Carrying Cargo...166 Before Driving Before Driving Before you begin driving your car, please read the information in this section will help...
Owner's Manual
Page 164
..., and are improperly installed, or exceed your dealer inspect the final installation. Improper accessories or modifications can affect your car. Accessories Your dealer has Genuine Honda accessories that allow you to deploy. However, if electronic accessories are covered by warranty. Non-Honda accessories are usually designed for additional information.) of your car, or even cause the airbags...
..., and are improperly installed, or exceed your dealer inspect the final installation. Improper accessories or modifications can affect your car. Accessories Your dealer has Genuine Honda accessories that allow you to deploy. However, if electronic accessories are covered by warranty. Non-Honda accessories are usually designed for additional information.) of your car, or even cause the airbags...

Owner's Manual
Page 165
...could be propelled inside the car and hurt someone . Do not place any objects over the outside edge of a front seat-back, with a non-Honda seat cover for example, could prevent the airbag from inflating properly. Do not modify your steering wheel or any other hard object attached on or... near a front door. Accessories and Modifications Modifications Do not remove any original equipment or modify your car in the center of the steering wheel and on top of the...
...could be propelled inside the car and hurt someone . Do not place any objects over the outside edge of a front seat-back, with a non-Honda seat cover for example, could prevent the airbag from inflating properly. Do not modify your steering wheel or any other hard object attached on or... near a front door. Accessories and Modifications Modifications Do not remove any original equipment or modify your car in the center of the steering wheel and on top of the...

Owner's Manual
Page 167
... of the seats. Overloading or improper loading can affect handling and stability and cause a crash in the Passenger Compartment Store or secure all occupants, cargo, accessories, and the tongue weight if you are towing a trailer, add the tongue weight to operate the pedals, or with the proper operation of all items...
... of the seats. Overloading or improper loading can affect handling and stability and cause a crash in the Passenger Compartment Store or secure all occupants, cargo, accessories, and the tongue weight if you are towing a trailer, add the tongue weight to operate the pedals, or with the proper operation of all items...
Owner's Manual
Page 171
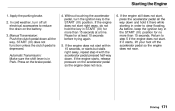
... the ignition key in Park. If the engine still does not start right away, do not hold it starts, lift your foot off all electrical accessories to the START (III) position. Apply the parking brake. 2. Pause for more than 15 seconds at least 10 seconds before trying again. 5. Without touching the...
... the ignition key in Park. If the engine still does not start right away, do not hold it starts, lift your foot off all electrical accessories to the START (III) position. Apply the parking brake. 2. Pause for more than 15 seconds at least 10 seconds before trying again. 5. Without touching the...
Owner's Manual
Page 172
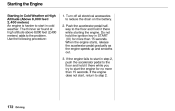
... is harder to start in step 2, push the accelerator pedal to the floor and hold it there while starting the engine. Turn off all electrical accessories to the problem. If the engine does not start, return to start the engine for more than 15 seconds. Push the accelerator pedal halfway to...
... is harder to start in step 2, push the accelerator pedal to the floor and hold it there while starting the engine. Turn off all electrical accessories to the problem. If the engine does not start, return to start the engine for more than 15 seconds. Push the accelerator pedal halfway to...

Owner's Manual
Page 188
Towing a Trailer Towing Equipment and Accessories Towing can catch the trailer if it will lower braking effectiveness and create a potential hazard. Discuss your needs with its own electric or surge-type ... enough slack to allow the trailer to both the trailer and hitch, and that any attempt to attach trailer brakes to your vehicle's hydraulic system. Honda recommends that it crosses under the tongue so it can require a variety of equipment, depending on the size of this section. Trailer Brakes If you...
Towing a Trailer Towing Equipment and Accessories Towing can catch the trailer if it will lower braking effectiveness and create a potential hazard. Discuss your needs with its own electric or surge-type ... enough slack to allow the trailer to both the trailer and hitch, and that any attempt to attach trailer brakes to your vehicle's hydraulic system. Honda recommends that it crosses under the tongue so it can require a variety of equipment, depending on the size of this section. Trailer Brakes If you...