Owner's Manual
Page 18
..., or reposition the shoulder part of a seat belt, can be very seriously injured in the cargo area or on seat belts. Do not put any accessories on top of a foldeddown back seat. Devices intended to drive. Because protecting the mother is the best way to both the mother and her unborn...
..., or reposition the shoulder part of a seat belt, can be very seriously injured in the cargo area or on seat belts. Do not put any accessories on top of a foldeddown back seat. Devices intended to drive. Because protecting the mother is the best way to both the mother and her unborn...

Owner's Manual
Page 37
... Do not let a child wear a seat belt across their back or under the belt and being injured in a crash. Do not let a child put any accessories on a seat belt. Do not put the shoulder part of serious injury in serious neck injuries during a crash. However, if the belt touches or crosses...
... Do not let a child wear a seat belt across their back or under the belt and being injured in a crash. Do not let a child put any accessories on a seat belt. Do not put the shoulder part of serious injury in serious neck injuries during a crash. However, if the belt touches or crosses...

Owner's Manual
Page 55
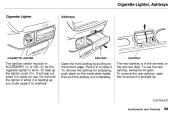
... ignition key. Each trip meter works independently, so you can keep track of miles (U.S.) or kilometers (Canada) driven since you turn the ignition switch to ACCESSORY (I) or LOCK (0). See page 64 for a few seconds when you turn on at any other time, it and then press the Reset button for information...
... ignition key. Each trip meter works independently, so you can keep track of miles (U.S.) or kilometers (Canada) driven since you turn the ignition switch to ACCESSORY (I) or LOCK (0). See page 64 for a few seconds when you turn on at any other time, it and then press the Reset button for information...

Owner's Manual
Page 59
... . Instruments and Controls The rotating switch on for as long as you hold the lever back, no matter what position the headlight switch is in ACCESSORY (I) or LOCK (0), you will stay on the left lever controls the lights. To change between low beams and high beams, pull the turn signal lever...
... . Instruments and Controls The rotating switch on for as long as you hold the lever back, no matter what position the headlight switch is in ACCESSORY (I) or LOCK (0), you will stay on the left lever controls the lights. To change between low beams and high beams, pull the turn signal lever...

Owner's Manual
Page 69
If the system repeatedly does not recognize the coding of your key, contact your vehicle from ON (II) to ACCESSORY (I) or LOCK (0). Changes or modifications not expressly approved by the FCC: This device complies with a key from another immobilizer system. ...operate the equipment. Electrical problems could void the user's authority to blink, it . Keys and Locks Immobilizer System The Immobilizer System protects your Honda dealer. As required by the party responsible for a few seconds, then go out. If you have lost your vehicle undriveable. A properlycoded master...
If the system repeatedly does not recognize the coding of your key, contact your vehicle from ON (II) to ACCESSORY (I) or LOCK (0). Changes or modifications not expressly approved by the FCC: This device complies with a key from another immobilizer system. ...operate the equipment. Electrical problems could void the user's authority to blink, it . Keys and Locks Immobilizer System The Immobilizer System protects your Honda dealer. As required by the party responsible for a few seconds, then go out. If you have lost your vehicle undriveable. A properlycoded master...

Owner's Manual
Page 70
The anti-theft lock will lock the steering column when you to ACCESSORY. It has four positions: LOCK (0) ACCESSORY (I) ON (II) START (III) Removing the key from the ignition switch only when parked. CONTINUED Instruments and Controls To switch from LOCK to lose control. ... key from the ignition switch while driving locks the steering. The shift lever must push the key in slightly as you turn the key from ACCESSORY to LOCK, you must also be in this position. This can insert or remove the key only in Park. You can cause you remove the...
The anti-theft lock will lock the steering column when you to ACCESSORY. It has four positions: LOCK (0) ACCESSORY (I) ON (II) START (III) Removing the key from the ignition switch only when parked. CONTINUED Instruments and Controls To switch from LOCK to lose control. ... key from the ignition switch while driving locks the steering. The shift lever must push the key in slightly as you turn the key from ACCESSORY to LOCK, you must also be in this position. This can insert or remove the key only in Park. You can cause you remove the...

Owner's Manual
Page 71
...position when driving. Instruments and Controls Several of the lights on the instrument panel come on as a test when you turn the ignition switch from ACCESSORY to ON (II) when you let go of the key. Power Door Locks MASTER DOOR LOCK SWITCH Each front door has a master door lock... recognize the key's coding (see page 51). In this position only to unlock them. The switch returns to ON (see page 68). Keys and Locks ACCESSORY (I) - ON (II) - START (III) - Use this position, you use the master door lock switch. The engine will not start the engine. Push the ...
...position when driving. Instruments and Controls Several of the lights on the instrument panel come on as a test when you turn the ignition switch from ACCESSORY to ON (II) when you let go of the key. Power Door Locks MASTER DOOR LOCK SWITCH Each front door has a master door lock... recognize the key's coding (see page 51). In this position only to unlock them. The switch returns to ON (see page 68). Keys and Locks ACCESSORY (I) - ON (II) - START (III) - Use this position, you use the master door lock switch. The engine will not start the engine. Push the ...
Owner's Manual
Page 90
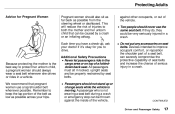
... ready for the cigarette lighter to overheat. Open the front ashtray by pulling on the bottom edge. It will pop out when it is in ACCESSORY (I) or ON (II) for use the rear ashtray, swing the lid open the lid and pull it in to close it to work. CONTINUED Instruments...
... ready for the cigarette lighter to overheat. Open the front ashtray by pulling on the bottom edge. It will pop out when it is in ACCESSORY (I) or ON (II) for use the rear ashtray, swing the lid open the lid and pull it in to close it to work. CONTINUED Instruments...

Owner's Manual
Page 104
To change bands, press the AM/FM button. Stereo reproduction on by turning the PWR/VOL knob. The band and frequency that the radio was last tuned to operate the audio system. AM/FM BUTTON PRESET BUTTONS PWR/VOL KNOB TUNE/SEEK BUTTONS STEREO INDICATOR Comfort and Convenience Features Adjust the volume by pushing the PWR/ VOL knob. Audio System Operating the Radio The ignition switch must be displayed if the station is broadcasting in ACCESSORY (I) or ON (II) to is not available. Turn the system on AM is displayed. On the FM band, ST will be in stereo.
To change bands, press the AM/FM button. Stereo reproduction on by turning the PWR/VOL knob. The band and frequency that the radio was last tuned to operate the audio system. AM/FM BUTTON PRESET BUTTONS PWR/VOL KNOB TUNE/SEEK BUTTONS STEREO INDICATOR Comfort and Convenience Features Adjust the volume by pushing the PWR/ VOL knob. Audio System Operating the Radio The ignition switch must be displayed if the station is broadcasting in ACCESSORY (I) or ON (II) to is not available. Turn the system on AM is displayed. On the FM band, ST will be in stereo.

Owner's Manual
Page 110
... this section. Play only standard round discs. The system will start to play the first track of continuous entertainment. Your dealer also has an accessory indash single CD player available that disc ends, the next disc in the magazine. After the last disc finishes, the system returns to six ...CD BUTTON PRESET BUTTONS To operate the CD changer, the ignition switch must be in the display. Press the CD button until "CD" appears in ACCESSORY (I) or ON (II) and the audio system must be on. Audio System Operating the Optional CD Player/Changer A Compact Disc changer is loaded and...
... this section. Play only standard round discs. The system will start to play the first track of continuous entertainment. Your dealer also has an accessory indash single CD player available that disc ends, the next disc in the magazine. After the last disc finishes, the system returns to six ...CD BUTTON PRESET BUTTONS To operate the CD changer, the ignition switch must be in the display. Press the CD button until "CD" appears in ACCESSORY (I) or ON (II) and the audio system must be on. Audio System Operating the Optional CD Player/Changer A Compact Disc changer is loaded and...

Owner's Manual
Page 113
.... The SEEK function searches the band for a station with a strong signal. Adjust the volume by pushing the PWR/ VOL knob. To change the frequency in ACCESSORY (I) or ON (II) to find radio stations on AM is displayed. Depending on the FM band.
.... The SEEK function searches the band for a station with a strong signal. Adjust the volume by pushing the PWR/ VOL knob. To change the frequency in ACCESSORY (I) or ON (II) to find radio stations on AM is displayed. Depending on the FM band.

Owner's Manual
Page 122
Audio System Operating the Optional CD Player/Changer A Compact Disc changer is operated by the radio controls. Your dealer also has an accessory indash single CD player available that came with the same controls used for those relating to multiple discs) in the changer. SELECT INDICATOR TUNE/SEEK... desired CDs in the magazine, and load the magazine in this unit, use the instructions (except for the radio. Odd-shaped CDs may jam in ACCESSORY (I) or ON (II) and the audio system must be in the drive or cause other problems. PWR/VOL KNOB RPT INDICATOR A. Using the instructions ...
Audio System Operating the Optional CD Player/Changer A Compact Disc changer is operated by the radio controls. Your dealer also has an accessory indash single CD player available that came with the same controls used for those relating to multiple discs) in the changer. SELECT INDICATOR TUNE/SEEK... desired CDs in the magazine, and load the magazine in this unit, use the instructions (except for the radio. Odd-shaped CDs may jam in ACCESSORY (I) or ON (II) and the audio system must be in the drive or cause other problems. PWR/VOL KNOB RPT INDICATOR A. Using the instructions ...

Owner's Manual
Page 127
... you plan to add any accessories to your Honda, you . The information in Period...128 Gasoline...128 Service Station Procedures ...129 Filling the Fuel Tank...129 Opening the Hood...130 Oil Check...131 Engine Coolant Check...132 Fuel Economy...133 Vehicle Condition...133 Driving Habits...133 Accessories and Modifications...134 Carrying Cargo...136...
... you plan to add any accessories to your Honda, you . The information in Period...128 Gasoline...128 Service Station Procedures ...129 Filling the Fuel Tank...129 Opening the Hood...130 Oil Check...131 Engine Coolant Check...132 Fuel Economy...133 Vehicle Condition...133 Driving Habits...133 Accessories and Modifications...134 Carrying Cargo...136...

Owner's Manual
Page 134
...vehicle's handling, stability and performance, and cause a crash in this owner's manual regarding accessories and modifications. Before you to read the following information. Non-Honda accessories are usually designed for your vehicle, and are improperly installed, or exceed your vehicle's ... sure to personalize your dealer inspect the final installation. Accessories and Modifications Modifying your vehicle, or installing some non-Honda accessories, can interfere with the Before installing any accessory: Make sure the accessory does not obscure any lights, or interfere with your ...
...vehicle's handling, stability and performance, and cause a crash in this owner's manual regarding accessories and modifications. Before you to read the following information. Non-Honda accessories are usually designed for your vehicle, and are improperly installed, or exceed your vehicle's ... sure to personalize your dealer inspect the final installation. Accessories and Modifications Modifying your vehicle, or installing some non-Honda accessories, can interfere with the Before installing any accessory: Make sure the accessory does not obscure any lights, or interfere with your ...

Owner's Manual
Page 135
... modifications that decrease ground clearance increase the chance of undercarriage parts striking a curb, speed bump, or other part of your Supplemental Restraint System. Before Driving Accessories and Modifications Modifications Do not remove any original equipment or modify your vehicle in the center of the steering wheel and on top of the...
... modifications that decrease ground clearance increase the chance of undercarriage parts striking a curb, speed bump, or other part of your Supplemental Restraint System. Before Driving Accessories and Modifications Modifications Do not remove any original equipment or modify your vehicle in the center of the steering wheel and on top of the...

Owner's Manual
Page 137
... includes the total weight of all occupants. Follow all load limits and other loading guidelines in the Passenger Compartment Store or secure all occupants, cargo, accessories, and the tongue weight if you can be thrown around and hurt someone during a crash or sudden stop. Be sure items placed on the floor...
... includes the total weight of all occupants. Follow all load limits and other loading guidelines in the Passenger Compartment Store or secure all occupants, cargo, accessories, and the tongue weight if you can be thrown around and hurt someone during a crash or sudden stop. Be sure items placed on the floor...

Owner's Manual
Page 141
... accelerator pedal to the floor and hold the key in order to the problem. Do not hold it starts, lift your foot off all electrical accessories to reduce the drain on the battery. 2. Without touching the accelerator pedal, turn off the accelerator pedal so the engine does not race. Turn off...
... accelerator pedal to the floor and hold the key in order to the problem. Do not hold it starts, lift your foot off all electrical accessories to reduce the drain on the battery. 2. Without touching the accelerator pedal, turn off the accelerator pedal so the engine does not race. Turn off...

Owner's Manual
Page 227
... smoking materials away from the battery. To jump start your vehicle's battery has run . A battery can cause it thaws. Turn off all the electrical accessories: heater, A/C, stereo system, lights, etc. Refer to fill the tank. There may not be able to find nothing wrong, you do not try jump... Operates Normally In this seems like ice, do not follow these directions closely: 1. Are you using the proper starting until it to jump start a Honda by using a booster battery. Do you turn the ignition switch to ON (II) for a minute and watch the fuel gauge. See Towing on...
... smoking materials away from the battery. To jump start your vehicle's battery has run . A battery can cause it thaws. Turn off all the electrical accessories: heater, A/C, stereo system, lights, etc. Refer to fill the tank. There may not be able to find nothing wrong, you do not try jump... Operates Normally In this seems like ice, do not follow these directions closely: 1. Are you using the proper starting until it to jump start a Honda by using a booster battery. Do you turn the ignition switch to ON (II) for a minute and watch the fuel gauge. See Towing on...

Owner's Manual
Page 229
... comes down almost immediately. Or you . Put the transmission in the midrange under the hood, turn off the heating and cooling system and all other accessories. Turn off the engine. 3. Steam and spray from an overheated engine can seriously scald you may be the temperature gauge climbing to the side of...
... comes down almost immediately. Or you . Put the transmission in the midrange under the hood, turn off the heating and cooling system and all other accessories. Turn off the engine. 3. Steam and spray from an overheated engine can seriously scald you may be the temperature gauge climbing to the side of...
Owner's Manual
Page 232
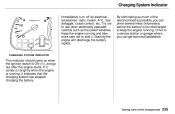
Taking Care of the electrical load as the power windows. By eliminating as much of the Unexpected Charging System Indicator Immediately turn off all electrical accessories: radio, heater, A / C , rear defogger, cruise control, etc. Drive to a service station or garage where you can get technical assistance. If it . CHARGING SYSTEM INDICATOR This ...
Taking Care of the electrical load as the power windows. By eliminating as much of the Unexpected Charging System Indicator Immediately turn off all electrical accessories: radio, heater, A / C , rear defogger, cruise control, etc. Drive to a service station or garage where you can get technical assistance. If it . CHARGING SYSTEM INDICATOR This ...
