Owner's Manual
Page 5
... About Your Seat Belts...38 Seat Belt System Components...38 Lap/Shoulder Belt...38 Seat Belt Maintenance...39 Additional Information About Your SRS...40 SRS Components...40 How Your Airbags Work...40 How Your SRS Indicator Light Works...42 SRS Service...42 Additional Safety Precautions...43 Carbon Monoxide Hazard...44 Safety Labels...
... About Your Seat Belts...38 Seat Belt System Components...38 Lap/Shoulder Belt...38 Seat Belt Maintenance...39 Additional Information About Your SRS...40 SRS Components...40 How Your Airbags Work...40 How Your SRS Indicator Light Works...42 SRS Service...42 Additional Safety Precautions...43 Carbon Monoxide Hazard...44 Safety Labels...
Owner's Manual
Page 44
... Restraint System is virtually maintenance-free, and there are no parts you can result in serious injury or death if the airbags do not inflate when needed. However, you must have your system checked by your dealer. Do not try to an authorized Honda dealer as soon as ... If you see any other time, you should have your vehicle checked by a Honda dealer or a knowledgeable body shop. This tells you to a potential problem. Take your Honda dealer as soon as possible if the SRS light alerts you to a problem. v Main Menu Table of Contents Additional Information About Your...
... Restraint System is virtually maintenance-free, and there are no parts you can result in serious injury or death if the airbags do not inflate when needed. However, you must have your system checked by your dealer. Do not try to an authorized Honda dealer as soon as ... If you see any other time, you should have your vehicle checked by a Honda dealer or a knowledgeable body shop. This tells you to a potential problem. Take your Honda dealer as soon as possible if the SRS light alerts you to a problem. v Main Menu Table of Contents Additional Information About Your...
Owner's Manual
Page 48
......54 Odometer...54 Trip Meter...55 Temperature Gauge...55 Fuel Gauge...55 Maintenance Required Indicator...56 Controls Near the Steering Wheel...57 Headlights...58 Automatic Lighting Off Feature...59 Daytime Running Lights...59 Instrument Panel Brightness...59 Turn Signals...60 Windshield Wipers...60 Windshield......97 Coin Box...97 Beverage Holder...98 Sun Visor...99 Vanity Mirror...99 Sunglasses Holder...100 Accessory Power Socket...100 Interior Lights...101 Instruments and Controls w v Main Menu Instruments and Controls This section gives information about the controls and displays that ...
......54 Odometer...54 Trip Meter...55 Temperature Gauge...55 Fuel Gauge...55 Maintenance Required Indicator...56 Controls Near the Steering Wheel...57 Headlights...58 Automatic Lighting Off Feature...59 Daytime Running Lights...59 Instrument Panel Brightness...59 Turn Signals...60 Windshield Wipers...60 Windshield......97 Coin Box...97 Beverage Holder...98 Sun Visor...99 Vanity Mirror...99 Sunglasses Holder...100 Accessory Power Socket...100 Interior Lights...101 Instruments and Controls w v Main Menu Instruments and Controls This section gives information about the controls and displays that ...
Owner's Manual
Page 50
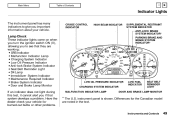
... text. Differences for burned-out bulbs or other problems. CRUISE CONTROL INDICATOR MALFUNCTION INDICATOR LAMP * The U.S. Lamp Check These indicator lights come on when you turn the ignition switch ON (II), allowing you to give you important information about your vehicle for the ...Indicator Low Oil Pressure Indicator Anti-lock Brake System Indicator Seat Belt Reminder Light D4 Lamp Immobilizer System Indicator Maintenance Required Indicator Brake System Indicator Door and Brake Lamp Monitor If an indicator does not light during this test, it cannot alert you if that system develops a...
... text. Differences for burned-out bulbs or other problems. CRUISE CONTROL INDICATOR MALFUNCTION INDICATOR LAMP * The U.S. Lamp Check These indicator lights come on when you turn the ignition switch ON (II), allowing you to give you important information about your vehicle for the ...Indicator Low Oil Pressure Indicator Anti-lock Brake System Indicator Seat Belt Reminder Light D4 Lamp Immobilizer System Indicator Maintenance Required Indicator Brake System Indicator Door and Brake Lamp Monitor If an indicator does not light during this test, it cannot alert you if that system develops a...

Owner's Manual
Page 57
...miles (9,600 km) after completing the scheduled maintenance. Refer to take your Honda dealer, reset the indicator as a constant reminder. 3. Between 6,000 miles (9,600 km) and 7,500 miles (12,000 km) this maintenance is time to the Maintenance Schedules for Normal and Severe Driving Conditions on... ignition switch ON (II). If this indicator will light for ten seconds. Press and hold the select/reset button in for about ten seconds, until the indicator resets. Hold the button for scheduled maintenance. MAINTENANCE REQUIRED INDICATOR This indicator reminds you exceed 7,500 miles...
...miles (9,600 km) after completing the scheduled maintenance. Refer to take your Honda dealer, reset the indicator as a constant reminder. 3. Between 6,000 miles (9,600 km) and 7,500 miles (12,000 km) this maintenance is time to the Maintenance Schedules for Normal and Severe Driving Conditions on... ignition switch ON (II). If this indicator will light for ten seconds. Press and hold the select/reset button in for about ten seconds, until the indicator resets. Hold the button for scheduled maintenance. MAINTENANCE REQUIRED INDICATOR This indicator reminds you exceed 7,500 miles...
Owner's Manual
Page 188
... Wheels ...242 Wheels and Tires...243 Winter Driving...244 Snow Tires...244 Tire Chains...244 Lights...245 Replacing Bulbs...249 Storing Your Vehicle...258 Maintenance w This section also includes Maintenance Schedules for normal driving and severe driving conditions, a Maintenance Record, and instructions for information on your Honda, you may want to take care of yourself.
... Wheels ...242 Wheels and Tires...243 Winter Driving...244 Snow Tires...244 Tire Chains...244 Lights...245 Replacing Bulbs...249 Storing Your Vehicle...258 Maintenance w This section also includes Maintenance Schedules for normal driving and severe driving conditions, a Maintenance Record, and instructions for information on your Honda, you may want to take care of yourself.
Owner's Manual
Page 200
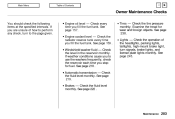
... every time you fill the fuel tank. Check the fluid level monthly. Tires - See page 238. See page 245. v Maintenance Main Menu Table of the headlights, parking lights, taillights, high-mount brake light, turn to use the washers frequently, check the reservoir each time you to the page given. Check the level in...
... every time you fill the fuel tank. Check the fluid level monthly. Tires - See page 238. See page 245. v Maintenance Main Menu Table of the headlights, parking lights, taillights, high-mount brake light, turn to use the washers frequently, check the reservoir each time you to the page given. Check the level in...

Owner's Manual
Page 207
... engine oil fill cap. Refill the engine with the recommended oil. If necessary, add oil to bring the level to a recycling center. Maintenance w If it does not, turn off the engine, let it sit for several minutes and check the drain bolt and oil filter for ... FILTER NOTICE Improper disposal of Contents Engine Oil 7. Do not discard it in a sealed container and take it on the dipstick. The oil pressure indicator light should go out within five seconds. If you change capacity (including filter): (4-cylinder models) 4.5 US qt (4.3 , 3.8 Imp qt) (6-cylinder models) 4.6 US qt (4.4 ...
... engine oil fill cap. Refill the engine with the recommended oil. If necessary, add oil to bring the level to a recycling center. Maintenance w If it does not, turn off the engine, let it sit for several minutes and check the drain bolt and oil filter for ... FILTER NOTICE Improper disposal of Contents Engine Oil 7. Do not discard it in a sealed container and take it on the dipstick. The oil pressure indicator light should go out within five seconds. If you change capacity (including filter): (4-cylinder models) 4.5 US qt (4.3 , 3.8 Imp qt) (6-cylinder models) 4.6 US qt (4.4 ...
Owner's Manual
Page 215
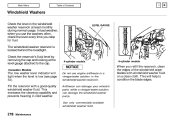
...'s fluid level by removing the cap and looking at least monthly during normal usage. Use only commercially-available windshield washer fluid. Maintenance When you stop for fuel. The windshield washer reservoir is low (see page 53). This increases the cleaning capability and prevents ...freezing in the windshield washer reservoir. This will light when the level is located behind the headlight. w Canadian Models LEVEL GAUGE 4-cylinder models 6-cylinder models NOTICE The low washer level ...
...'s fluid level by removing the cap and looking at least monthly during normal usage. Use only commercially-available windshield washer fluid. Maintenance When you stop for fuel. The windshield washer reservoir is low (see page 53). This increases the cleaning capability and prevents ...freezing in the windshield washer reservoir. This will light when the level is located behind the headlight. w Canadian Models LEVEL GAUGE 4-cylinder models 6-cylinder models NOTICE The low washer level ...

Owner's Manual
Page 233
...at a steady speed with Refrigerant HFC-134a (R-134a). (See Specifications on page 296.) NOTICE Whenever you have your dealer check the system. Maintenance w If the air conditioning does not get as cold as recharging, should be done by a qualified mechanic. You can damage the environment..... This circulates the lubricating oil contained in the refrigerant. v AIR CONDITIONING CONDENSER Main Menu Table of things to clean them . Use a light spray from a hose or a soft brush to the front surface. These block the air flow and reduce cooling efficiency. Run the air conditioning...
...at a steady speed with Refrigerant HFC-134a (R-134a). (See Specifications on page 296.) NOTICE Whenever you have your dealer check the system. Maintenance w If the air conditioning does not get as cold as recharging, should be done by a qualified mechanic. You can damage the environment..... This circulates the lubricating oil contained in the refrigerant. v AIR CONDITIONING CONDENSER Main Menu Table of things to clean them . Use a light spray from a hose or a soft brush to the front surface. These block the air flow and reduce cooling efficiency. Run the air conditioning...

Owner's Manual
Page 242
A burned out bulb can create an unsafe condition by reducing your vehicle's visibility and the ability to other drivers. HEADLIGHT CONTINUED w v TURN SIGNAL/SIDE MARKER LIGHT PARKING LIGHT Maintenance Main Menu Table of Contents Lights Check the operation of your intentions to signal your vehicle's exterior lights at least once a month.
A burned out bulb can create an unsafe condition by reducing your vehicle's visibility and the ability to other drivers. HEADLIGHT CONTINUED w v TURN SIGNAL/SIDE MARKER LIGHT PARKING LIGHT Maintenance Main Menu Table of Contents Lights Check the operation of your intentions to signal your vehicle's exterior lights at least once a month.

Owner's Manual
Page 243
v Main Menu Table of replacement bulb is needed. Refer to the chart on page 297 to determine what type of Contents Lights Check the following: TAILLIGHT HIGH-MOUNT BRAKE LIGHT Headlights (low and high beam) Parking lights Taillights Brake lights High-mount brake light Turn signals Back-up lights Hazard light function License plate light Side marker lights Daytime running lights (Canadian models) If you find any bulbs are burned out, replace them as soon as possible. TURN SIGNAL LIGHT STOP/TAILLIGHT BACK-UP LIGHT Maintenance w
v Main Menu Table of replacement bulb is needed. Refer to the chart on page 297 to determine what type of Contents Lights Check the following: TAILLIGHT HIGH-MOUNT BRAKE LIGHT Headlights (low and high beam) Parking lights Taillights Brake lights High-mount brake light Turn signals Back-up lights Hazard light function License plate light Side marker lights Daytime running lights (Canadian models) If you find any bulbs are burned out, replace them as soon as possible. TURN SIGNAL LIGHT STOP/TAILLIGHT BACK-UP LIGHT Maintenance w

Owner's Manual
Page 244
... with the items you would normally and attach it as you normally carry. Open the hood. 4. To check these settings: 1. CONTINUED Maintenance w v HORIZONTAL GAUGE Main Menu Table of Contents Lights Headlight Aiming The headlights were properly aimed when your vehicle was new. Each headlight assembly has horizontal and vertical adjustment indicators. Load...
... with the items you would normally and attach it as you normally carry. Open the hood. 4. To check these settings: 1. CONTINUED Maintenance w v HORIZONTAL GAUGE Main Menu Table of Contents Lights Headlight Aiming The headlights were properly aimed when your vehicle was new. Each headlight assembly has horizontal and vertical adjustment indicators. Load...

Owner's Manual
Page 245
v ADJUSTMENT VERTICAL ADJUSTMENT Main Menu Table of Contents Lights VERTICAL ANGLE GAUGE HORIZONTAL 5. The bubble should be made using a Phillips-head screwdriver to realign it with its "0" mark as described, an adjustment can be centered underneath the longest scribe mark on the gauge. 6. If you cannot get an indicator to the illustrations. 7. Please refer to align, have your Honda dealer inspect the vehicle for body damage or suspension problems. Maintenance w If either indicator is not aligned with the "0" mark. Check the vertical angle gauge.
v ADJUSTMENT VERTICAL ADJUSTMENT Main Menu Table of Contents Lights VERTICAL ANGLE GAUGE HORIZONTAL 5. The bubble should be made using a Phillips-head screwdriver to realign it with its "0" mark as described, an adjustment can be centered underneath the longest scribe mark on the gauge. 6. If you cannot get an indicator to the illustrations. 7. Please refer to align, have your Honda dealer inspect the vehicle for body damage or suspension problems. Maintenance w If either indicator is not aligned with the "0" mark. Check the vertical angle gauge.

Owner's Manual
Page 246
... bulb. Make sure it with your skin or hard objects. Turn on the headlights to overheat and shatter. 1. v BULB Main Menu Table of Contents Lights Replacing a Headlight Bulb Your vehicle has two bulbs on each side, four in place. 5. Make sure you touch the glass, clean it is burned... out. Maintenance w When replacing a bulb, handle it one -quarter turn clockwise to unlock the tab, then slide the connector off the bulb. 6. Insert the new ...
... bulb. Make sure it with your skin or hard objects. Turn on the headlights to overheat and shatter. 1. v BULB Main Menu Table of Contents Lights Replacing a Headlight Bulb Your vehicle has two bulbs on each side, four in place. 5. Make sure you touch the glass, clean it is burned... out. Maintenance w When replacing a bulb, handle it one -quarter turn clockwise to unlock the tab, then slide the connector off the bulb. 6. Insert the new ...

Owner's Manual
Page 247
v Main Menu Table of Contents Lights Replacing Front Turn Signal and Side Marker Light Bulbs HOLDING CLIP 5. If you are changing the bulb on the driver's side, start the engine, turn the steering wheel all the way to the ... turning it clockwise to remove the holding clip. Install the holding clip from the fender and bumper. 4. Maintenance w Turn it one-quarter turn counterclockwise. 9. Insert the socket back into the headlight assembly. Test the lights to lock it in place by pushing on the passenger's side, turn off the engine. Install the...
v Main Menu Table of Contents Lights Replacing Front Turn Signal and Side Marker Light Bulbs HOLDING CLIP 5. If you are changing the bulb on the driver's side, start the engine, turn the steering wheel all the way to the ... turning it clockwise to remove the holding clip. Install the holding clip from the fender and bumper. 4. Maintenance w Turn it one-quarter turn counterclockwise. 9. Insert the socket back into the headlight assembly. Test the lights to lock it in place by pushing on the passenger's side, turn off the engine. Install the...

Owner's Manual
Page 248
Turn the bulb holder one-quarter turn it clockwise until it bottoms. w Push the new bulb straight into its socket. v Maintenance Main Menu Table of its hole in the lens, and turn counterclockwise to make sure the new bulb works. 1. Put the bulb holder back into the socket until it from the lens. 2. Pull the bulb straight out of Contents Lights Replacing a Parking Light Bulb 3. Turn on the parking lights to remove it locks. 4. The parking light bulb is under the headlight bulb.
Turn the bulb holder one-quarter turn it clockwise until it bottoms. w Push the new bulb straight into its socket. v Maintenance Main Menu Table of its hole in the lens, and turn counterclockwise to make sure the new bulb works. 1. Put the bulb holder back into the socket until it from the lens. 2. Pull the bulb straight out of Contents Lights Replacing a Parking Light Bulb 3. Turn on the parking lights to remove it locks. 4. The parking light bulb is under the headlight bulb.

Owner's Manual
Page 249
... socket by turning it bottoms. 5. Remove the fastener on the center until it counterclockwise with the head). Pull the lining back. FASTENER 1. Maintenance w Test the lights to make sure the new bulb is installed under the edge of the trunk seal. 2. Reinstall the trunk lining. Open the trunk. Make sure... it one-quarter turn signal. 3. v Main Menu Table of its socket. Pull the bulb straight out of Contents Lights Replacing Rear Bulbs (in the hole of the side of the trunk lining and push on the side of the two bulbs is flush with...
... socket by turning it bottoms. 5. Remove the fastener on the center until it counterclockwise with the head). Pull the lining back. FASTENER 1. Maintenance w Test the lights to make sure the new bulb is installed under the edge of the trunk seal. 2. Reinstall the trunk lining. Open the trunk. Make sure... it one-quarter turn signal. 3. v Main Menu Table of its socket. Pull the bulb straight out of Contents Lights Replacing Rear Bulbs (in the hole of the side of the trunk lining and push on the side of the two bulbs is flush with...

Owner's Manual
Page 250
Open the trunk. 2. Remove the burned out bulb from the socket by turning it straight out of the two bulbs is working. 1. Install the new bulb in Trunk Lid) 5. Test the lights to make sure the new bulb is burned out: taillight or back-up light. 3. Determine which of its socket. Reinstall the socket into the light assembly. 7. v Main Menu Table of Contents Lights Replacing Rear Bulbs (in the socket. 6. Maintenance w Remove the socket by pulling it one-quarter turn counterclockwise. 4.
Open the trunk. 2. Remove the burned out bulb from the socket by turning it straight out of the two bulbs is working. 1. Install the new bulb in Trunk Lid) 5. Test the lights to make sure the new bulb is burned out: taillight or back-up light. 3. Determine which of its socket. Reinstall the socket into the light assembly. 7. v Main Menu Table of Contents Lights Replacing Rear Bulbs (in the socket. 6. Maintenance w Remove the socket by pulling it one-quarter turn counterclockwise. 4.

Owner's Manual
Page 251
... by pulling it one-quarter turn counterclockwise. 2. v BULB Main Menu Table of the socket. 3. Remove the license light assembly by pulling the lens while squeezing the tabs on the right edge of the holder. Open the trunk and remove the socket from the... carefully prying on both sides of the lens with a flat-tip screwdriver and pulling the assembly out. 2. Install the new bulb and reinstall the socket. Maintenance 1. Remove the burned-out bulb by turning it straight out of Contents Lights Replacing a High-mount Brake Light Bulb Replacing a Rear License Bulb 1. w
... by pulling it one-quarter turn counterclockwise. 2. v BULB Main Menu Table of the socket. 3. Remove the license light assembly by pulling the lens while squeezing the tabs on the right edge of the holder. Open the trunk and remove the socket from the... carefully prying on both sides of the lens with a flat-tip screwdriver and pulling the assembly out. 2. Install the new bulb and reinstall the socket. Maintenance 1. Remove the burned-out bulb by turning it straight out of Contents Lights Replacing a High-mount Brake Light Bulb Replacing a Rear License Bulb 1. w


