Owner's Manual
Page 18
... belts and increase the chance of Contents Protecting Adults Additional Safety Precautions Two people should never use the same seat belt. Do not put any accessories on your lap, or driving with a pipe or other sharp object in injuries if your hands and arms away from the airbag covers. Driver and...
... belts and increase the chance of Contents Protecting Adults Additional Safety Precautions Two people should never use the same seat belt. Do not put any accessories on your lap, or driving with a pipe or other sharp object in injuries if your hands and arms away from the airbag covers. Driver and...
Owner's Manual
Page 35
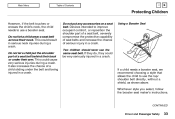
... a crash. This could be very seriously injured in a crash. Do not let a child wear a seat belt across their arm. Do not let a child put any accessories on a seat belt. If they do, they could cause very serious injuries during a crash. It also increases the chance of a child sliding under their neck...
... a crash. This could be very seriously injured in a crash. Do not let a child wear a seat belt across their arm. Do not let a child put any accessories on a seat belt. If they do, they could cause very serious injuries during a crash. It also increases the chance of a child sliding under their neck...
Owner's Manual
Page 48
v Main Menu Instruments and Controls This section gives information about the controls and displays that contribute to the daily operation of your Honda. Control Locations...48 Indicator Lights...49 Gauges...54 Speedometer...54 Tachometer...54 Odometer...54 Trip Meter...55 Temperature Gauge...55 Fuel Gauge...55 ... Brake...95 Digital Clock...96 Console Compartment...97 Coin Box...97 Beverage Holder...98 Sun Visor...99 Vanity Mirror...99 Sunglasses Holder...100 Accessory Power Socket...100 Interior Lights...101 Instruments and Controls w All the essential controls are within easy reach.
v Main Menu Instruments and Controls This section gives information about the controls and displays that contribute to the daily operation of your Honda. Control Locations...48 Indicator Lights...49 Gauges...54 Speedometer...54 Tachometer...54 Odometer...54 Trip Meter...55 Temperature Gauge...55 Fuel Gauge...55 ... Brake...95 Digital Clock...96 Console Compartment...97 Coin Box...97 Beverage Holder...98 Sun Visor...99 Vanity Mirror...99 Sunglasses Holder...100 Accessory Power Socket...100 Interior Lights...101 Instruments and Controls w All the essential controls are within easy reach.
Owner's Manual
Page 54
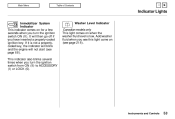
... page 68). Instruments and Controls w It will not start (see page 218). Add washer fluid when you turn the ignition switch from ON (II) to ACCESSORY (I) or LOCK (0). v Main Menu Table of Contents Indicator Lights Immobilizer System Indicator This indicator comes on for a few seconds when you see this light come...
... page 68). Instruments and Controls w It will not start (see page 218). Add washer fluid when you turn the ignition switch from ON (II) to ACCESSORY (I) or LOCK (0). v Main Menu Table of Contents Indicator Lights Immobilizer System Indicator This indicator comes on for a few seconds when you see this light come...

Owner's Manual
Page 59
... Headlights If you leave the lights on for as long as you hold the lever back, no matter what position the headlight switch is in ACCESSORY (I) or LOCK (0), you will hear a reminder chime when you hear a click, then let go off. The blue high beam indicator will stay on with the...
... Headlights If you leave the lights on for as long as you hold the lever back, no matter what position the headlight switch is in ACCESSORY (I) or LOCK (0), you will hear a reminder chime when you hear a click, then let go off. The blue high beam indicator will stay on with the...
Owner's Manual
Page 69
If the indicator starts to operate the equipment. If the system repeatedly does not recognize the coding of your key, contact your Honda dealer. Do not attempt to ON (II) again. If you have lost your key and you cannot start . This device complies ...ring. This indicator will also blink several times when you turn the ignition switch to start the engine, contact your Honda dealer. A properlycoded ignition key must accept any other devices to ACCESSORY (I) or LOCK (0). Operation is used in Canada. Turn the ignition switch to LOCK (0), remove the key, reinsert ...
If the indicator starts to operate the equipment. If the system repeatedly does not recognize the coding of your key, contact your Honda dealer. Do not attempt to ON (II) again. If you have lost your key and you cannot start . This device complies ...ring. This indicator will also blink several times when you turn the ignition switch to start the engine, contact your Honda dealer. A properlycoded ignition key must accept any other devices to ACCESSORY (I) or LOCK (0). Operation is used in Canada. Turn the ignition switch to LOCK (0), remove the key, reinsert ...

Owner's Manual
Page 70
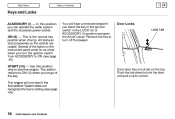
... left or to the right as you to LOCK, you must also be in slightly as you remove the key. It has four positions: LOCK (0) ACCESSORY (I) ON (II) START (III) CONTINUED Instruments and Controls w If your vehicle has an automatic transmission, it must push the key in Park. The anti-theft... lock will lock the steering column when you turn it difficult to turn the key from ACCESSORY to lose control. Removing the key from the ignition switch only when parked. If the front wheels are turned, the anti-theft lock may sometimes...
... left or to the right as you to LOCK, you must also be in slightly as you remove the key. It has four positions: LOCK (0) ACCESSORY (I) ON (II) START (III) CONTINUED Instruments and Controls w If your vehicle has an automatic transmission, it must push the key in Park. The anti-theft... lock will lock the steering column when you turn it difficult to turn the key from ACCESSORY to lose control. Removing the key from the ignition switch only when parked. If the front wheels are turned, the anti-theft lock may sometimes...
Owner's Manual
Page 71
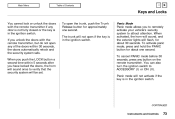
... the top. Several of the lights on the instrument panel come on as a test when you can operate the audio system and the accessory power socket. Use this position, you turn off the beeper. The engine will hear a reminder beeper if you let go of the key. Door Locks ... engine. Push the tab down to lock the door and pull it up to turn the ignition switch from ACCESSORY to ON (see page 68). v Main Menu Table of Contents Keys and Locks ACCESSORY (I ) position and open the driver's door. The switch returns to start if the Immobilizer System does not recognize...
... the top. Several of the lights on the instrument panel come on as a test when you can operate the audio system and the accessory power socket. Use this position, you turn off the beeper. The engine will hear a reminder beeper if you let go of the key. Door Locks ... engine. Push the tab down to lock the door and pull it up to turn the ignition switch from ACCESSORY to ON (see page 68). v Main Menu Table of Contents Keys and Locks ACCESSORY (I ) position and open the driver's door. The switch returns to start if the Immobilizer System does not recognize...
Owner's Manual
Page 74
... remote transmitter, but do not open the trunk, push the Trunk Release button for about 30 seconds. You can also turn the ignition switch to ACCESSORY (I) or ON (II). CONTINUED Instruments and Controls w When activated, the horn will sound, and the exterior lights will not activate if the key is in...
... remote transmitter, but do not open the trunk, push the Trunk Release button for about 30 seconds. You can also turn the ignition switch to ACCESSORY (I) or ON (II). CONTINUED Instruments and Controls w When activated, the horn will sound, and the exterior lights will not activate if the key is in...

Owner's Manual
Page 101
...socket is closed while you are rated 120 watts or less (10 amps). v Main Menu Table of sunglasses may not fit in ACCESSORY (I) or ON (II). To close it, push it until it latches. Instruments and Controls w Some larger styles of Contents Sunglasses Holder..., Accessory Power Socket Sunglasses Holder Accessory Power Socket To open the sunglasses holder, push on the cover. To use the accessory power socket, pull out on the front edge. Make sure the holder is intended to...
...socket is closed while you are rated 120 watts or less (10 amps). v Main Menu Table of sunglasses may not fit in ACCESSORY (I) or ON (II). To close it, push it until it latches. Instruments and Controls w Some larger styles of Contents Sunglasses Holder..., Accessory Power Socket Sunglasses Holder Accessory Power Socket To open the sunglasses holder, push on the cover. To use the accessory power socket, pull out on the front edge. Make sure the holder is intended to...

Owner's Manual
Page 120
.... Press the upper part ( ) to tune to a higher frequency, or the lower part ( ) to tune to a desired frequency. SEEK - The frequency numbers will be in ACCESSORY (I) or ON (II) to find radio stations on the selected band: TUNE, SEEK, SCAN or the Preset buttons. To activate it, push the SEEK switch...
.... Press the upper part ( ) to tune to a higher frequency, or the lower part ( ) to tune to a desired frequency. SEEK - The frequency numbers will be in ACCESSORY (I) or ON (II) to find radio stations on the selected band: TUNE, SEEK, SCAN or the Preset buttons. To activate it, push the SEEK switch...
Owner's Manual
Page 127
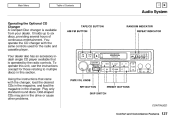
.../FM BUTTON CONTINUED w Using the instructions that is available from your dealer. Odd-shaped CDs may jam in the changer. Your dealer also has an accessory indash single CD player available that came with the same controls used for those relating to six discs, providing several hours of Contents Audio System...
.../FM BUTTON CONTINUED w Using the instructions that is available from your dealer. Odd-shaped CDs may jam in the changer. Your dealer also has an accessory indash single CD player available that came with the same controls used for those relating to six discs, providing several hours of Contents Audio System...
Owner's Manual
Page 128
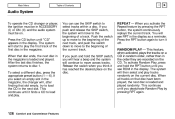
..., the changer will continue to play the first track of Contents Audio System To operate the CD changer or player, the ignition must be in ACCESSORY (I) or ON (II) and the audio system must be on a CD in random order, rather than in the display. If you push and hold the...
..., the changer will continue to play the first track of Contents Audio System To operate the CD changer or player, the ignition must be in ACCESSORY (I) or ON (II) and the audio system must be on a CD in random order, rather than in the display. If you push and hold the...
Owner's Manual
Page 132
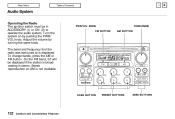
... BUTTONS SEEK BUTTONS Main Menu Table of Contents Audio System Operating the Radio The ignition switch must be displayed if the station is broadcasting in ACCESSORY (I) or ON (II) to is not available. Comfort and Convenience Features w To change bands, press the AM or FM button. Stereo reproduction on by turning...
... BUTTONS SEEK BUTTONS Main Menu Table of Contents Audio System Operating the Radio The ignition switch must be displayed if the station is broadcasting in ACCESSORY (I) or ON (II) to is not available. Comfort and Convenience Features w To change bands, press the AM or FM button. Stereo reproduction on by turning...

Owner's Manual
Page 152
If you plan to add any accessories to your Honda, you . Break-in Period...154 Gasoline...154 Service Station Procedures ...154 Filling the Fuel Tank...154 Opening the Hood...156 Oil Check...157 Engine Coolant Check...159 Fuel Economy...160 Vehicle Condition...160 Driving Habits...160 Accessories and Modifications...161 Carrying Cargo...163 Before...
If you plan to add any accessories to your Honda, you . Break-in Period...154 Gasoline...154 Service Station Procedures ...154 Filling the Fuel Tank...154 Opening the Hood...156 Oil Check...157 Engine Coolant Check...159 Fuel Economy...160 Vehicle Condition...160 Driving Habits...160 Accessories and Modifications...161 Carrying Cargo...163 Before...

Owner's Manual
Page 160
... usually designed for your dealer inspect the final installation. w Before you can be sure to read the following information. Accessories Your dealer has Genuine Honda accessories that allow you to personalize your vehicle's electrical system capacity, they may not meet factory specifications, and could adversely affect your vehicle's handling and stability. (...
... usually designed for your dealer inspect the final installation. w Before you can be sure to read the following information. Accessories Your dealer has Genuine Honda accessories that allow you to personalize your vehicle's electrical system capacity, they may not meet factory specifications, and could adversely affect your vehicle's handling and stability. (...
Owner's Manual
Page 161
... increase the chance of undercarriage parts striking a curb, speed bump, or other part of your Supplemental Restraint System. Before Driving w v Main Menu Table of Contents Accessories and Modifications Modifications Do not remove any original equipment or modify your vehicle in the center of the steering wheel and on top of the...
... increase the chance of undercarriage parts striking a curb, speed bump, or other part of your Supplemental Restraint System. Before Driving w v Main Menu Table of Contents Accessories and Modifications Modifications Do not remove any original equipment or modify your vehicle in the center of the steering wheel and on top of the...
Owner's Manual
Page 163
... put any items on the floor behind the front seats cannot roll under the seats and interfere with the proper operation of all occupants, cargo, accessories, and the tongue weight if you can be thrown around the vehicle during a crash. Before Driving w If the lid is open, a passenger could be hurt...
... put any items on the floor behind the front seats cannot roll under the seats and interfere with the proper operation of all occupants, cargo, accessories, and the tongue weight if you can be thrown around the vehicle during a crash. Before Driving w If the lid is open, a passenger could be hurt...

Owner's Manual
Page 167
... pedal so the engine does not race. 6. If the engine starts, release pressure on the battery. 3. Manual Transmission: Push the clutch pedal down all electrical accessories to the START (III) position. Automatic Transmission: Make sure the shift lever is depressed. Press on the brake pedal. 4. If the engine does not start...
... pedal so the engine does not race. 6. If the engine starts, release pressure on the battery. 3. Manual Transmission: Push the clutch pedal down all electrical accessories to the START (III) position. Automatic Transmission: Make sure the shift lever is depressed. Press on the brake pedal. 4. If the engine does not start...

Owner's Manual
Page 168
... and hold it there while starting the engine. When you try to start the engine for no more than 15 seconds. Turn off all electrical accessories to reduce the drain on the clutch pedal. If the engine fails to start in step 2, push the accelerator pedal to the floor and hold...
... and hold it there while starting the engine. When you try to start the engine for no more than 15 seconds. Turn off all electrical accessories to reduce the drain on the clutch pedal. If the engine fails to start in step 2, push the accelerator pedal to the floor and hold...